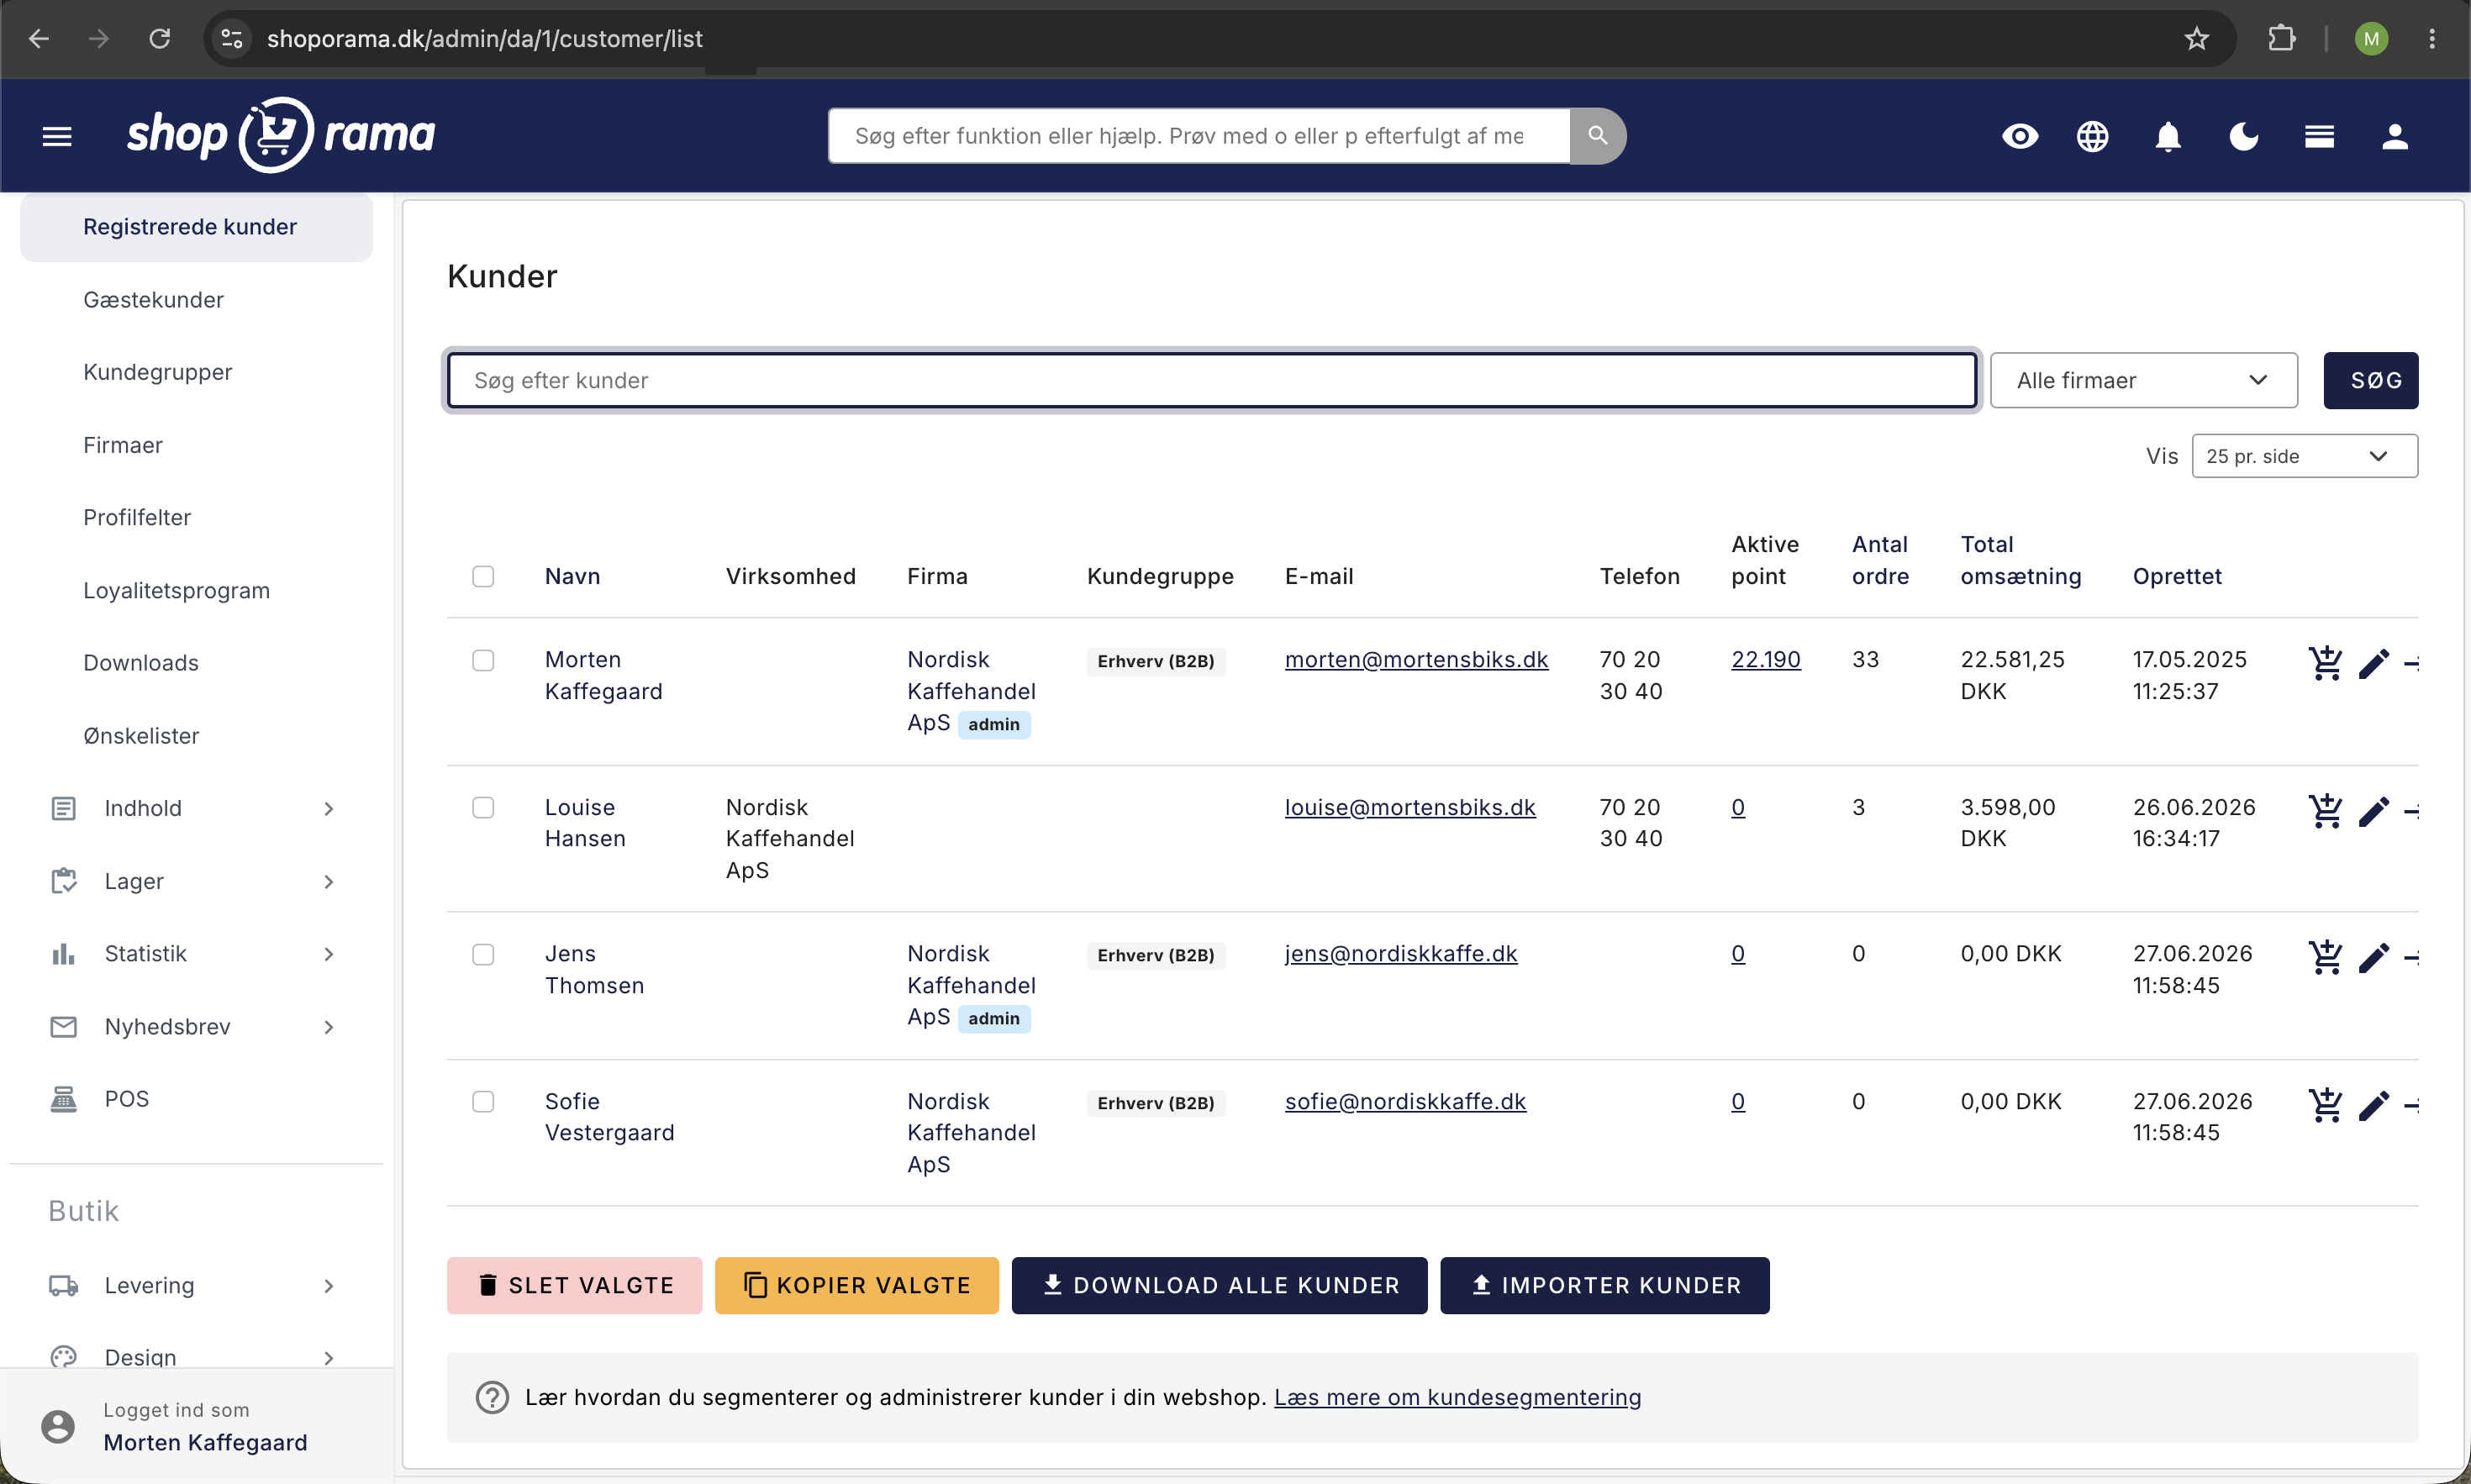
Create orders directly from the customer overview
Create orders directly from your customer overview with customer details automatically populated.
Create an order from the customer list
You can create a new order directly from the customer list. The customer's information is automatically transferred to the order, so you don't have to enter it manually.

Here’s how
- Go to Customers in the admin panel.
- Find the customer for whom you want to create an order.
- Click the shopping cart icon next to the customer.
- A new order is created automatically, and you’ll be taken to the order editing page.
- Add products, select a shipping method and payment method, and save the order.
What is automatically transferred?
The following information is copied from the customer profile to the new order:
- Contact information: email, phone number, and business registration number.
- Billing address: company name, name, address, ZIP code, city, and country.
- Shipping address: If the customer has a separate shipping address, it is also copied.
The order is automatically linked to the customer so that it appears in the customer’s order history.
Open the customer’s profile before creating the order
The order inherits the customer’s information exactly as it appears on the customer’s profile at the moment you click the shopping cart icon. If the address is out of date or the customer is missing a CVR number, it’s therefore quickest to correct it in the profile first. Click the customer’s name in the customer overview to open their profile.
The profile contains everything you know about the customer, all in one place:
- Name and address: company name, CVR number, EAN number, name, email, phone number, address, ZIP code, city, and country.
- Customer group and company: which customer group the customer belongs to, which company the customer may be associated with, and whether the customer is a regular member or a company admin.
- Internal ID: Your own customer number, if you also have the customer in another system.
- Alternative shipping address: name, address, ZIP code, city, and country. If this field is filled out, it will be included in the order.
- Fields: the additional customer fields you have created yourself.
- Password and Shared Cart: a new password for the customer’s login, and whether the customer is allowed to share their cart across logins.
At the top of the profile are the shortcuts “View Points ” and “View Wish Lists.” It’s worth checking the wish list before calling the customer, so you’ll know what the customer is already interested in. The shortcut to points is only displayed once you’ve activated the loyalty program.
Learn more about editing a customer’s information and how to find and filter customers in the customer overview.
View a customer’s loyalty points
Each customer has their own points page where you can track their points in the loyalty program. You can access it in two ways: click the number in the Active Points column in the customer overview, or click View Points at the top of the customer’s profile.
The points page is a statement of the customer’s points. The most recent entry appears at the top, and 25 entries are displayed per page. Each row includes the following columns:
- Date: when the entry was created.
- Order: The order from which the points originated. Click the order number to open the order. Points that you have manually assigned yourself have no order associated with them.
- Order Amount: The total price of the order.
- Points: The number of points on the line. A positive number indicates points the customer has received, and a negative number indicates points the customer has used.
- Status: Approved, Pending, Revoked, or Expired.
- Pending until: the date on which points with the Pending status will be released.
- Expires: When the points expire, if an expiration date has been set.
- Note: A brief explanation of the entry.
The statuses change automatically. Points with the Pending status become Approved once the date under “Pending until” has passed, and approved points become Expired once the expiration date has passed. You set the waiting period once in the loyalty program settings, so you normally don’t need to adjust the individual entries at all.
At the bottom of the page, you’ll see two numbers, and they’re not the same:
- Active points are the balance the customer can use for purchases right now. These are the approved points, minus the points the customer has already used, and minus any points that expired before the customer had a chance to use them.
- Total points is the sum of all entries for the customer, regardless of status. This number represents the history, not a balance.
It is the active points that are displayed in the column in the customer overview, and it is also the number the customer sees in the store.
Manually Add or Deduct Points
Sometimes you’ll need to manually adjust the points. Perhaps you want to give a customer a few hundred points because a package arrived late, or deduct points because an order was returned. You can do both from the customer’s points page.
Assign points
- Open the customer’s points page and click “Assign Points” at the bottom of the page.
- Select Status. “Approved ” makes the points available immediately, while “Pending ” holds them back until you release them yourself by selecting “Approve Selected.”
- Enter the number in the Points field.
- If desired, enter a date in the Expires field. If you leave the field blank, the points will not expire.
- Enter a Note so that you and your colleagues can see later why the points were awarded.
- Click Assign. The entry appears at the top of the customer’s point history.
Deduct points
You deduct points in exactly the same way. Simply enter a minus sign before the number in the Points field—for example, -500 instead of 500. The entry appears in the history as points used and is immediately deducted from the customer’s active balance. Add a note explaining why, such as which order was returned.
If you’d rather cancel a specific allocation entirely, you can instead open the relevant entry and set it to Rejected. Then it will no longer count toward the customer’s balance, but the entry will remain in the history. In the overview, its status will be shown as Revoked.
Edit or delete a single entry
Click the pencil icon at the far right of a line to open the entry. Here you can edit Status, Pending Until, Points, Expires, and Note, and save using Save or Save and Close. The Delete button removes the entry entirely.
If you need to edit multiple lines at once, check the boxes next to them and use Approve Selected or Delete Selected at the bottom of the page.
Be careful when deleting. A deleted entry is gone forever, and the customer’s balance changes immediately. If you want to keep a record of the transaction, it’s better to enter an offsetting entry so that the history shows both the original entry and your correction. This is also what an auditor will want to be able to track.
Frequently Asked Questions
I corrected the customer’s address after I created the order. Will the change be carried over?
No. The information is copied to the order the moment it’s created, and after that, the two exist separately. This is intentional so that an old order always shows the address where the items were actually shipped. If the order needs to be changed, correct the address directly on the order.
There are no points listed for my customer. Did I do something wrong?
Probably not. The customer only receives points once the order is approved or shipped, depending on the award timing you’ve selected in the loyalty program. Additionally, if you’ve set a waiting period, the points will appear as “Pending” until the period has elapsed, and they won’t count toward “Active Points” until then. Click the number in the “Active Points” column to view the full history.
How do I give a customer extra points as a small gesture of apology?
Open the customer’s points page, click “Assign Points,” select the “Approved” status, enter the number of points, and add a note—for example, explaining what the issue is. The customer can use the points immediately.
A customer has returned an order. How do I deduct the points they earned?
You have two options. Either assign a negative number of points with a note about the return—which results in the cleanest history—or open the original entry and set it to “Rejected.” Both actions remove the points from the customer’s active balance.
Why aren’t “Active Points” and “Total Points” the same number?
Because they measure two different things. Active Points is the balance the customer can use for purchases right now. Total Points is the sum of everything ever posted to the customer’s account, including points that have been used, expired, or revoked. If you need a figure to assess a liability, you should look at the Active Points.
Do I have to approve points manually every time?
No, not for the points customers earn themselves. Points from an order are assigned a “Pending until” date and are automatically approved once the waiting period has elapsed; approved points automatically expire on their expiration date. However, if you assign points yourself with the “Pending” status, they won’t have a date, and they’ll remain there until you release them by selecting “Approve Selected.”
Can I see which order a point comes from?
Yes. The “Order” column displays the order number as a link, so you can click directly on the order to see what the customer purchased. If the field is empty, the points were assigned manually or awarded upon sign-up, and the note will typically provide the rest of the information.
Can I award points even if I haven’t activated the loyalty program?
The points page is accessible from the customer overview regardless, so you can still enter entries. However, the customer can’t use the points in the store until the loyalty program is activated and your theme supports it. If you’re unsure whether your theme supports this, please email support@shoporama.dk.
Related articles
Customer Overview: Find and Manage Your Registered Customers
The Customer Overview lists all customers with profiles. Learn what the columns mean, how to search and sort, create orders, log in as a customer,...
Manage your orders in Shoporama
Guide to managing orders in Shoporama - from receiving to shipping and status updates.
Edit a customer's profile and information
Overview of the customer profile in Shoporama: which fields you can edit, how the company and customer group are linked, how to manage loyalty...
Create invoice payment
Guide to setting up invoice payment as a payment method in Shoporama.