Manage your orders in Shoporama
Guide to managing orders in Shoporama - from receiving to shipping and status updates.
Order management is the heart of your online store. In Shoporama, you can manage the entire order flow—from the moment a new order is received until it is shipped, credited, or closed. This guide walks you through all the features on the order list and the order page.
Order List
You’ll find all orders under “Orders” in the side menu. The number in the circle shows how many new orders you have. Unpaid orders are displayed with a pink background.
Status Tabs
At the top of the order list, you’ll find tabs to filter orders by status. Several of the tabs show the number of orders in parentheses:
- All — shows all orders
- New — orders just received
- In Progress — orders currently being processed
- Pending — orders that are on hold (e.g., waiting for items or payment)
- Ready — orders that have been packed and are ready for shipment
- Ready for Pickup — orders the customer picks up themselves (e.g., at a physical store)
- Picked up — orders that have been picked up by the customer
- Shipped — orders that have been shipped
- Credited — credit memos
- Canceled — canceled orders
You can also create your own views with saved filters so you can quickly switch to the combinations you use most often. Click the + button next to the tabs to create a new view.
Search and Filtering
You can search for orders using free text (order number, customer name, email, etc.) and filter by date range. Additionally, there are advanced filters:
- Label — filter by one or more order labels
- Supplier — show only orders with products from specific suppliers
- Shipping — filter by shipping method (e.g., GLS, PostNord, DAO)
- Country — filter by delivery country
- Paid — show only paid or unpaid orders
- Captured — filter by whether the amount has been captured
- Payment Method — filter by payment gateway
- Batch — filter by batch number (if batch management is enabled)
The filter buttons display a small number indicating how many values you’ve selected for each filter, and you can reset all filters with a single button.
How to combine filters
Each filter opens a small window where you check the boxes next to the values you want to see, then click “Apply Filter.” “Paid” and “Captured” are the only two where you select one value at a time instead of multiple. If you have many labels, suppliers, or shipping methods, you can search within the window instead of scrolling down through the list. The filters stack on top of each other, allowing you to build a very precise list.
There are two rules you need to know before the filters really make sense:
- Multiple values in the same filter mean “or” —if you select both GLS and PostNord under Shipping, you’ll get orders with either one or the other shipping method
- Multiple filters mean “and” —if you select Shipping = GLS and Country = Sweden, you’ll only get the orders that meet both criteria
Labels are the big exception. If you select two labels, you’ll only get the orders that have both labels, not orders with just one. This is exactly what you need when, for example, you want to find orders marked as both “B2B” and “Urgent,” but it surprises most people the first time.
Filter by where the package actually is
At the bottom of the Shipping filter, there’s a section called Delivery Status. Here, you don’t filter based on what you’ve done with the order, but on where the package is right now: In Transit, Delivered to Address, At a Package Store, Picked Up at a Package Store, and Returned.
This is invaluable for catching those packages that are sitting and gathering dust at a package shop before they’re returned to you at your own expense. Read more in Track Delivery and Package Shop Pickup.
How the search bar works
The search field works differently depending on what you type into it, and this explains most “I can’t find my order” situations:
- Numbers — searches by order number and cart number
- Email and phone number — must be entered exactly as written. An incomplete address, a phone number with spaces, or an added country code will yield no results
- Names and company names — match based on parts of the text, so “jens” will find both Jens Hansen and Jensine Berg. Both the name on the order and the delivery name are searched
The "From" and "To" date fields include the entire day; if you select the same date in both fields, the search will cover the entire 24-hour period, from midnight to midnight.
Sorting and Number per Page
The column headers No., Time, and Delivery sort the list, and a small arrow indicates the sort direction. Click again to reverse the order. Without sorting, the most recent orders appear at the top.
On the right side of the filter bar, you can choose how many orders to display at a time, from 10 up to 150. Shoporama remembers your selection for the next time you open the order list. On the far left of the same bar is a button that clears all filters and searches at once, so you can start over without having to click through each individual filter.
Save a filtered order list as a tab or shortcut
Once you’ve finally put together the right list, you won’t have to click it up again tomorrow. Shoporama offers two ways to save a filtered order list, and each serves a different purpose.
1. Save it as a tab on the shopping list
- Set the filters and sorting options you’d like to be able to return to
- Click the plus icon on the far right of the row of status tabs. If you hover your mouse over it, it says “Add Shortcut”
- Give the view a short name of up to 40 characters, e.g., “Sweden, not shipped,” and click Create
The view will appear as an extra tab next to All, New, In Progress, and the other statuses, and it’s just one click away every time you open the order list. If you want to rename or delete it, click the pencil icon inside the tab itself.
2. Save it as a shortcut in the top bar
The star icon in the top bar is the shortcut menu for the entire admin area, and it works on all pages, not just the order list. It saves the page you’re currently on, including filters, sorting, and everything else.
- Filter the order list exactly the way you want it
- Click the star in the top bar and select “Create Shortcut” at the bottom of the menu
- Name the shortcut and click Save
You’ll be taken back to the saved list immediately, and the shortcut will appear both in the star menu at the top and under the “Shortcuts” heading in the left-hand menu. To rename or delete it, use the pencil icon next to the shortcut in the left-hand menu.
Which of the two should you choose?
- The tab — best for the lists you switch between all day long, because it appears side by side with the status tabs on the order list
- The shortcut — best when you want to jump directly to the list from any page in the admin panel. It’s also the only one of the two that can save a filter for “Unpaid” or “Uncollected.” These two filters aren’t carried over to a tab
Both are saved on the online store and not in your own user account. Everyone with access to the store sees the same tabs and shortcuts, which is an advantage when multiple people are managing orders, but keep that in mind when naming them. If you have multiple online stores, you’ll need to set them up separately in each store.
Compact and Expanded View
The order list has two view modes:
- Compact view — displays order number, status, date, customer, price, and shipping method in separate columns
- Expanded view — additionally displays product details with images, full shipping address, internal comments, purchase price, profit, and weight
You can also expand individual orders by clicking the arrow next to the order, or expand all orders at once using the arrow in the table header next to the checkmark that selects all. Your preferred view is automatically saved.
Customize Columns
Click " Customize View " to select which additional columns to display. You can add:
- Cart number — the internal cart ID
- Internal note — internal comments
- Technical note — technical log
- Comment — the customer’s comment
- Discount code and discount amount
- Customer ID — with a link to the customer profile
- Profit — calculated profit per order
- Company name
- Unshipped orders from the same recipient — number of orders that have not yet been shipped to the same customer
- Previous purchases — number of previous orders from the customer
- Reference, Points, Payment Method, Paid
For each column, you can choose whether it should be displayed in compact view, expanded view, or both.
How the column selector works
The “Customize View” button is located in the bulk edit bar at the bottom of the screen. Each field in the window has two controls next to each other: a toggle that turns the column on or off, and a small menu that determines where the column appears:
- All — the column appears in both compact and expanded views
- Compact — the column appears only in the compact list
- Expanded — the column appears only when the orders are expanded
The menu is disabled until you toggle the switch next to it. If you select Expanded and the column does not appear in the list, there is nothing wrong: you must expand the orders using the arrow in the table header before the field is displayed.
In addition to the fields above, you can also enable Product Labels and Batch if you use batch management. If you use the columns to look up information every day, they’re also a good starting point for a saved view, so the list is ready with the correct information.
Important
The column selection is saved in the online store and applies to all users. If you change the columns, you’ll also change them for your colleagues. If you don’t agree on how much information the list should display, the compromise is usually to set the extra fields to “Expanded,” so they’re only visible to those who expand the orders themselves.
Profit and Purchase Price
In the expanded view, you can see the purchase price and profit for each order. Profit is calculated as follows:
Profit = order total − sales tax − estimated shipping cost − purchase price
- The purchase price is based on the products’ current purchase price (the price currently set for the product), not what it was when the order was placed
- The shipping cost uses the “Default shipping cost excl. tax on shipments” field from the online store settings (under Online Store, in the Orders section), not the actual shipping cost for the individual order
- If the product has variants, the variant is identified by the stock keeping unit (SKU), so the variant’s own purchase price is used if you have set one
Note: These figures are for guidance only. If you change the purchase price of a product, the profit on previous orders will also change, as it is always calculated based on the current purchase price.
Manage orders via AI
You can find, update, and create orders directly through an AI assistant without opening the admin panel. The AI can change statuses, add or remove labels, create shipping labels, and retrieve details for a specific order. This is handy when you need to quickly handle many orders or simply respond to a customer inquiring about their shipment.
Please note that the AI cannot process refunds via the payment gateway. The refund itself must still be processed manually through your payment provider or via “Credit Order” in the admin panel. However, the AI can update the order’s status and notes.
Examples of prompts you can copy:
Show me all orders from the last 7 days that haven’t been shipped yet.Mark order 10245 as shipped and create a GLS shipping label for it.Find the order from kunde@eksempel.dk from yesterday and add the "B2B" label.Read more about how you can manage your store with an AI assistant in the blog post “Now You Can Manage Your Entire Web Store via Chat.”
Bulk Editing
Check multiple orders and use the fixed bar at the bottom of the screen. Here you can:
Change status
- Mark as Shipped — automatically sends an “order shipped” email to the customer
- Mark as In Progress — puts the order into processing
- Mark as Ready for Pickup
- Mark as Picked Up
- Change to any other status via the dropdown
Shipping labels and shipping
- Send to GLS / PostNord / DAO / Burd — create shipments with the shipping carrier
- Download shipping labels — download labels as PDFs for all marked orders
- Create a return label — create a return label with GLS, PostNord, or DAO
- Print packing slips — print packing slips for the selected orders
Finance
- Withdraw funds — capture payment (works with most gateways, including QuickPay, ePay, OnPay, Nets Easy, Stripe, PensoPay, Flatpay, and Mollie)
- Bookkeeping — send to Billy, Dinero, or e-conomic
Labels
Add or remove order labels from multiple orders at once.
Other Actions
- Mark as paid
- Send email — compose and send an email to the selected customers
- Resend order confirmation or order shipment email
- Copy order — create a copy of the order
- Blacklist — cancel and block the customer’s email and phone number
- Delete — permanently delete orders
How to use the bulk edit bar
All of the actions above require that you first select at least one order. If you haven’t selected anything, nothing will happen when you click, and this is by far the most common reason why the buttons seem not to work.
Select the orders
- One at a time — check the boxes next to the orders you want to work with
- Entire page — use the checkbox at the top of the table or the “Select All” option just below the list. These two work together
- Using the keyboard — press Cmd + A on Mac or Ctrl + A on Windows when the cursor isn’t in a text field
The bar always shows how many orders you’ve selected and their total value. It’s a quick check right before you click something that can’t be undone. You can collapse the bar using the arrow at the top of it, and Shoporama will remember whether it was expanded or collapsed the next time you visit.
The selection only covers the page you’re currently on. If you need to process 80 orders at once, you should first increase the number of items per page so that they’re all visible. The only exception is the CSV file (all in the search) under Export, which processes your entire search regardless of what you’ve selected. See Export Orders as CSV.
The shipping button that appears automatically
As soon as your selection contains orders to be shipped via GLS or PostNord, an extra button appears in the bar with the names of the shipping carriers involved, e.g., “GLS” or “POST NORD + GLS.” If you click it, each individual order is forwarded to its respective shipping carrier in a single workflow. This means you don’t need to split the batch into GLS orders and PostNord orders first.
This button covers GLS and PostNord. For DAO and Burd, you’ll send orders from their own menus in the toolbar.
On mobile, the large menu bar has been replaced with two buttons, “Sent” and “In Progress,” so you can complete orders directly from your phone while out in the warehouse.
Actions Directly on Individual Orders
You don’t even need to open an order to take action on it. Each row in the order list has three places you can click, and that saves a surprising number of clicks on a busy packing day.
Change the status without leaving the list
Click on the status indicator itself in the order’s row. A menu will then drop down showing all statuses, from New and In Progress to Ready for Pickup to Shipped, Credit, and Canceled. The order’s status changes immediately, and you remain in the list with your filters intact.
Add and remove labels
The label icon in the row shows all your order labels by color, and a checkmark indicates which ones the order already has. Click a label to apply it, and click it again to remove it. This is the fastest way to mark “called the customer” or “items missing” as you work through the list.
The three-dot menu
- Print packing slip — opens the packing slip in a new tab, ready to print
- View in Store — opens the order as the customer sees it
- Send to GLS, PostNord, DAO, or Burd — appears only on orders with the status “New,” and only for the shipping carrier the order was actually purchased with
- Return form and QR return — appears only on orders that have already been shipped
- Returned Items — proceeds directly to crediting the order
- Partial Delivery — send part of the order now and the rest later, e.g., if an item is backordered. Appears on orders with the status New, In Progress, Pending, or Ready. See Partial Delivery: send part of the order now and the rest later
- Emails and Order Queue — see what has been sent to the customer and what is pending in the background for the order
- Copy and Delete — duplicate the order or permanently delete it
Because the menu adapts to the order’s status and shipping method, it doesn’t look the same for two different orders. If “Send to GLS” is missing from an order, it’s almost always because the order no longer has the “New” status, because the customer has selected a different shipping method, or because the GLS integration hasn’t been set up in the store.
Write an internal note without opening the order
If you expand the order, you can click directly in the “Internal Comment ” field below the customer’s address and start typing. The note is saved automatically as soon as you click away, and the field changes color so you can see at a glance which orders have a note. The customer never sees it. This is by far the fastest way to note “called, waiting for reply” on twenty orders in a row.
Export
You can export orders in several formats:
- CSV file — exports all orders in the current search, including all order details, products, addresses, and payment information
- Uni-Connect — GLS format (business/residential)
- Swipbox format
- Environmental export — exports environmental data (packaging, WEEE, batteries) for a given period
The CSV export runs in the background and notifies you when the file is ready for download.
The typical order flow
- Receive the order — the order appears in the list with the status "New." You’ll receive a pop-up notification in the admin panel
- Process the order — set the status to “In Progress” and use the picking list to pick and pack the items
- Generate shipping labels — select orders and send them to GLS, PostNord, DAO, or Burd
- Print labels and packing slips — download shipping labels as PDFs and print packing slips
- Mark as shipped — the customer automatically receives an “order shipped” email with a tracking number
Edit an order
Click an order number to open the order page, where you can edit all details:
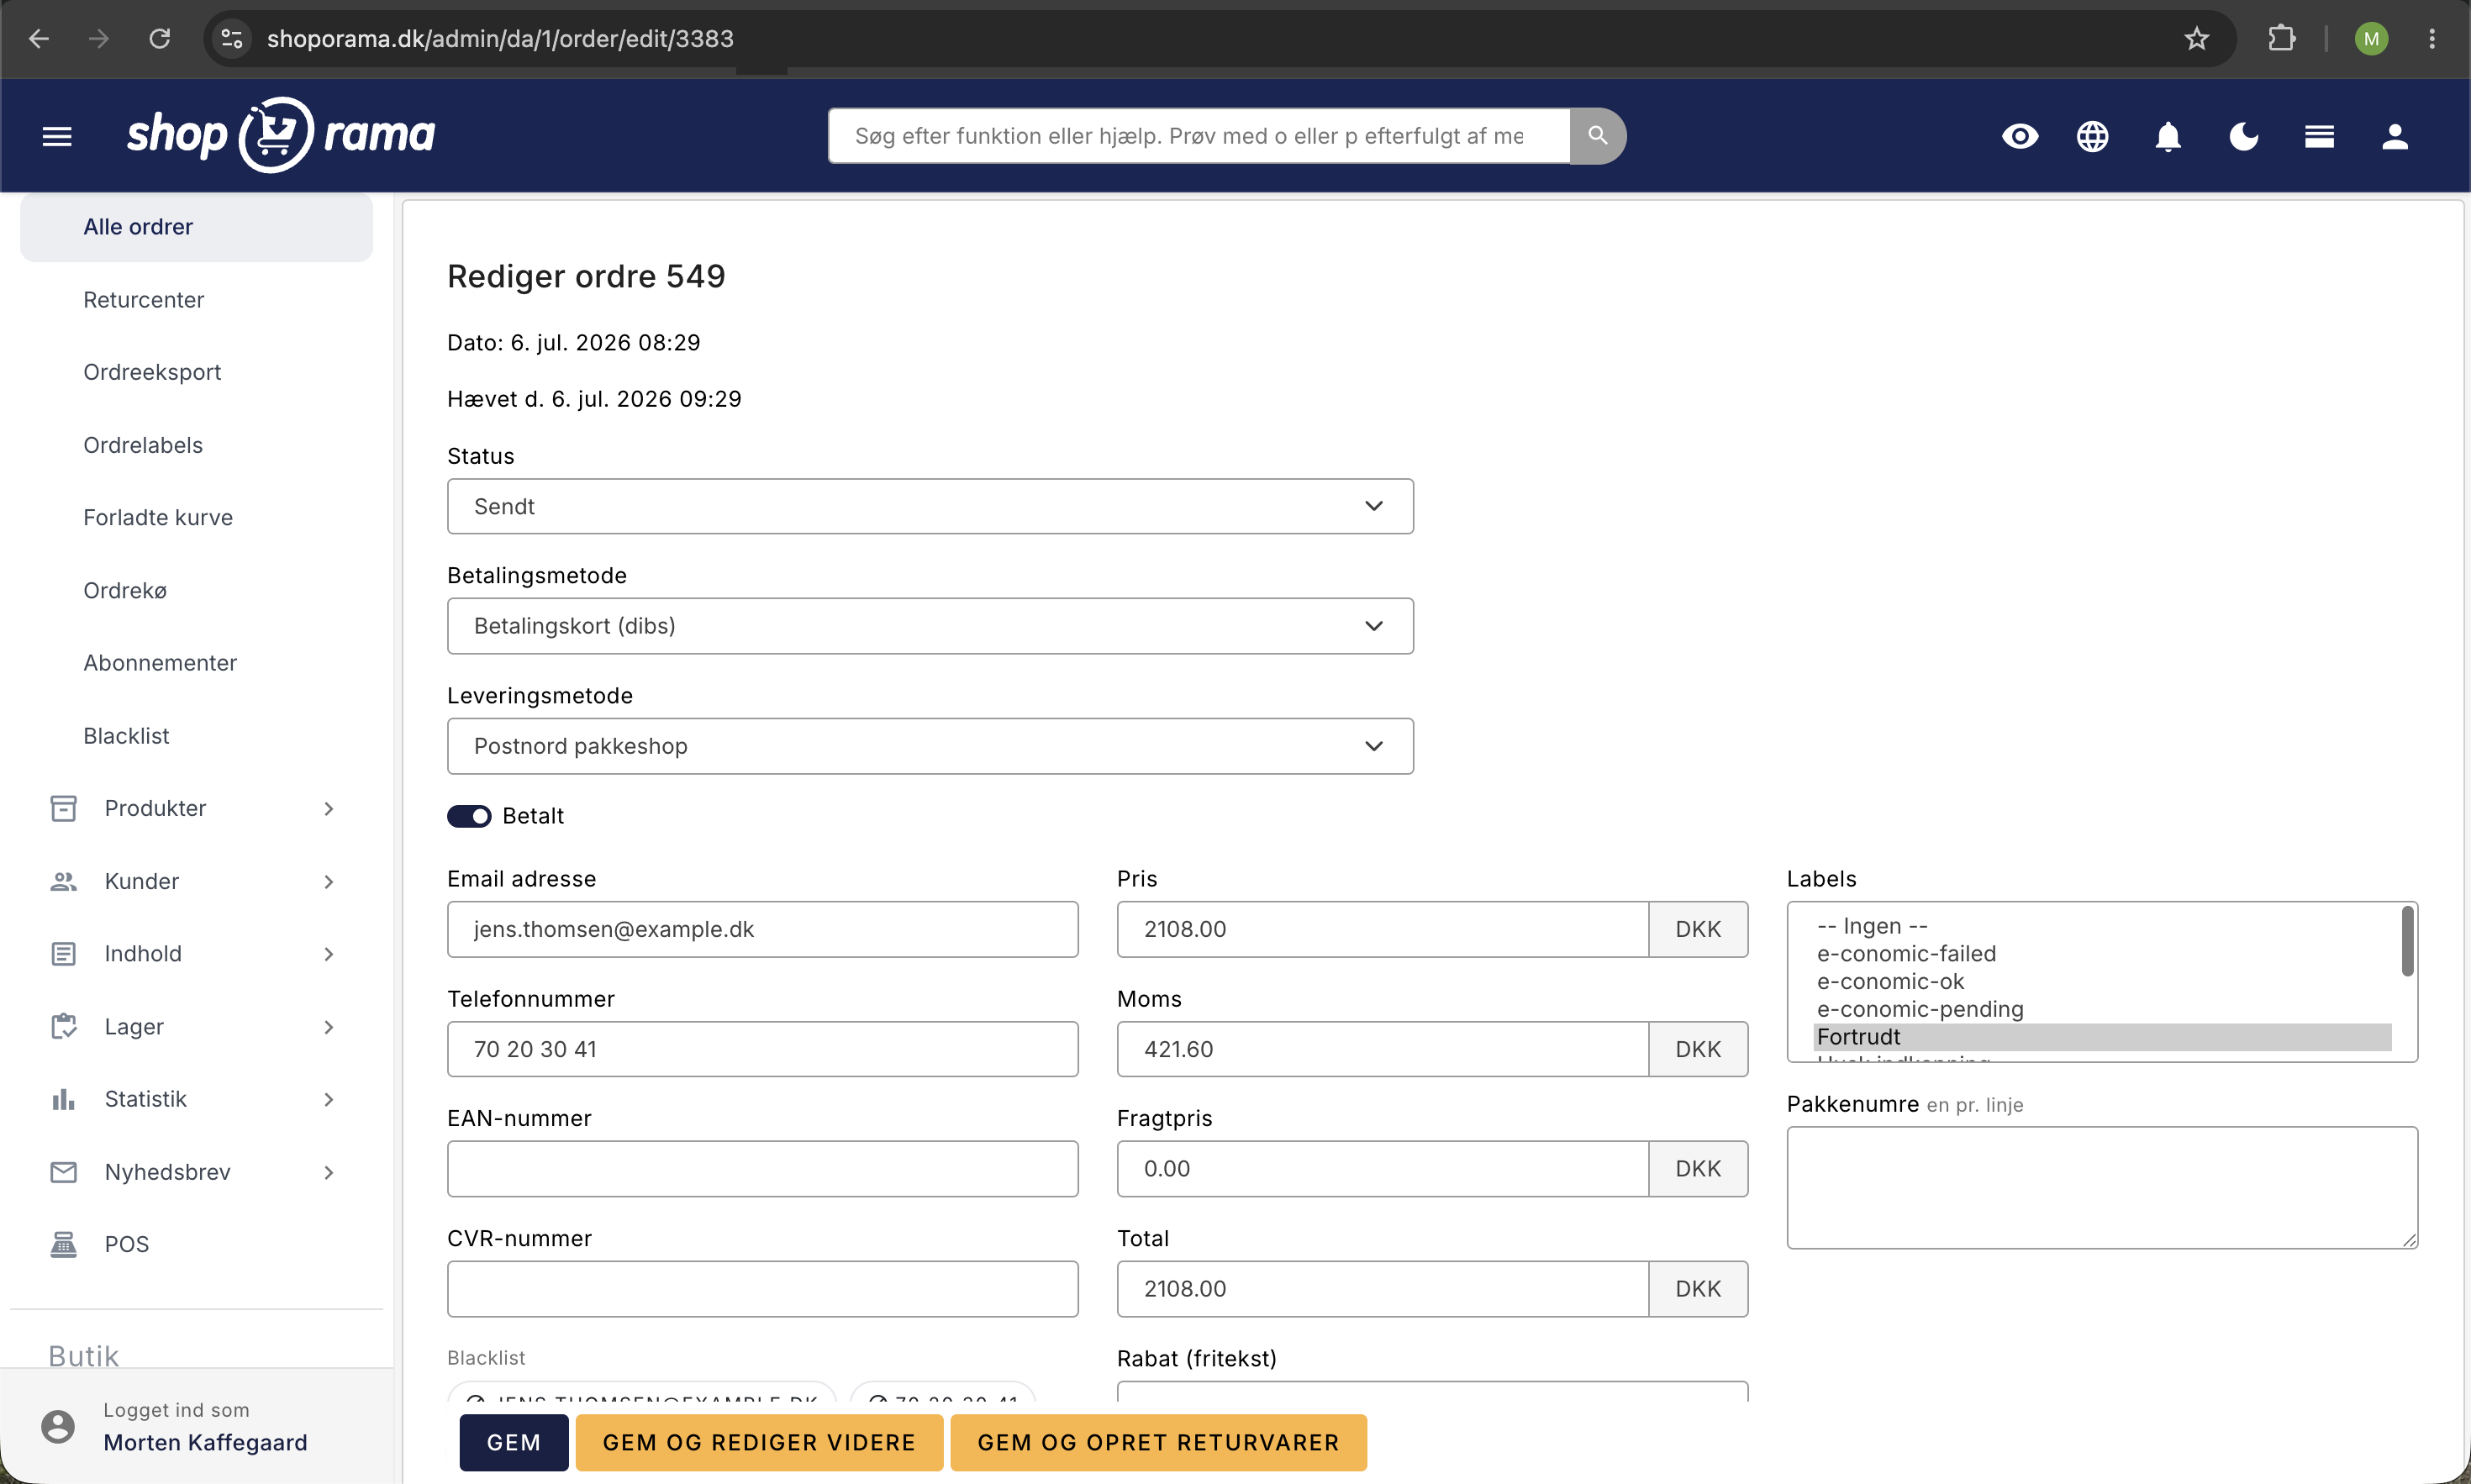
Status and Payment
- Change order status
- Change payment and shipping method
- Mark as paid/unpaid
- View transaction number and cart ID
- View and share payment link with the customer (if the order hasn't been paid)
Contact Information
- Email, phone number, EAN number, and CVR number — all editable
- View and edit billing address and shipping address
- Pickup location information (ID, name, address)
Products
- View all products with image, name, variant, quantity, price, and item number
- Edit quantity, unit price, and sales tax
- Change variants using the dropdown menu
- Add new products to the order
- View inventory movements associated with the order
Prices
- Edit order price, sales tax, shipping cost, and total
- View discount code and discount amount
- View promotional discount with calculation details
- Use "Calculate New Total Price" to recalculate the total based on the products
Comments and notes
- Public comment — visible to the customer
- Internal comment — visible only in the admin panel
- Technical note — for technical log and troubleshooting
Tracking Numbers
Add one or more tracking numbers (one per line). Tracking numbers are automatically included in the "order shipped" email to the customer with a link to track the order.
Labels
Assign order labels to categorize and organize orders.
Emails and Order Queue
View all emails sent in connection with the order, and compose new emails directly from the order page. You can also view the order queue with background actions (e.g., label generation, bookkeeping).
Additional options when saving
- Resend order confirmation
- DO NOT send any email when changing status — useful if you want to change the status without notifying the customer
- The order must be sent to the accounting or point-of-sale system — sends the order to Billy, Dinero, or e-conomic
Credits and Returns
From the order page, you can create a credit memo via “Save” and create return items. On the returns page, you can:
- Select which products to credit (per item)
- Specify whether the items should be restocked
- Create returned items as new products
- Credit shipping costs
- Refund loyalty points
- Add comments to the credit memo
The credit memo is created as a separate order with negative amounts and linked to the original order. If the payment gateway supports it, you can subsequently refund the amount directly from the credit memo.
Automatic payment capture
You can configure your payment gateway to automatically capture the amount when an order is marked as shipped. This saves you a manual step in the order workflow.
Notifications
When you have the order list open, Shoporama automatically checks for new orders. New orders appear as a pop-up notification, and the number of new orders is updated in the side menu and page title.
Create a New Order
You can create orders manually from the admin panel by clicking “Create New Order.” This is useful for phone orders or orders that need to be created without the customer going through checkout.
Frequently Asked Questions
I’ve selected orders, but nothing happens when I click the buttons at the bottom
First, check the counter on the far right of the bulk edit bar. If it says “0 order(s) selected,” nothing has been selected, and the buttons won’t work. This typically happens because you’ve switched pages or changed your filter settings since you checked the boxes. Select the orders again and try from the beginning. If the bar is collapsed, click the arrow at the top of it to reveal the buttons.
Can I select all orders in my entire search, or only those on the page?
Only the ones on the page. If you need to process multiple orders at once, set the number per page to, for example, 150 in the filter bar and then select all of them. If you have more than 150 orders to go through, it’s better to break the work into batches so you can see what’s actually being processed. The only action that applies to the entire search without selecting anything is the CSV export “all in the search.”
I want a tab that shows only unpaid orders, but the filter doesn’t carry over
That’s correct. The “Unpaid” and “Uncollected” filters aren’t saved in a tab on the order list. Instead, use the star icon in the top bar and save the list as a shortcut. The shortcut saves the entire URL of the page you’re on, so the filter remains active. The shortcut appears both under the star icon and in the menu on the left, and you can use it for your monthly check of what hasn’t been paid yet.
My colleague has rearranged the columns. Can I get my own back?
The columns under “Customize View” are saved on the web store and are shared by all users, so unfortunately there isn’t a personalized version. Instead, agree on a common starting point, and move the fields you don’t agree on to “Advanced.” That way, they’ll only be visible to the person who expands the orders, and the list won’t be cluttered for the rest of you.
I searched for the customer’s phone number and got no results, even though the order exists
Phone numbers and email addresses must be entered exactly as they appear on the order, character by character. If the customer entered the number with spaces or a country code, and you search without them, you won’t get any results. Instead, try searching for the customer’s last name, which matches parts of the text, or find the order through the customer’s profile.
I have five online stores. Do I need to create the same shortcuts in each one?
Yes. Both tabs and shortcuts are specific to each individual online store, so they must be created in each store. However, they apply to all users of the store, so you only need to set them up once per store—not once per employee. Use the same names across all stores so you don’t have to think about where you are when switching between them.
Can I filter by two labels and see only the orders that have both of them?
Yes, and that’s actually how the label filter works by default. If you select two labels, you’ll only see the orders that have both. If you’d rather see orders with one label or the other, you’ll need to filter by them one at a time. Precisely because labels are combined this way, they’re great for narrowing down a list to a very specific set, such as all orders that are both “Influencer” and “Exchange.”
How do I find the packages waiting at the package shop?
Open the Shipping filter and check the box next to “At the package shop ” under Delivery Status. This will show you all the orders that have arrived but haven’t been picked up yet. Save the list as a shortcut with the star icon, and you’ll have a regular check you can do every morning before the packages start getting returned to you.
Tip
Use the picking list to efficiently pick and pack orders in the warehouse, and order labels to organize your orders with color codes.
Need help? Contact us at support@shoporama.dk.
Related articles
Pick list
Guide to Shoporama's pick list. Pick and pack orders efficiently with barcode scanning, batch management and mobile-friendly interface.
Order queue
Guide to the order queue in Shoporama. See the status of automatic order actions such as capture, invoicing and stock pull, and learn how to manage...
Order labels
Guide to order labels in Shoporama. Create color-coded labels to organize and categorize your orders and set up automatic allocation based on...
Split Delivery: Ship part of the order now and the rest later
Can't you ship the entire order at once? With split shipping, you ship what you have in stock, and the rest will be shipped when it arrives. The...
Related features
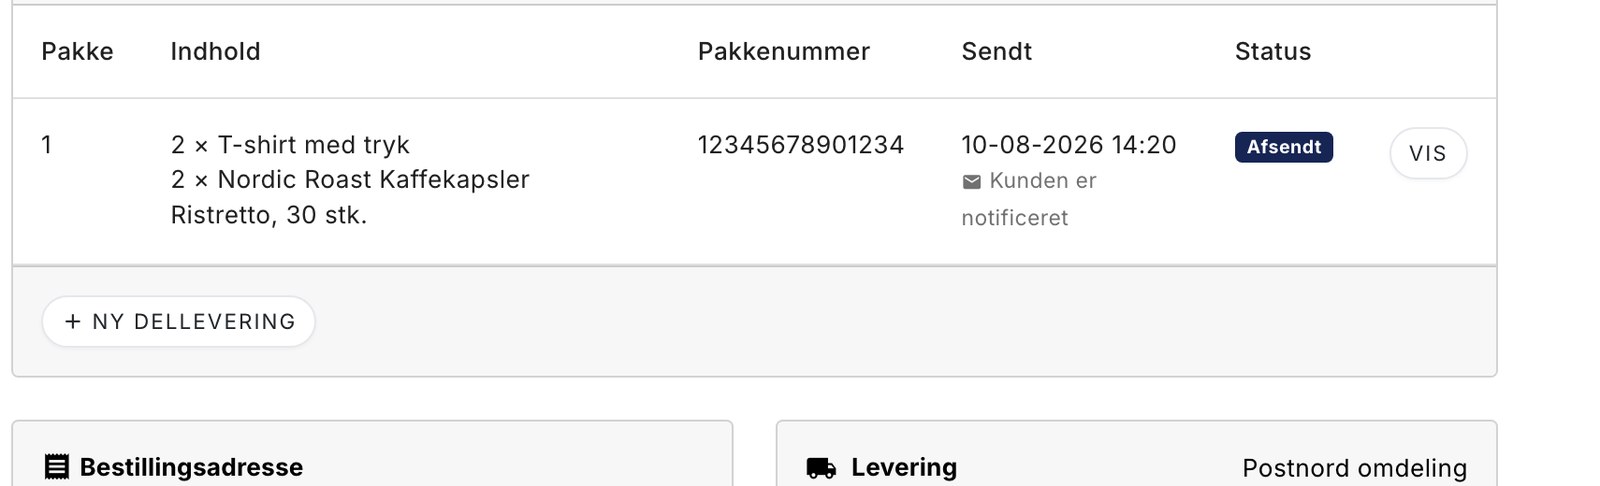
Send part of the order now and the rest later
Was an item missing from the shelf? Now you can ship what you have, and the rest will be shipped when it arrives. One order, one invoice, and the...
Partial delivery: Send what you have now, and the rest when it arrives home
Webshop with PostNord
Create an online store with PostNord shipping: parcel shop selector in checkout, automatic label printing, tracking and international shipping...
Webshop with GLS
Create a webshop with GLS shipping and print parcel labels in one click. Parcel selector, tracking, returns and batch printing from Shoporama.