Set up ePay as a payment gateway
Step-by-step guide to setting up ePay as a payment gateway in your Shoporama webshop. Fill in Merchant ID, Secret (MD5) and Password for capture and get started quickly with card payment, MobilePay, Forbrugsforeningen and Klarna.
ePay er en af de betalingsgateways som Shoporama understøtter. Med ePay kan du tage imod kortbetaling, MobilePay Online, Klarna, Forbrugsforeningen og en lang række andre betalingsmetoder. Her får du en komplet guide til at sætte den op.
Bemærk: ePay hed tidligere Bambora, men er siden december 2024 igen et selvstændigt selskab under navnet ePay. Når du opretter en ny betalingsgateway i Shoporama, skal du vælge ePay.
Trin 1: Opret gateway i Shoporama
- Log ind i dit Shoporama admin-panel
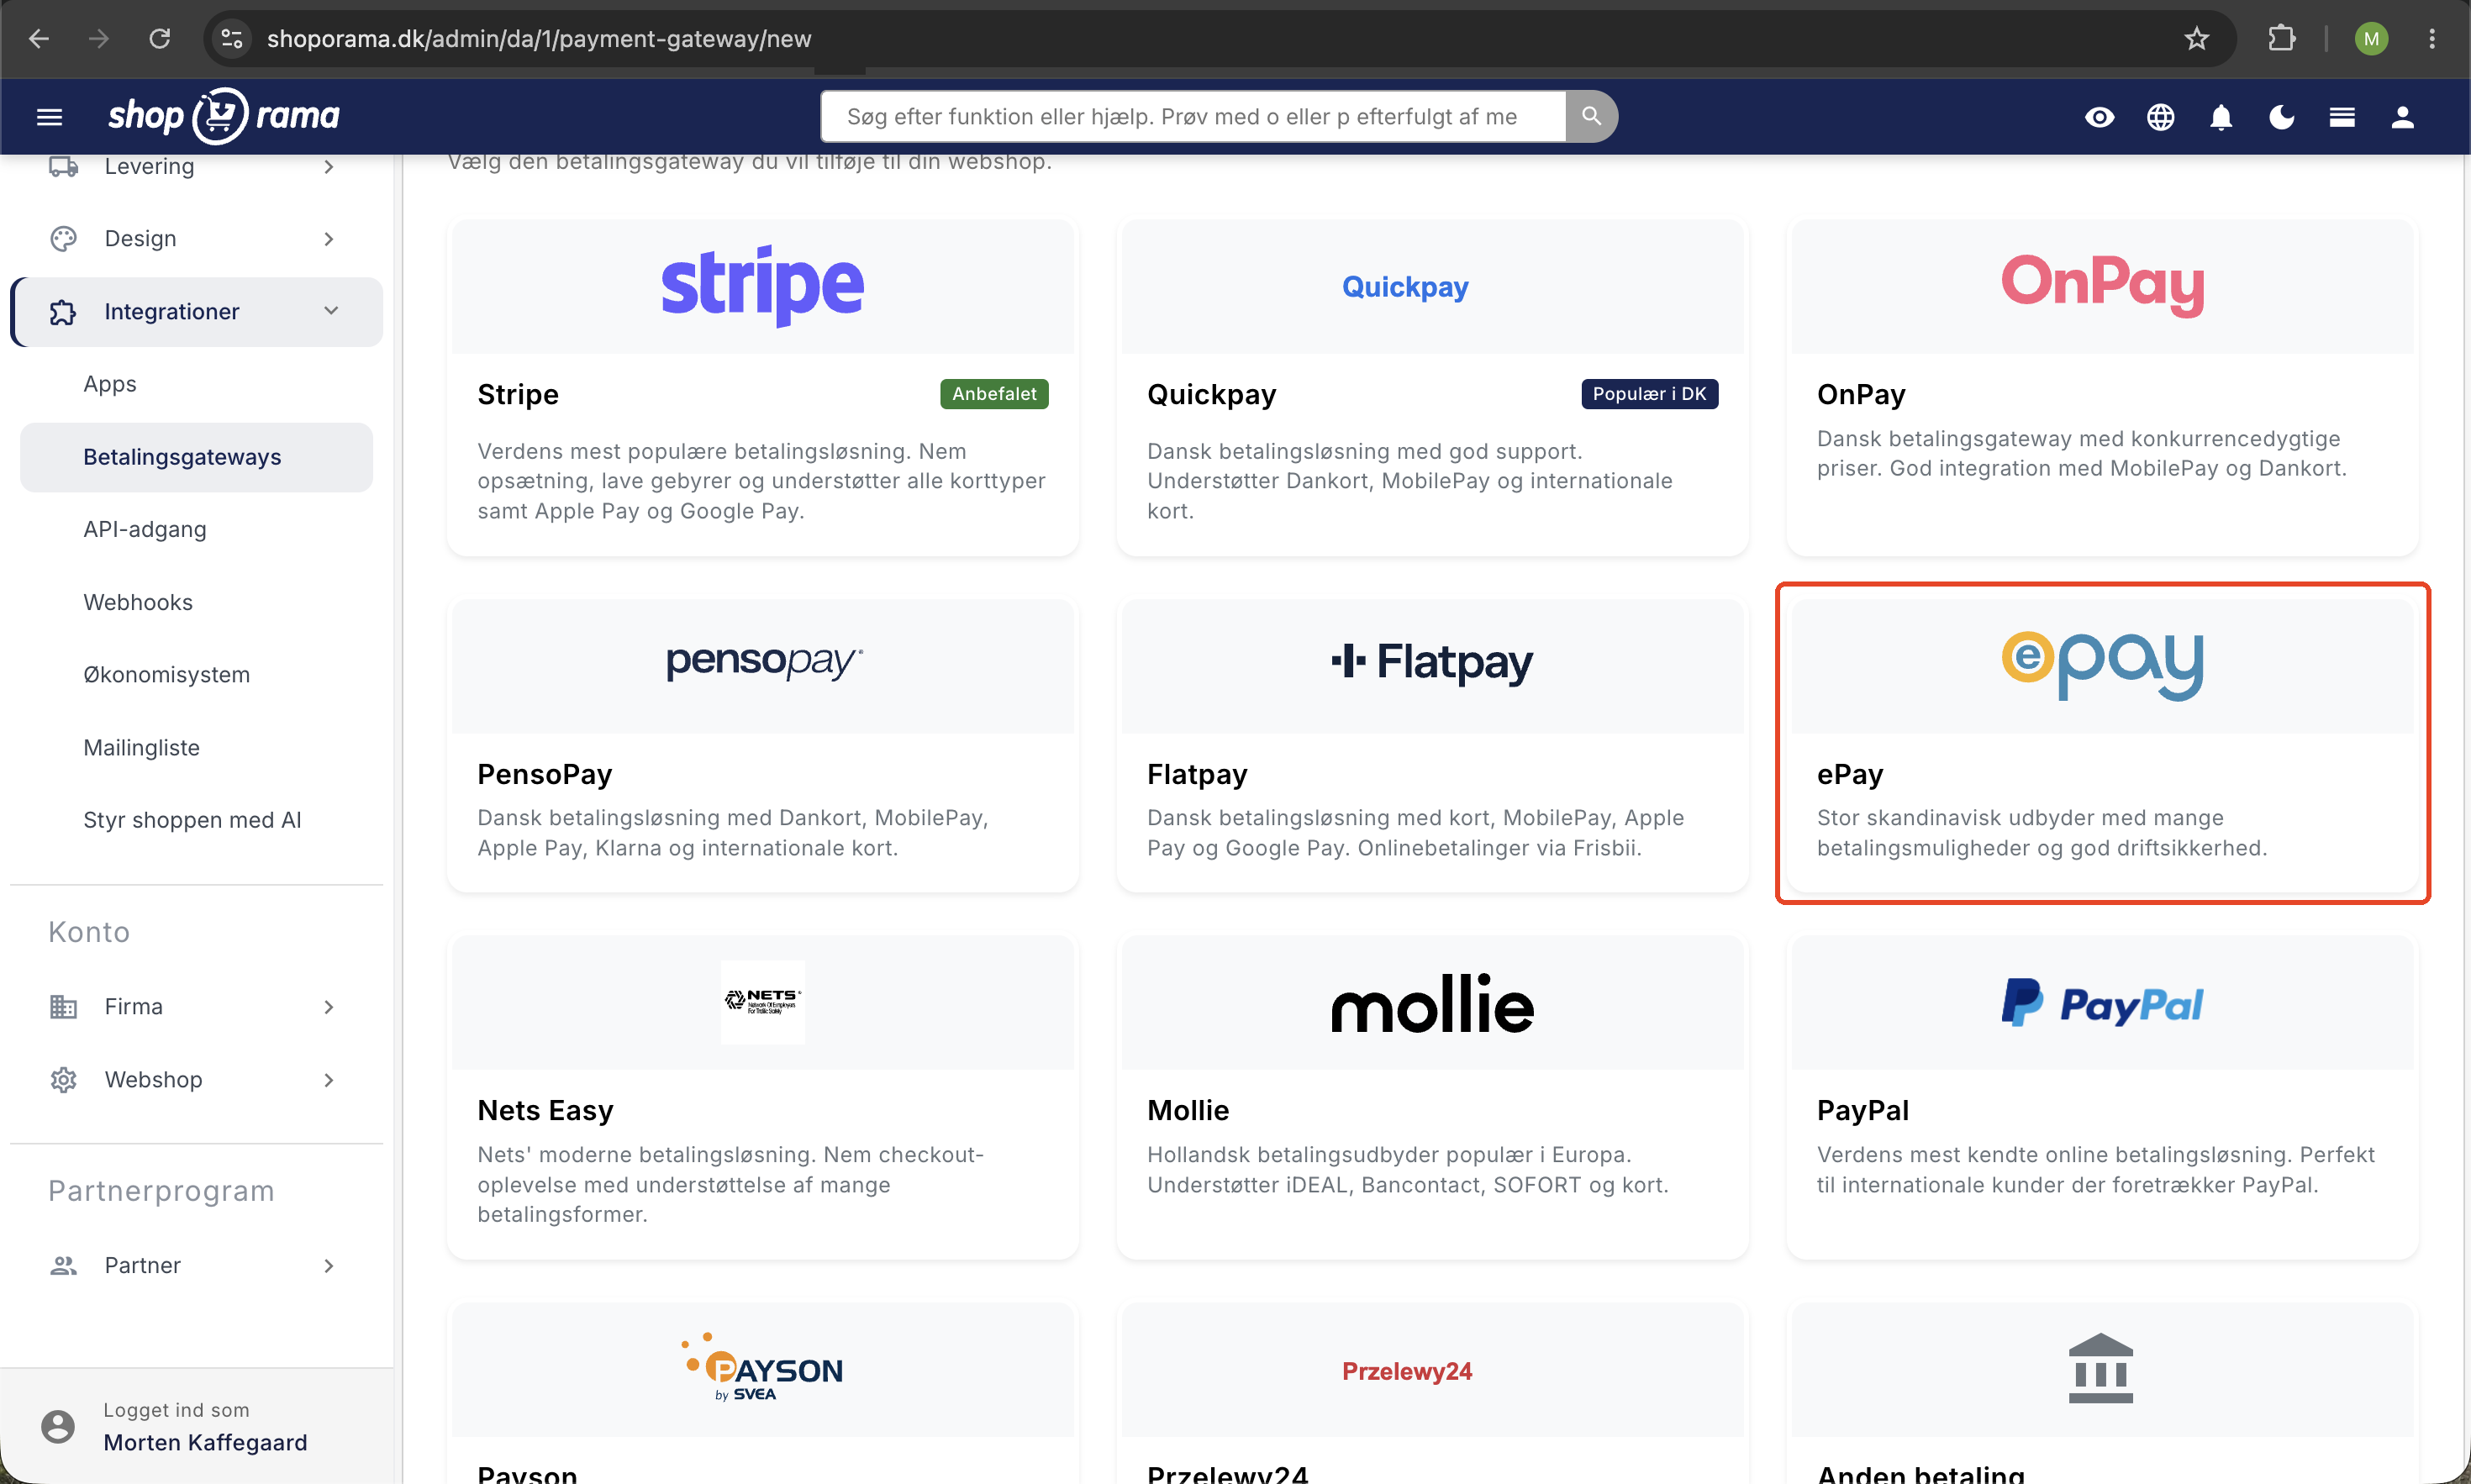
- Gå til Butik » Integrationer » Betalingsgateways
- Klik Opret ny betalingsgateway
- Vælg ePay
- Giv den et sigende navn, fx Kreditkort
- Klik Gem
Trin 2: Udfyld Merchant ID
I feltet Merchant ID skal du indtaste dit Merchant ID fra ePay. Du finder det i ePays administrationspanel øverst til højre eller under Indstillinger » Betalingssystem. Det er typisk et 7-cifret tal.
Trin 3: Udfyld Secret (MD5-secret)
Feltet Secret er en MD5-secret som ePay bruger til at signere callbacks. Det sikrer at Shoporama kan verificere at en betalingsbesked rent faktisk kommer fra ePay og ikke fra en udefrakommende.
Du finder den i ePay-admin under Indstillinger » Betalingssystem » MD5 stempel/nøgle. Du vælger selv hvilken streng der skal bruges. Det vigtige er, at du indsætter præcis samme værdi i ePay og i Shoporama.
Trin 4: Password (til capture)
Hvis du vil have Shoporama til at hæve betalinger automatisk når en ordre sendes, skal du udfylde feltet Password (til capture).
Det er et såkaldt Remote password som du finder i ePay-admin under Indstillinger » Betalingssystem » Remote password. Det bruges til at autorisere de API-kald, Shoporama foretager når en betaling skal hæves eller refunderes.
Tip: Uden et Remote password kan Shoporama ikke hæve eller refundere betalinger automatisk. Du kan godt undvære det, men så skal hævning og refundering ske manuelt i ePay-admin.
Trin 5: Tilføj dit domæne i ePay
ePay kræver, at du whitelister de domæner der må bruge betalingsvinduet. Hvis dit domæne ikke er godkendt, vil du se fejlen "The referring domain is not allowed".
- Log ind i ePays admin-panel
- Gå til Indstillinger » Betalingssystem
- Find feltet med tilladte domæner
- Tilføj dit domæne (fx www.dinshop.dk)
- Tilføj også dinshop.shoporama.dk hvis du stadig bruger Shoporama-subdomænet
Vigtigt: Hvis du skifter domæne senere, skal du huske at opdatere listen i ePay.
Trin 6: Automatisk capture (valgfrit)
Hvis du ønsker, at pengene automatisk hæves når ordren sendes eller afhentes, kan du sætte flueben i "Hæv automatisk pengene når varen sendes eller afhentes". Det kræver, at du har udfyldt Password (til capture).
Beløbet bliver reserveret på kundens kort med det samme, men hæves først når du markerer ordren som sendt eller afhentet. Det er den anbefalede opsætning til fysiske varer, da du ifølge dansk lovgivning ikke må hæve pengene før varen er afsendt. Læs mere i vores guide til at hæve betalinger på ordrer.
Trin 7: Gem og test
Klik Gem i Shoporama. Test derefter at betalingen virker ved at oprette en testordre i din webshop.
For at se det rigtige betalingsvindue skal din shop være sat til live. I demo-mode vises et forenklet skærmbillede i stedet. Se FAQ nedenfor for mere info.
Avancerede indstillinger
ePay-gatewayen har en række avancerede indstillinger, som de fleste ikke behøver at ændre:
- Windowstate: styrer hvordan betalingsvinduet vises (1 = samme vindue, 3 = overlay, 4 = fuld side, anbefalet)
- Window ID: ID til et tilpasset betalingsvindue-design oprettet i ePay
- Group: gruppér transaktioner under et fælles navn i ePay
- Sprog: 1 = dansk, 2 = engelsk, 3 = svensk
- Korttype: begræns til én bestemt korttype (fx kun Dankort eller MobilePay Online). Lad stå tom for at tillade alle aktiverede korttyper
- Betalingsgruppe: filtrér betalingsmetoder efter kategori (kort, gavekort, netbank, faktura, mobil osv.)
- Tilføj fakturadata: sender ordrelinjer og kundeoplysninger med betalingen. Kræves ved brug af Klarna
- CSS URL: URL til eksternt stylesheet der tilpasser betalingsvinduets udseende
- Google Tracker: Google Analytics tracking-ID til at spore betalingsflow
Ofte stillede spørgsmål
Hvilke felter skal jeg som minimum udfylde?
Som minimum skal du udfylde Merchant ID og Secret. Hvis du vil have automatisk hævning og refundering af betalinger, skal du også udfylde Password (til capture). De øvrige felter kan stå tomme og bruger så standardværdier.
Hvor finder jeg MD5-secret i ePay?
Log ind i ePay-admin og gå til Indstillinger » Betalingssystem. Her finder du feltet "MD5 stempel/nøgle" (eller blot "MD5-key"). Du kan selv vælge hvilken streng der skal bruges. Vigtigst er, at du sætter præcis samme værdi i ePay og i Shoporama.
Kan jeg tilbyde MobilePay og Klarna via ePay?
Ja. ePay understøtter MobilePay Online (paymenttype 29), Klarna (paymenttype 17), ViaBill og en lang række andre metoder. De skal være aktiveret på din ePay-aftale først. Brug af Klarna kræver desuden, at du slår Tilføj fakturadata til, så ordrelinjer sendes med.
Kan jeg tage imod Forbrugsforeningen via ePay?
Ja. Forbrugsforeningen aktiveres som korttype 11 inde på din ePay-gateway. Vil du tilbyde både kort og Forbrugsforeningen, kan du oprette to ePay-gateways i Shoporama med samme nøgler men forskellige korttyper. Læs den fulde guide om Forbrugsforeningen som betalingsmetode.
Hvordan refunderer jeg en ordre?
Hvis du har udfyldt Password (til capture), kan du refundere en betaling direkte fra ordrevisningen i Shoporama via en kreditnota. Læs vores guide til kreditnotaer og refundering. Mangler du Remote password, skal refunderingen laves manuelt i ePay-admin.
Hvorfor ser jeg ikke betalingsvinduet?
Der kan være flere årsager:
- Shoppen er i demo-mode. Betalingsvinduet vises kun når shoppen er sat til live. I demo-mode ser du i stedet teksten "Lad som om du betaler".
- Manglende SSL. Betalingsvinduet kræver, at din shop kører over HTTPS. Shoporama opretter automatisk SSL-certifikat når dit domæne er korrekt sat op.
- Forkert Merchant ID. Tjek at du har indtastet det korrekte Merchant ID fra ePay.
Jeg får fejlen "The referring domain is not allowed"
Denne fejl betyder, at det domæne du bruger ikke er godkendt i ePays admin. Log ind i ePay og tilføj dit domæne under Indstillinger » Betalingssystem. Husk at tilføje både dit eget domæne (fx www.dinshop.dk) og eventuelt dit Shoporama-subdomæne (fx dinshop.shoporama.dk).
Kan jeg teste betaling med testkort?
ePay udleverer test-merchantnumre og testkort, som du kan bruge til at teste betalingsflowet. Bemærk dog, at betalingsvinduet kun vises når shoppen er sat til live, ikke i demo-mode.
Alternativt kan du lave et testkøb med et rigtigt kort på et billigt produkt og efterfølgende refundere betalingen i ePays admin.
Hvad er forskellen på demo-mode og live?
I demo-mode simulerer Shoporama betalingen, så du kan teste resten af checkout-flowet (kurv, leveringsoplysninger, ordrebekræftelse) uden at involvere ePay. I live sendes kunden til det rigtige betalingsvindue hos ePay, hvor der betales med kort, MobilePay eller andre betalingsmetoder.
Hedder det ePay, Bambora eller Worldline?
ePay blev oprindeligt opkøbt af Bambora, som senere blev en del af Worldline. Siden december 2024 er ePay igen et selvstændigt selskab. Det korrekte navn er simpelthen ePay.
Får jeg pengene direkte ind på min konto?
Nej. ePay er en betalingsgateway, ikke en indløser. Pengene udbetales af din indløsningsaftale (fx Nets, Clearhaus, Teller) til din virksomhedskonto efter en aftalt afregningsfrekvens. ePay sørger blot for at sende kortdata sikkert videre til indløseren. Læs mere om hvornår du får dine penge udbetalt.
Har du problemer med opsætningen? Kontakt os på support@shoporama.dk, så hjælper vi dig.
Related articles
Consumers' Association as a payment method
How to accept the Spending Credit in your Shoporama online shop. The Spending Credit is activated as a card type in the ePay gateway, not as a...
Collect payments on orders (capture)
Guide to capture payments on orders in Shoporama. Understand the difference between authorization and capture and learn how to capture manually or...
Credit notes and refunds
Complete guide to credit notes and refunds in Shoporama, including partial refunds, full credit notes and transfer to accounting systems.
Set up Klarna as payment method
Learn how to set up Klarna as a payment method in your Shoporama webshop.
Mollie payment gateway
Learn how to set up Mollie as a payment gateway in Shoporama. Mollie supports iDEAL, credit cards, Klarna, PayPal, Apple Pay, Bancontact and many...
Stripe payment gateway
Learn how to set up and use Stripe as a payment gateway in your Shoporama online shop. Stripe supports card payment, MobilePay, Klarna, Apple Pay,...
Restrict payment methods to specific countries
Restrict which payment methods are shown in checkout based on the customer's country of delivery.
When will I get my money paid out?
Find out when you get paid from your sales through the payment gateway.