Google Ads conversion tracking
How to set up Google Ads conversion tracking in Shoporama. Target Add to Cart, Begin Checkout and Purchase with Conversion ID and labels, as well as offline conversions for clicks that end up as orders.
Google Ads conversion tracking tells you which ad clicks actually lead to action in your online store. With Shoporama’s built-in integration, you can track “Add to Cart,” “Start Checkout,” and completed purchases without having to edit themes or work with Google Tag Manager. This guide takes you all the way from your Google Ads account to the setup in Shoporama, and also covers offline conversions for even more accurate data.
Prerequisites
- A Google Ads account with permissions to create conversion actions.
- The tracking module enabled in Shoporama (there may be a monthly fee).
- Access to the Webshop admin menu in Shoporama.
Step 1: Create conversion actions in Google Ads
- Sign in to Google Ads.
- Go to Goals > Conversions > Summary.
- Click " New conversion action " and select " Website."
- Create a conversion action for each event you want to track. At a minimum, create one for “Purchase,” and ideally also for “Add to Cart ” and “Begin Checkout.”
- Once the action is created, you’ll find your Conversion ID (starts with AW-) and a Conversion Label for each action. You’ll need both of these in Shoporama.
You don’t need to install Google Tag Manager or add tracking code to your site. Shoporama sends the signals automatically once you’ve entered the IDs and labels.
Step 2: Enable tracking in Shoporama
- Go to Webshop > Tracking in the left sidebar (the Webshop section has a gear icon).
- Check the box next to Enable Tracking.
- Select Google Ads as the platform under “Which ones do you want to enable?”.
- Fill out the fields in the Google Ads section and click Save.
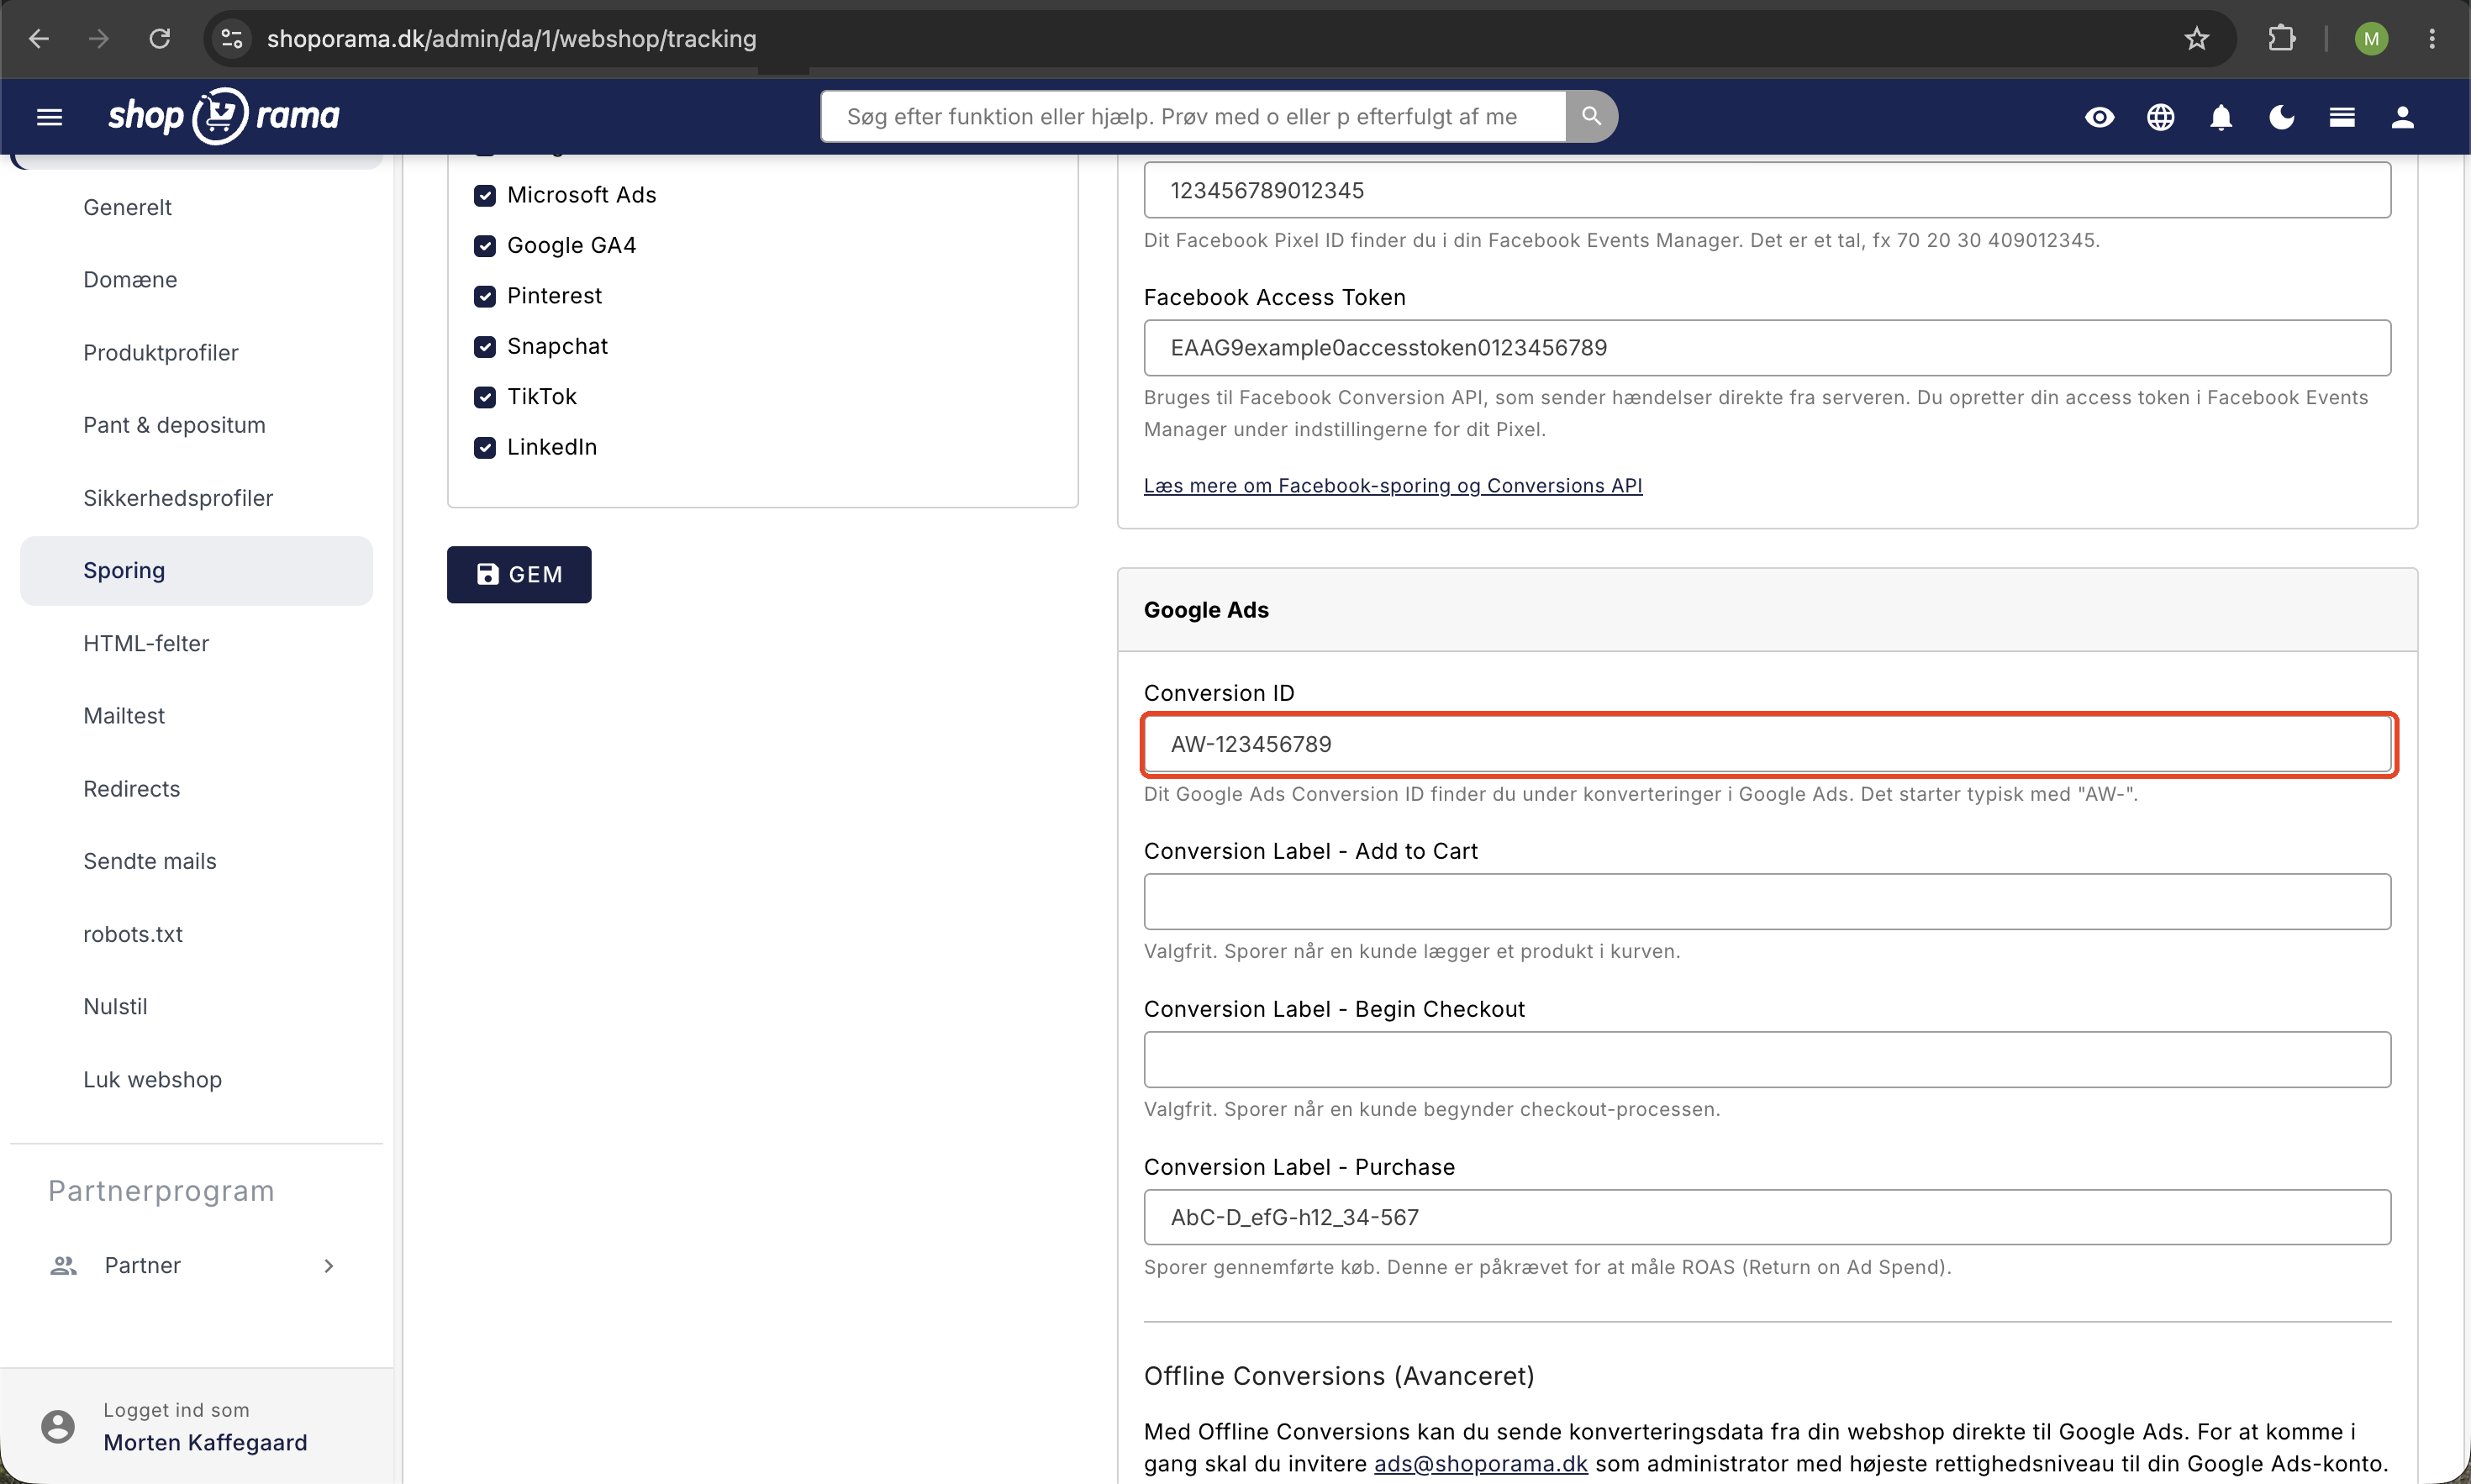
Step 3: Enter the Conversion ID and labels
- Conversion ID (required) — your Google Ads ID in the format AW-123456789.
- Conversion Label - Add to Cart (optional) — fires when a customer adds a product to the cart.
- Conversion Label - Begin Checkout (optional) — fires when the customer starts the checkout process.
- Conversion Label - Purchase (required for ROAS measurement) — fires when a purchase is completed. The order amount is sent as the conversion value.
What is tracked automatically?
When the Conversion ID is filled in, Shoporama automatically fires the relevant event at the right time:
- Add to Cart is sent when a customer adds a product to the cart (requires a label).
- "Begin Checkout " is sent when the customer starts checkout (requires a label).
- "Purchase " is sent on the receipt page, including the order amount and currency.
Fields you leave blank will not trigger any events. It’s fine to start with just “Purchase” and add the others later.
Server-side tracking
Traditional browser-based tracking is increasingly being blocked by ad blockers, ITP in Safari, and cookie restrictions. If you enable server-side tracking in the tracking settings, conversions are sent from Shoporama’s server instead, which typically increases the number of recorded conversions significantly.
Server-side tracking requires setting up a tracking subdomain and configuring DNS. Read more in Server-side tracking in Shoporama.
Offline Conversions (Advanced)
Even with server-side tracking, conversions are lost. Offline conversions solve this by sending the actual order back to Google Ads and linking it to the original ad click via gclid (Google Click ID). The result is complete conversion data that doesn’t rely on cookies or browser tracking.
Here’s how to get started:
- Invite ads@shoporama.dk as an administrator with the highest permission level on your Google Ads account.
- Create a conversion point in Google Ads of the “Import from clicks” type.
- In Shoporama, under Webshop > Tracking, fill in:
- Conversion Action — find the value in the URL under conversion details in Google Ads. The parameter is called ctId, e.g., ctId=123456789.
- Customer ID — your customer number in Google Ads (typically displayed in the top-right corner of the Ads interface).
- Operating Customer ID — required only if the account is managed via an MCC (Manager Account).
- Click Save.
Shoporama will then generate a CSV file containing your conversions. The file can be downloaded at <your-webshop>/google_ads_offline_conversion.csv and is protected by basic auth. The username is "ads," and the password is listed on the tracking page so that Google can retrieve the file itself according to a schedule you set up in Google Ads.
Note
The conversion point will not start receiving data until approximately 6 hours after it is created, and only after Shoporama has accepted the invitation to your account. Please be patient on the first day.
Read the full guide on offline conversions in Google and Microsoft Ads.
Consent Mode v2
Shoporama supports Google Consent Mode v2. When you enable “Use Consent Mode” in the tracking settings, consent signals are automatically sent to Google based on the customer’s selection in the cookie banner. This means that tracking complies with GDPR and only occurs with consent, while Google can still model the missing conversions based on anonymized signals.
Tip
Use Google Ads together with Google Analytics 4 for a complete overview of the customer’s journey from ad click to purchase.
Frequently Asked Questions
Where do I find the menu item in Shoporama?
In the left sidebar under Webshop (the section with the gear icon), click on Tracking. This is the same page you use for Google Analytics, Meta Pixel, and other tracking platforms.
Do I need to install Google Tag Manager?
No. Shoporama has a built-in Google Ads integration, and you don’t need Tag Manager or manual code in the theme. Just enter the Conversion ID and labels, and the events will trigger automatically.
Why don’t the numbers in Google Ads match my order summary exactly?
Google uses attribution models that distribute conversions across time and channels. Additionally, ad blockers and cookie restrictions still block some browser tracking. Enable server-side tracking and, if applicable, offline conversions to bridge the gap, but always expect a slight discrepancy from your own order statistics.
What’s the difference between standard tracking and offline conversions?
Standard tracking sends the conversion the moment the customer completes the purchase in the browser. Offline conversions retrieve your orders from Shoporama and link them to the original ad click via gclid, so they’re counted even if browser tracking was blocked. Offline data is typically more complete, but it takes a few hours to come in.
Why do I need to invite ads@shoporama.dk to my account?
To upload offline conversions, Google requires that the party sending the data have administrator access to the account. This access is used solely to submit your conversions via the API. You can revoke this access if you discontinue using this feature.
Does Consent Mode affect my ad costs?
No, Consent Mode does not change your costs. It only controls which signals are sent to Google based on the customer’s consent. When a customer opts out of marketing cookies, Google models the conversion based on aggregated data instead of losing it entirely.
Our online store uses an MCC account. What should I do differently?
Fill in both the Customer ID (the ad account itself) and the Operating Customer ID (your MCC/Manager Account). Invite ads@shoporama.dk to the underlying account where the conversions belong.
Can I test the setup before I go live?
Yes. Use Google Tag Assistant in Chrome or the Network tab in Developer Tools to see if the events are being fired. Place a test order and verify that the Purchase event is sent with the correct amount. Conversions will appear in the Google Ads interface after a few hours.
What happens if I only fill in the Conversion ID?
Then no events will be fired. You must at least fill in the Conversion Label—Purchase —to measure ROAS. The other labels are optional and can be added later.
Related articles
Need help? Email support@shoporama.dk.