Many stores sell more than just merchandise. The beer shop hosts tastings, the yarn shop offers knitting classes, the wine shop hosts dinners, and the small travel agency organizes trips for up to 30 people. With ticket sales in Shoporama, you sell them in your own online store, alongside your products, and the customer pays for everything at once.
Tickets and products in the same cart
An event is a product in your online store, just with dates instead of inventory. Customers can add a ticket to Friday’s beer tasting and a case of beer to the same cart and pay just once. The order comes in just like your other orders, the payment goes through your own payment solution, and the order is processed like the others.
There’s no separate fee per ticket sold. Your subscription and the fees charged by your payment solution are the same as for your other orders. And customers stay on your site instead of being redirected to a ticket portal.
Dates with seats and a price per date
Each item has its own dates, and each date has a set number of seats. You can set a minimum number of participants, a sales cutoff, and a surcharge per ticket—for example, an extra 1,500 DKK for a high-season departure. If you run the same course every week, you can set up an entire series at once: first start date, duration, weekly frequency, and number of sessions.
Ticket types such as Adult and Child or Standard and VIP can each have their own price. All ticket types share the seats available for a given date, so an event with 20 seats will never sell more than 20 tickets.
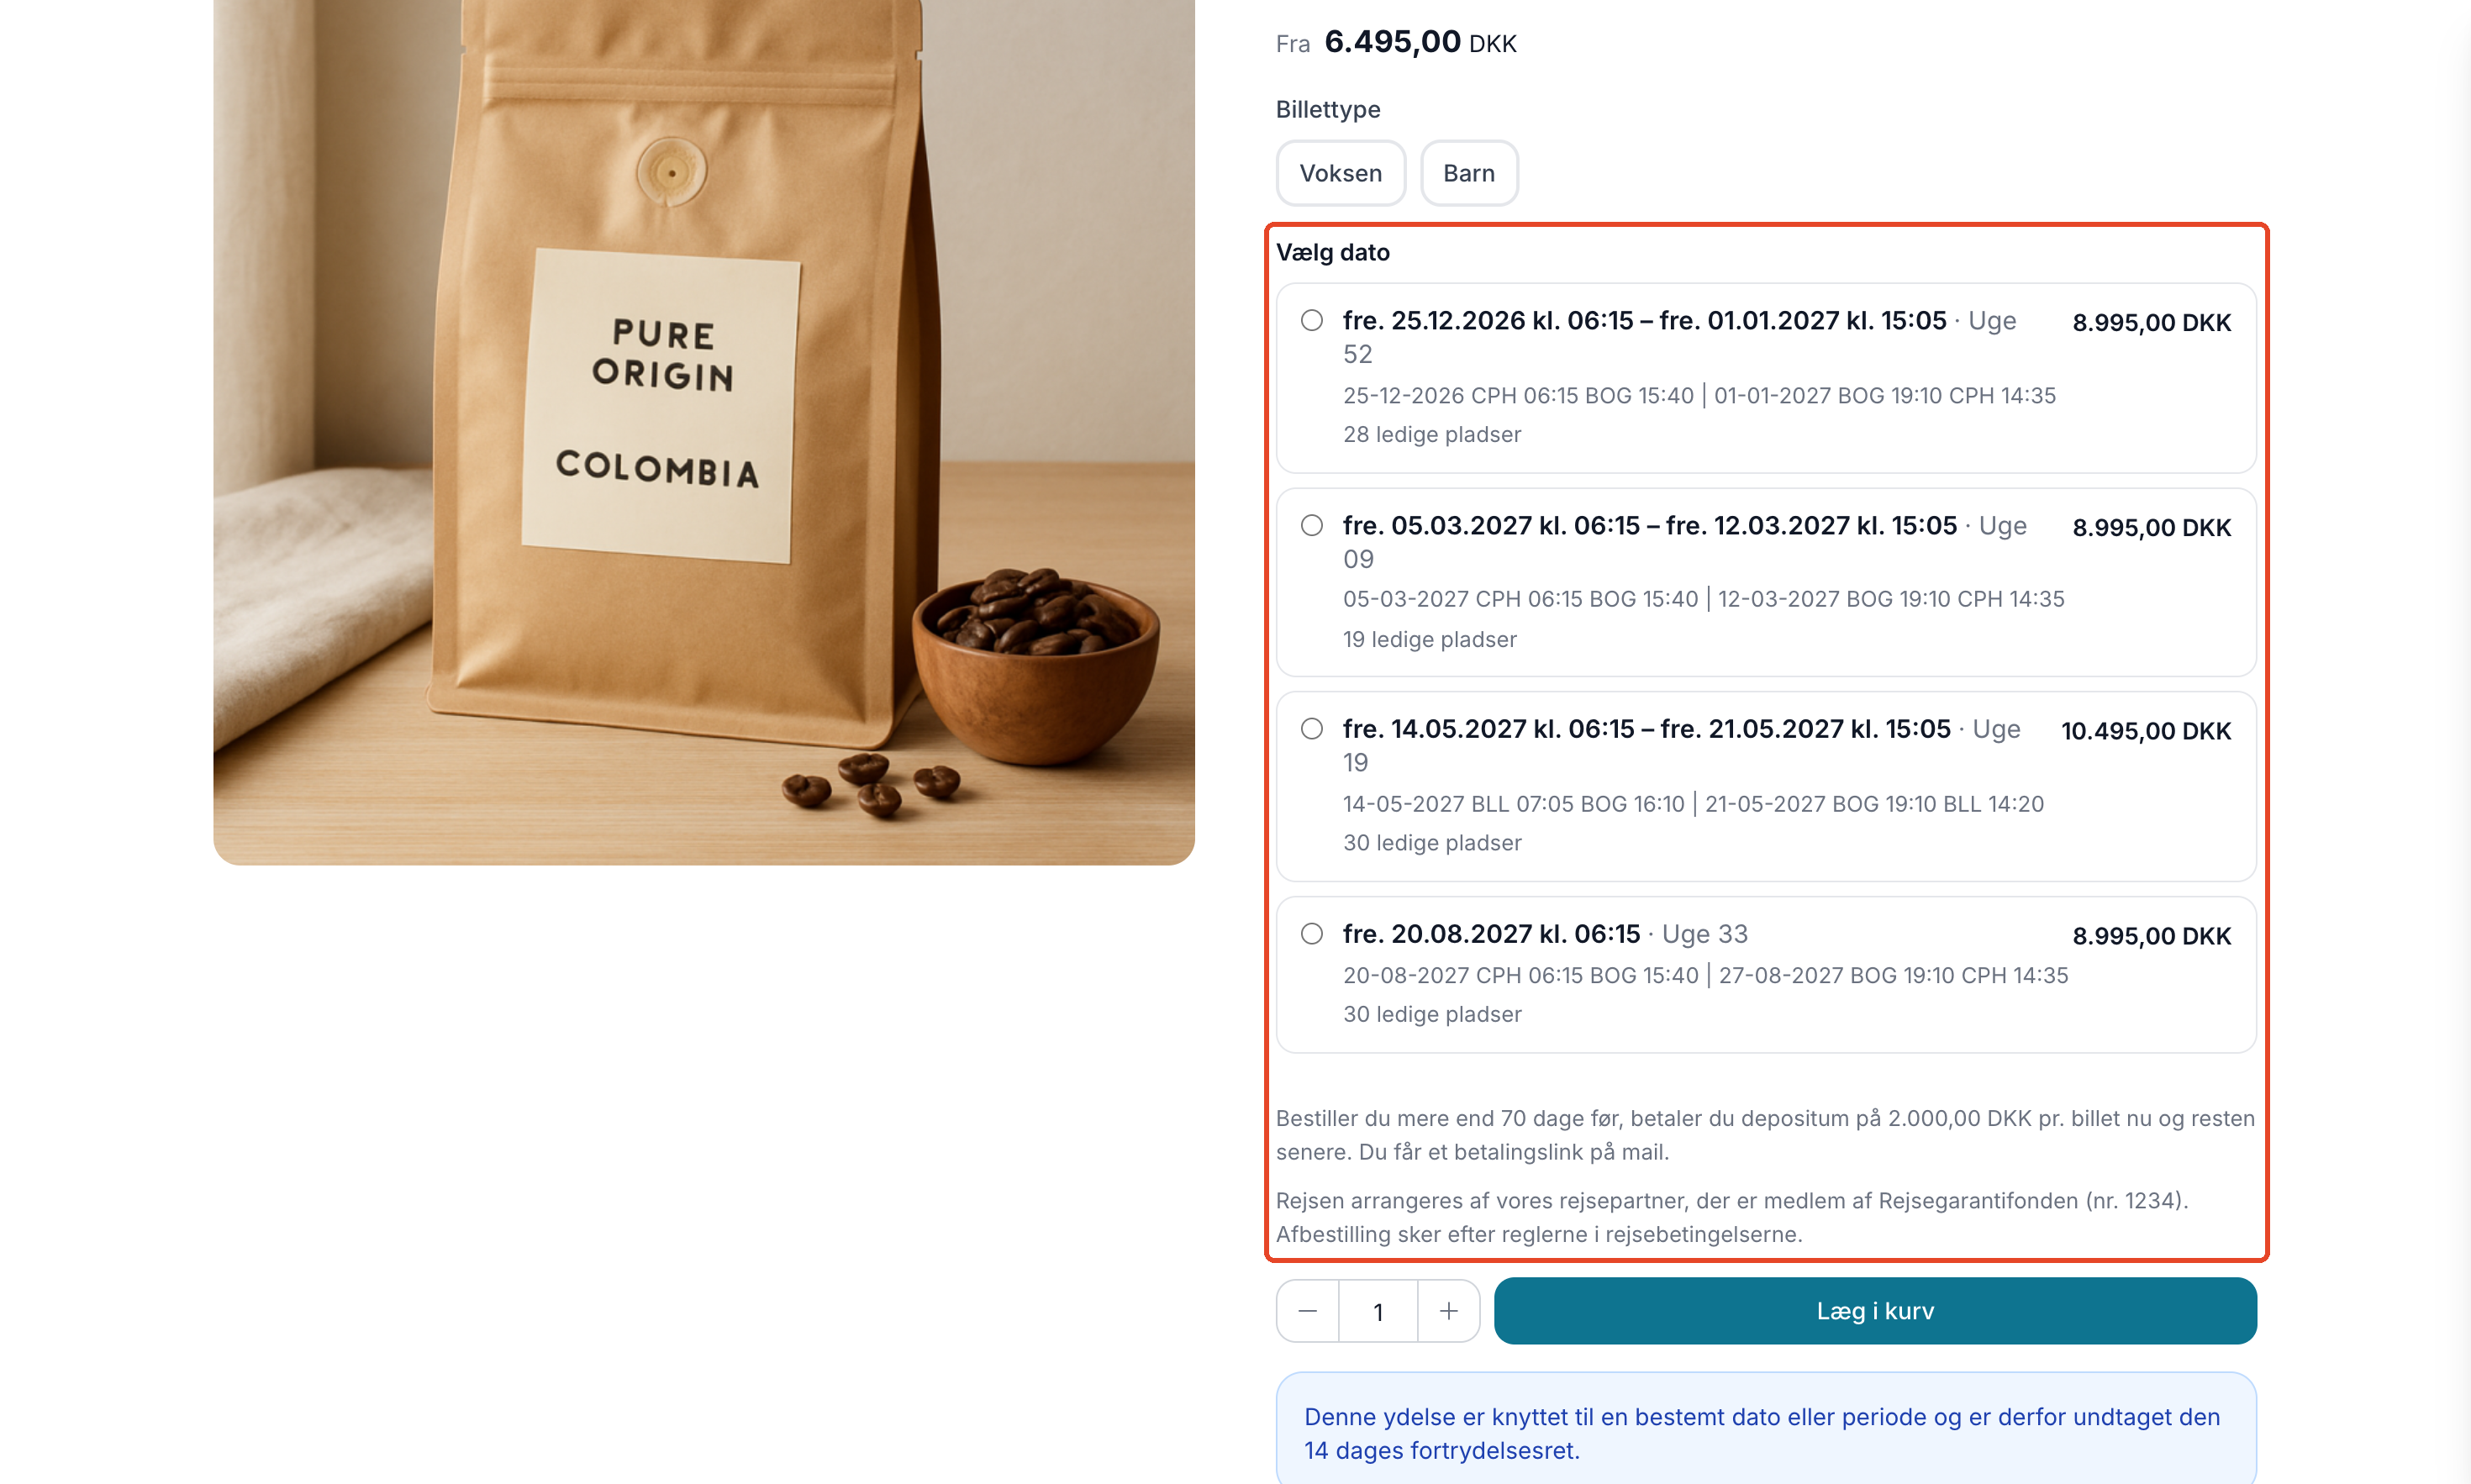
The customer selects a date on the product page
The date selector displays all upcoming dates with prices and available seats. When five or fewer seats remain, it says, for example, “Only 3 seats left,” and a fully booked date is marked as sold out. The number of available spots is refreshed every time the page is loaded, so the customer doesn’t see an outdated number. If the item has only one available date, it is preselected.
The participants’ names are included at checkout
For each item, you decide whether you only need the buyer’s name, one name per participant, or the name and birthday of each participant—for example, for a tour operator. You can also ask each participant for their email, phone number, company, allergies, and dietary preferences—or up to three custom fields of your own choosing—and make these fields required. The customer fills out these fields for each ticket at checkout and can edit them on their ticket page until the sale closes. The information is automatically deleted 12 months after the date, and you can change this to 3, 6, 24, or 36 months. The order itself is still stored, as required by accounting law.
Tickets with QR Code, PDF, and Calendar File
Once the order is paid, the customer receives an email with a QR code for each ticket and the tickets attached as PDFs formatted for mobile devices, so they can be viewed even without an internet connection. The email links to the customer’s ticket page, where the QR codes are ready for their phone, and where the customer can download all tickets as PDFs or print them on A4 paper, add the date to their calendar, and edit the names. 48 hours before the event, the customer receives a reminder with the time and location.
If you sell travel packages, you can disable the QR codes. In that case, the customer will instead receive a booking confirmation with the date and participants.
Check-in with your phone at the door
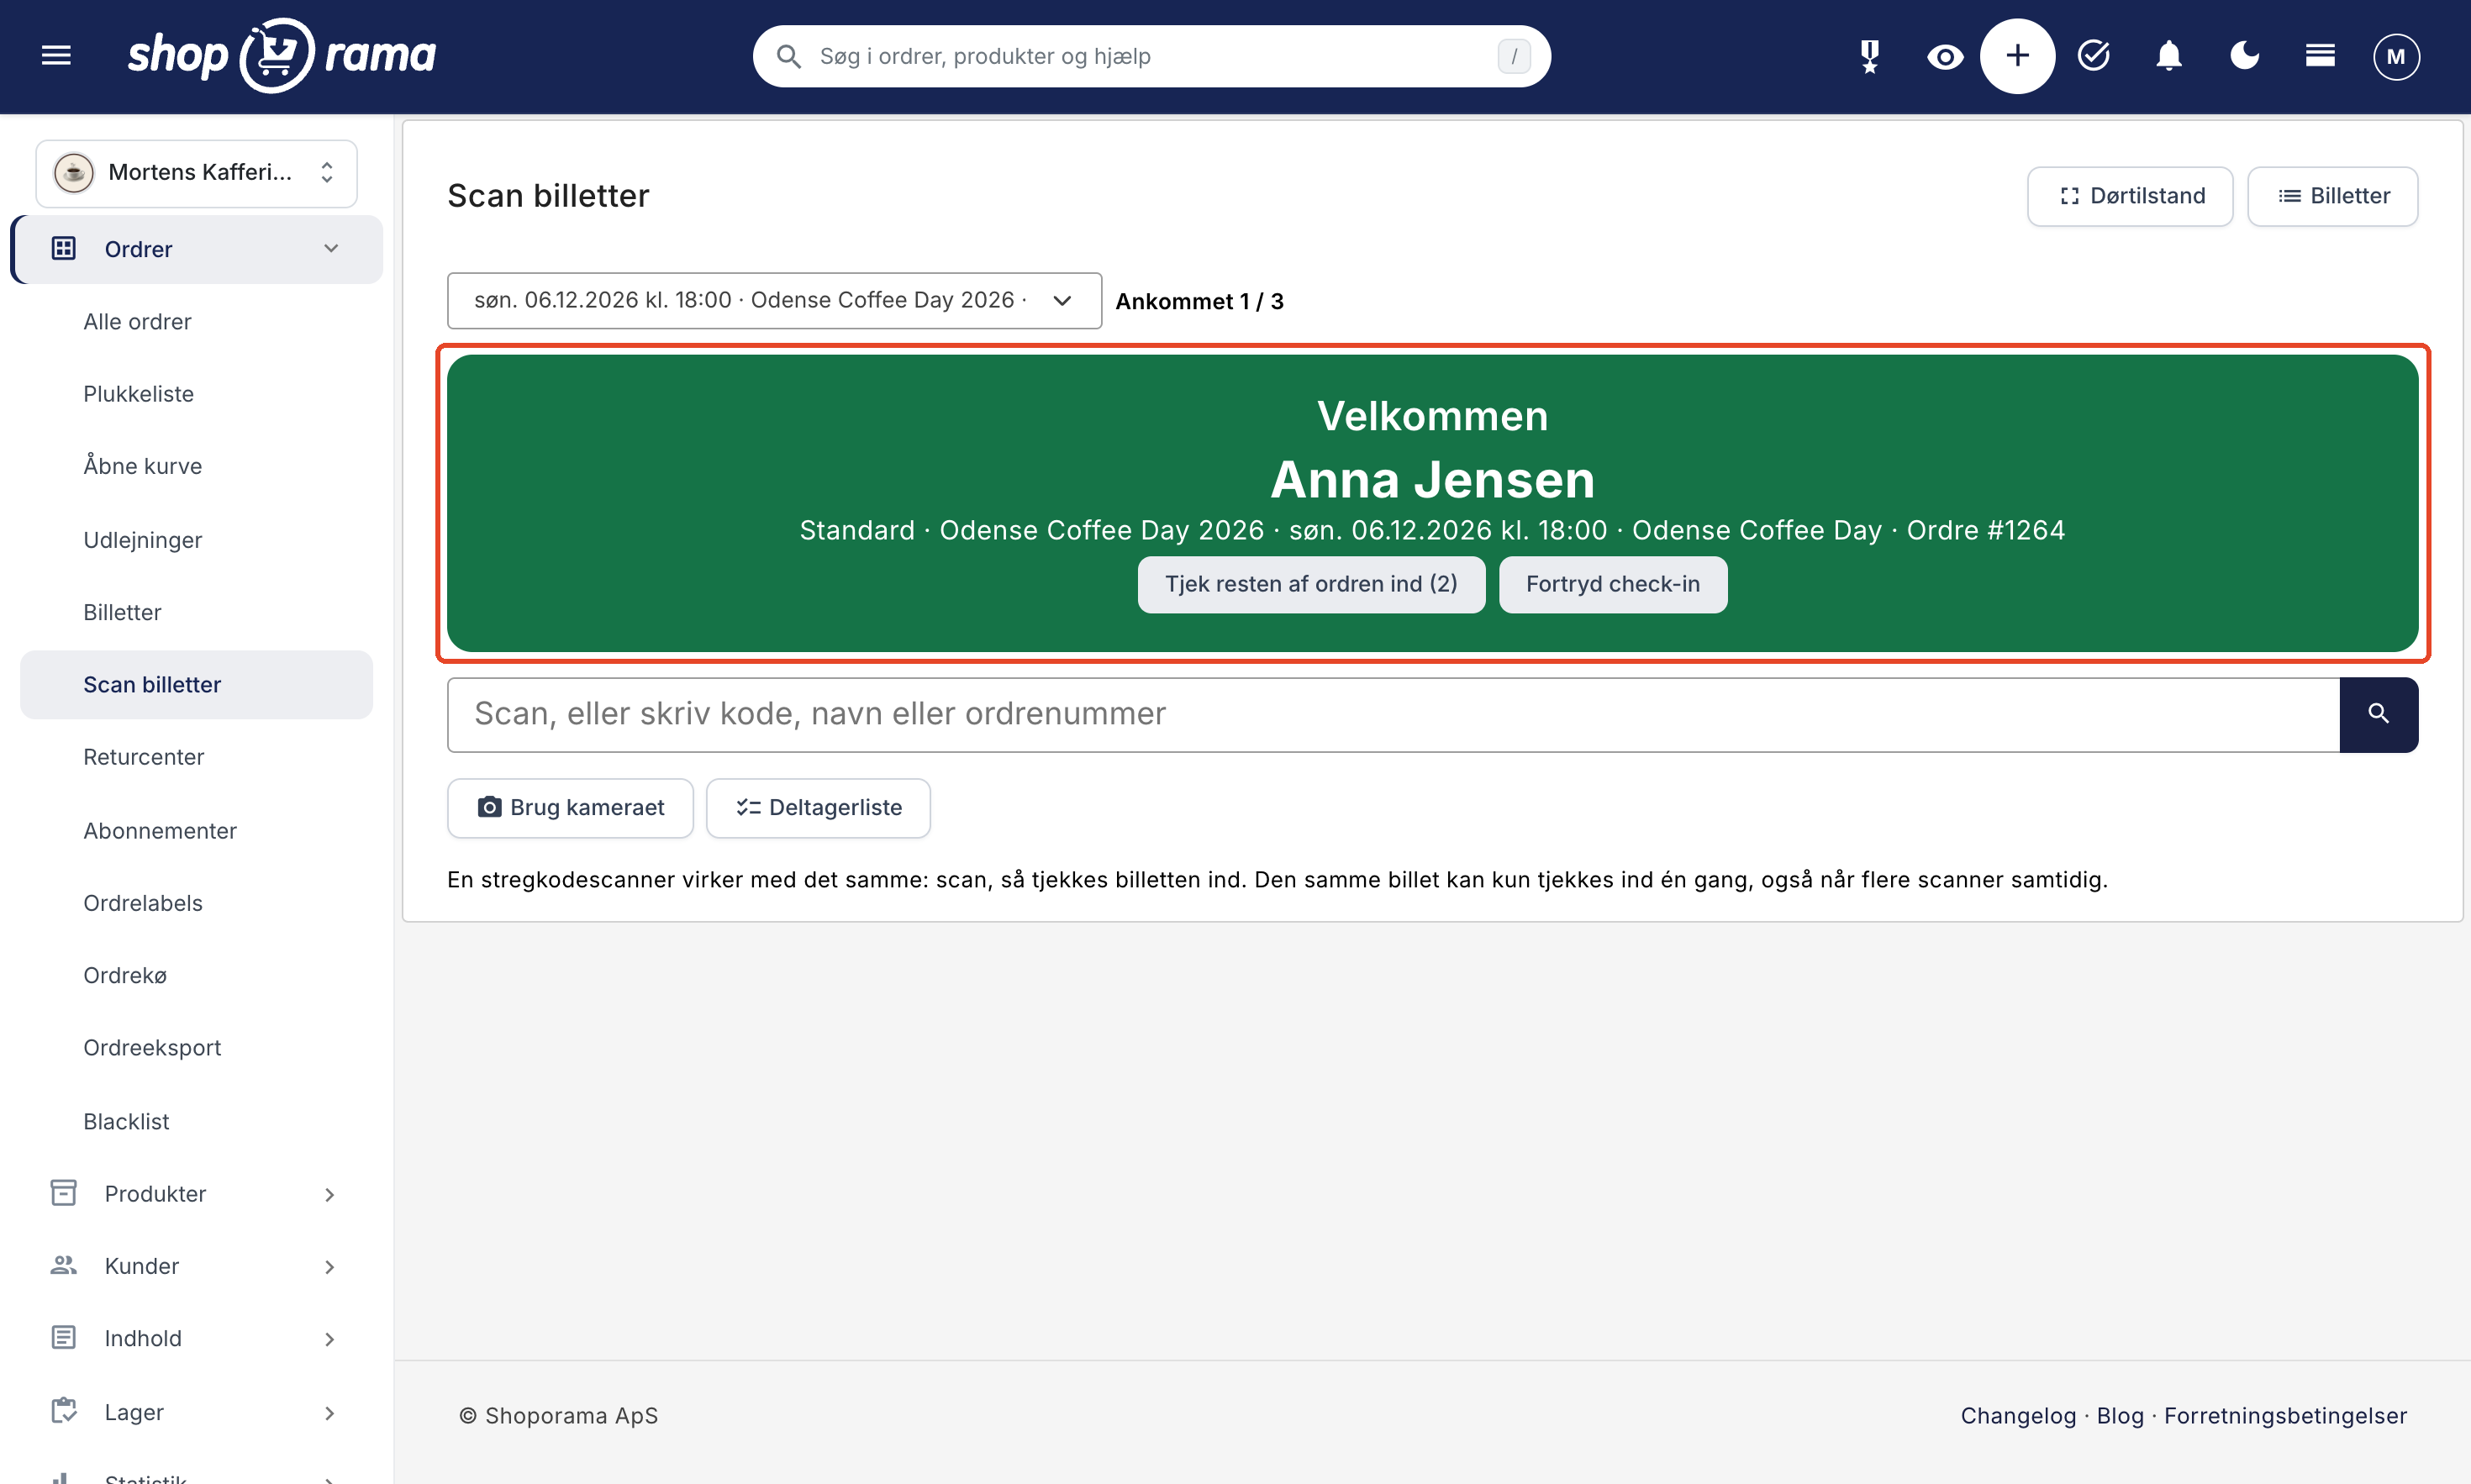
At the door, open “Scan Tickets” in the admin panel on a phone or tablet. You can scan using your phone’s camera, a USB or Bluetooth barcode scanner, or enter a code, a name, or an order number. The result fills the entire screen: green means welcome, orange means the ticket has already been checked in, and red indicates, for example, an incorrect date or a canceled ticket. The same ticket can only be checked in once, even if multiple people scan it at the same time.
Door Mode displays the scanner in full-screen mode without the menu, and it can be added to the phone’s home screen. Assign the “Door Staff” role to the volunteers at the door, so they can only scan tickets and view the participant list. They won’t see any orders and can’t export anything.
Waiting List When the Date Is Sold Out
On a sold-out date, customers can sign up for the waitlist using their email address. If a spot becomes available—for example, because someone else cancels or because you add more seats—the first people on the list will automatically receive an email. No spots are reserved for them, so the first person to book gets the spot. You can also notify everyone on the list yourself right away.
Deposit Now, Pay the Rest Later
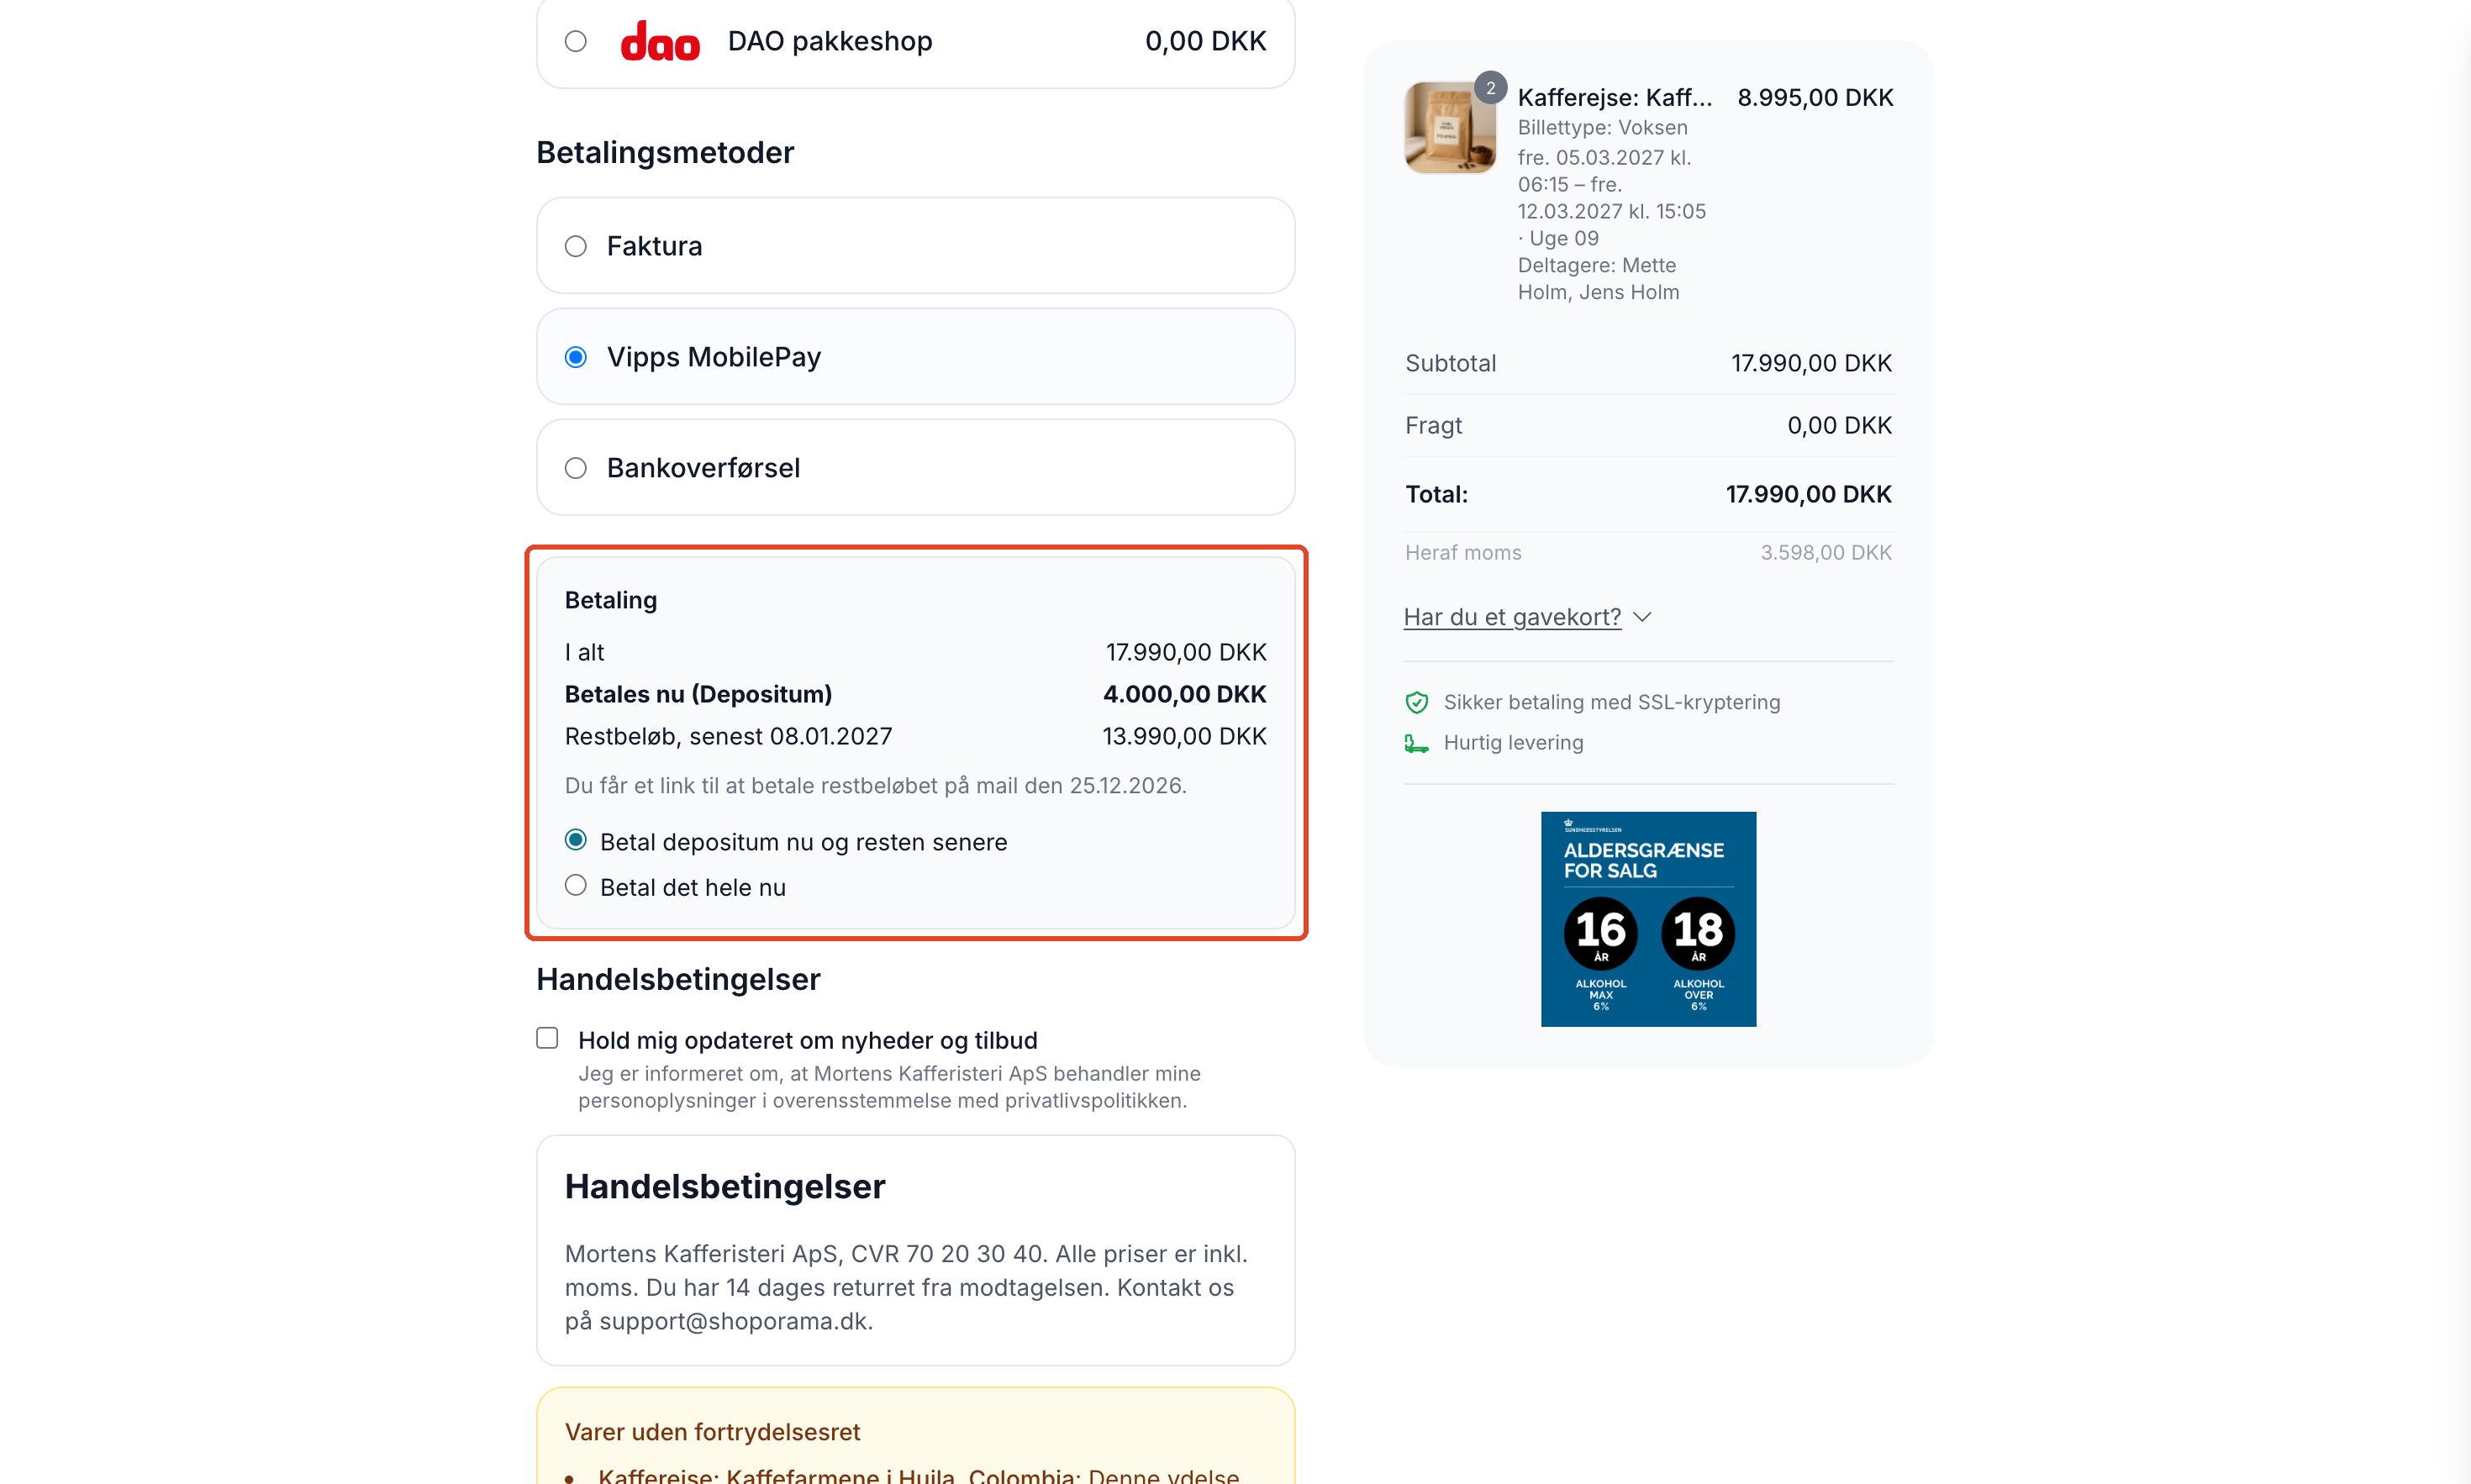
Trips and courses are often booked well in advance. If you combine the tickets with installment payments, the customer pays a deposit at the time of booking, and the remainder is automatically charged via a payment link before the departure date. Using the “Travel” template, the customer pays 2,000 DKK per person now, and the link for the remaining balance is sent by email 70 days before departure. If the customer books later than that, the entire amount is paid immediately.
The deposit and the remaining balance are treated as two separate orders, each with its own invoice and correct VAT, so the accounting system receives two standard invoices. If the remaining balance has not been paid, the scanner at the door highlights this in orange.
Overview of Dates and Participants
Under Orders → Tickets, you’ll see all upcoming dates with sold tickets, seats, how many have checked in, and how many are on the waitlist. The icons indicate whether a date is on sale, sold out, canceled, or below the minimum requirement when sales end within 7 days.
The participant list for a date can be used on your phone at the door, exported to Excel (CSV), and printed. With “Send to All,” you can send an email to everyone who has purchased a ticket for that date, and if you cancel a date using the “Cancel” button and notify participants on the date’s page, all participants will receive an email about it. You can credit the orders afterward as usual.
What You Need to Know
- The theme. The date picker, participant fields at checkout, and deposit are displayed in the built-in themes Montana, MontanaB2B, Delaware, and DelawareDK. In a custom theme, an item with only one date can still be purchased. Email support@shoporama.dk if you’re using your own theme.
- No seat assignments. Tickets are for events with open seating. There are no numbered seats.
- No marketplace. Customers find the event in your online store. Shoporama is not a ticketing portal that markets it for you.
- The scanner requires an internet connection. There is no offline mode.
- Refunds for cancellations are processed manually. If you cancel using the “Cancel and Notify Participants” option on the event page, participants will receive an email, but you must refund the money by crediting the orders.
- Only in the online store. Tickets are not sold through the POS system, and ticket items are not included in Google Shopping or other regular product feeds.
- Right of withdrawal. Ticket items are automatically marked as exempt from the right of withdrawal because they are tied to a specific date. You can change this yourself on the product page.
Get started
Enable tickets on a product profile, enter the dates for the item, and you’re all set. Read how in the article about tickets. Check-in at the door and the role of door staff are covered in the article about scanning tickets, and deposits and final payments are covered in the article about installment payments. If you have any questions, please email us at support@shoporama.dk.