Quick Inventory Entry: Add Items to Inventory Using a Barcode Scanner
Scan a barcode or an item number, enter the quantity, and the items are in stock. Here's how to use Shoporama's quick inventory entry feature for receiving goods, including items with variants.
Receiving goods is one of those tasks where time just flies by. For each item, you have to open the product list, search for the item, click on it, find the inventory field, enter the quantity, and save. Quick inventory entry cuts that down to three steps: scan the barcode, enter the quantity, and press Enter.
What Quick Inventory Entry Does
The page looks up one product at a time based on the item’s code and lets you add a quantity to inventory immediately. It searches for both the item’s barcode and its SKU, so you can scan whatever’s printed on the box. The barcode is called a GTIN in Shoporama—that is, the number under the bars on the packaging, typically a 13-digit EAN-13. The item number is called the SKU and is your own number for the item. You don’t need to find the product in the list first.
Here’s how to find the page
Go to Inventory, Quick Inventory Entry in the menu on the left. The page opens with a single field where the cursor is ready, so a scanner can enter the code immediately.
You can also access it from Inventory> Inventory Movements, where there’s a search field at the top of the page. Both paths lead to the same place.
Step by step
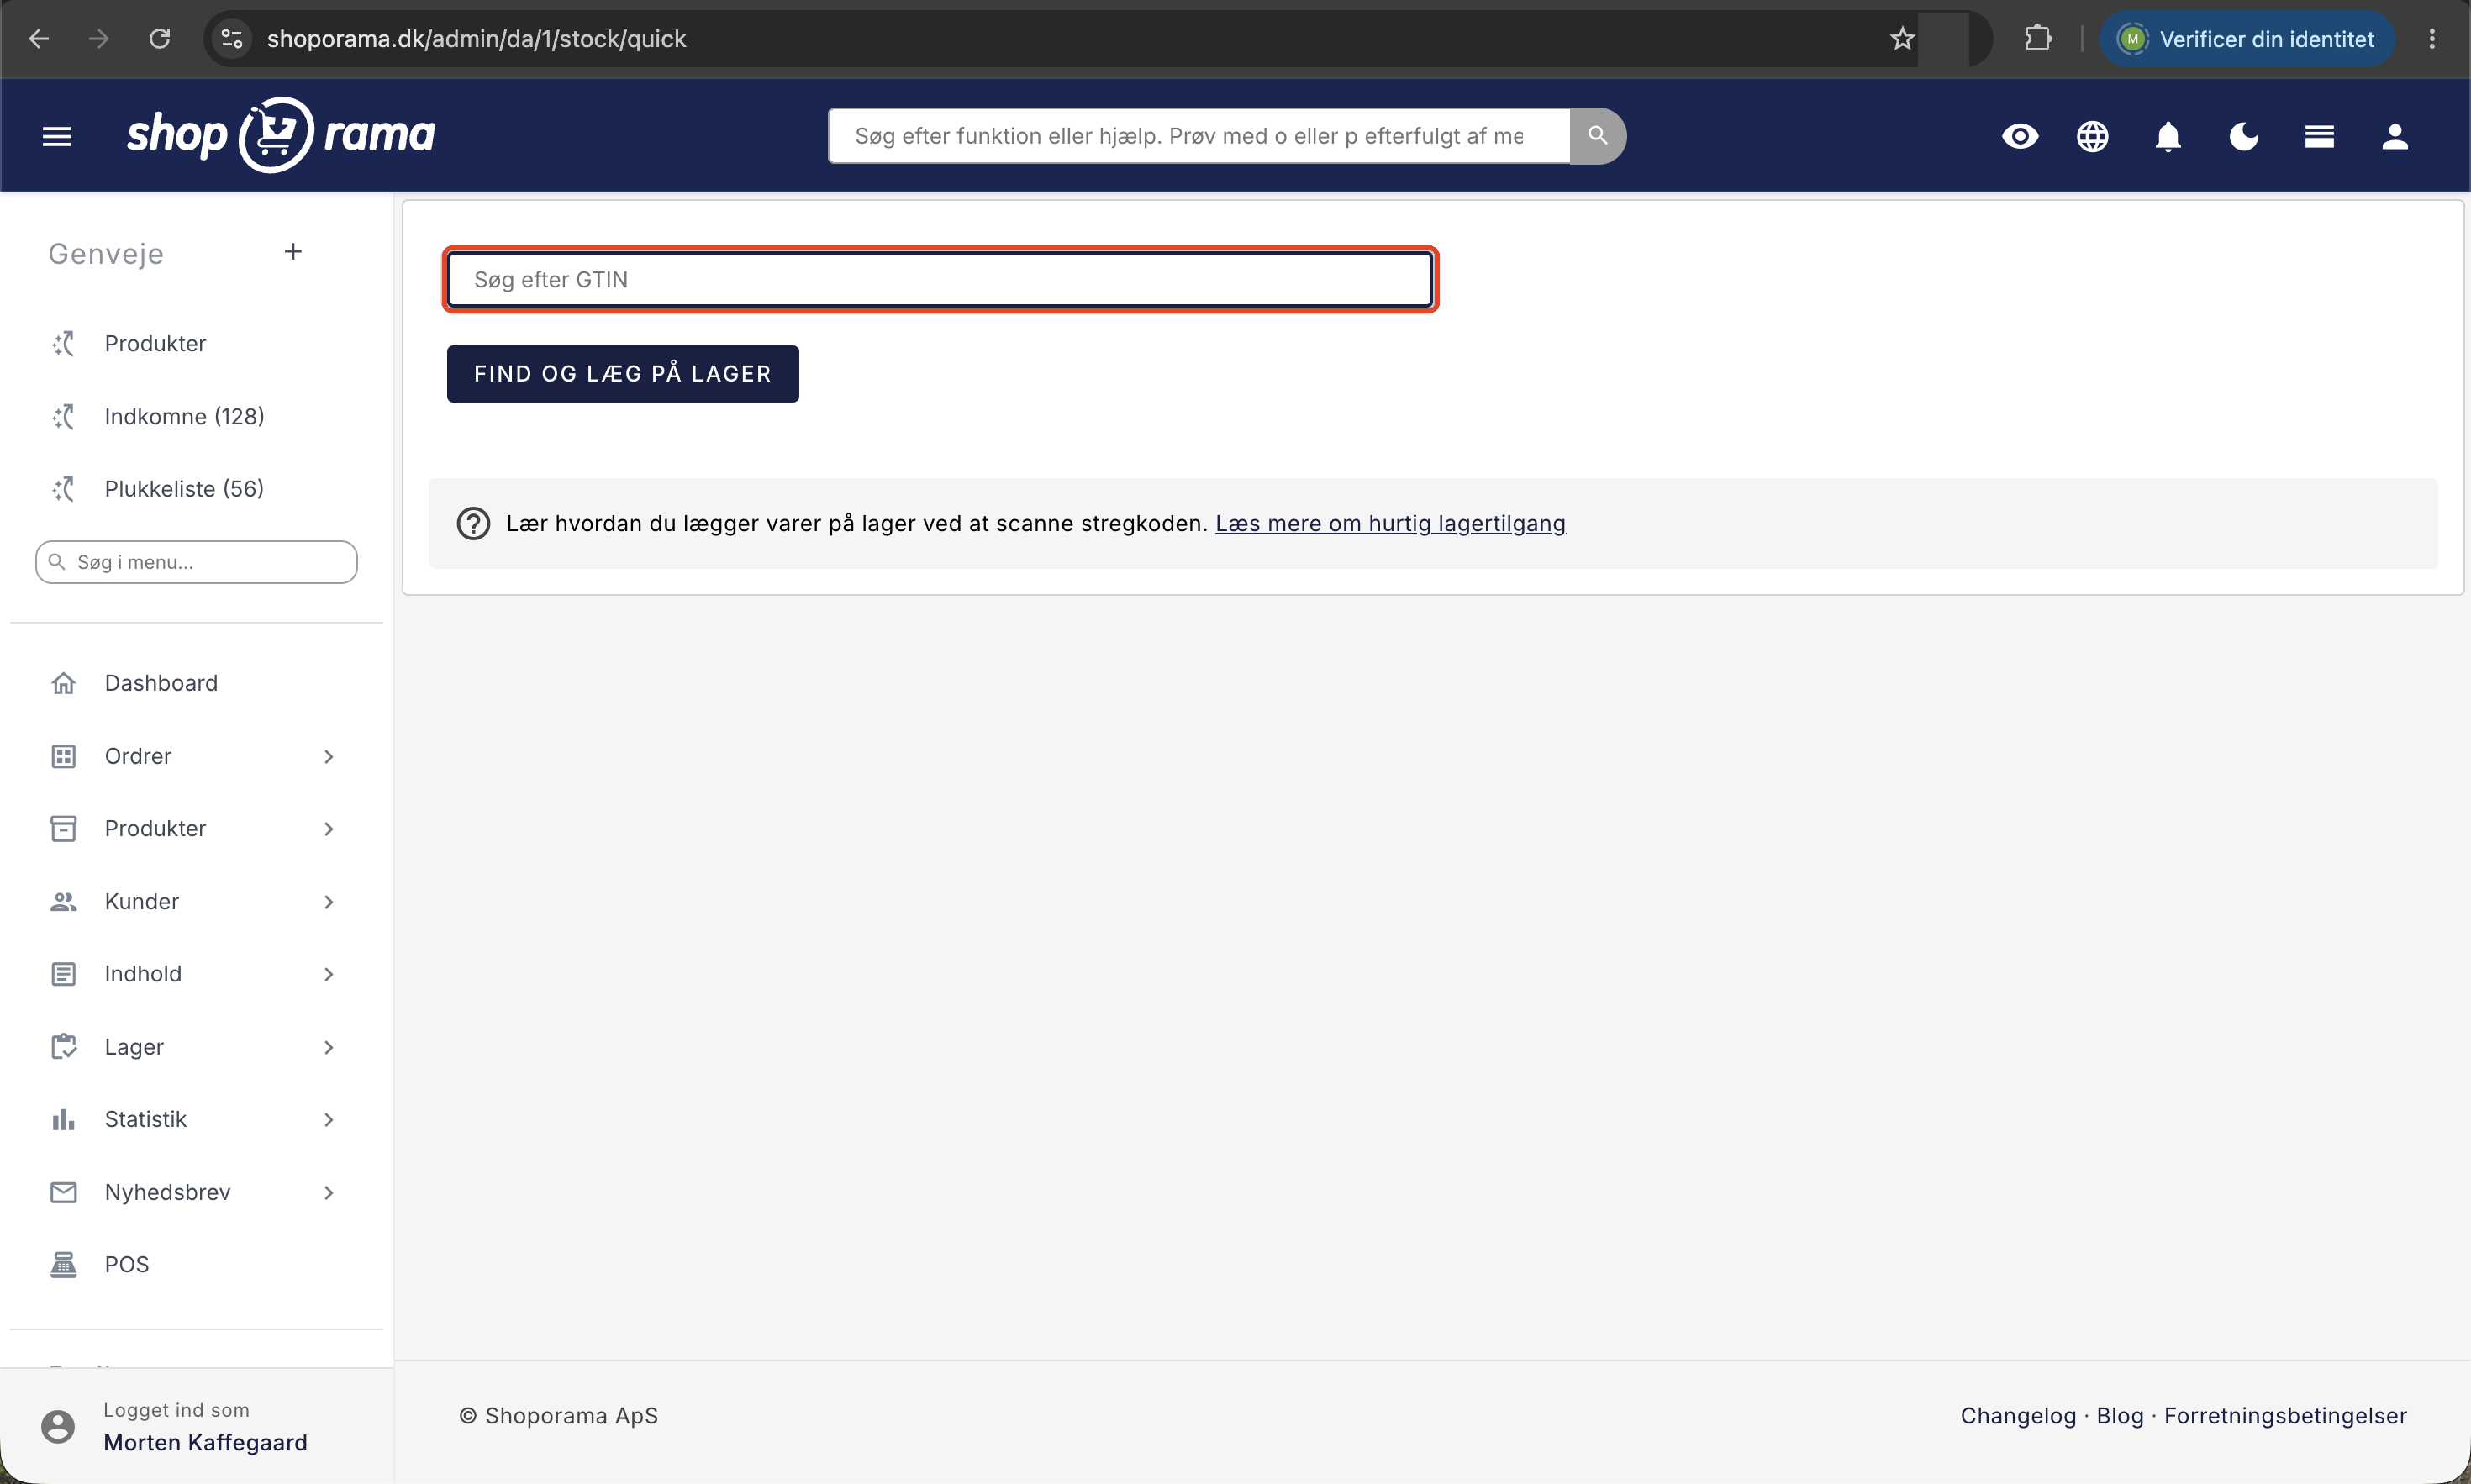
- Go to Inventory, Quick Inventory Entry.
- Scan the item’s barcode into the “GTIN or SKU” field. If you don’t have a scanner, type in the code or item number.
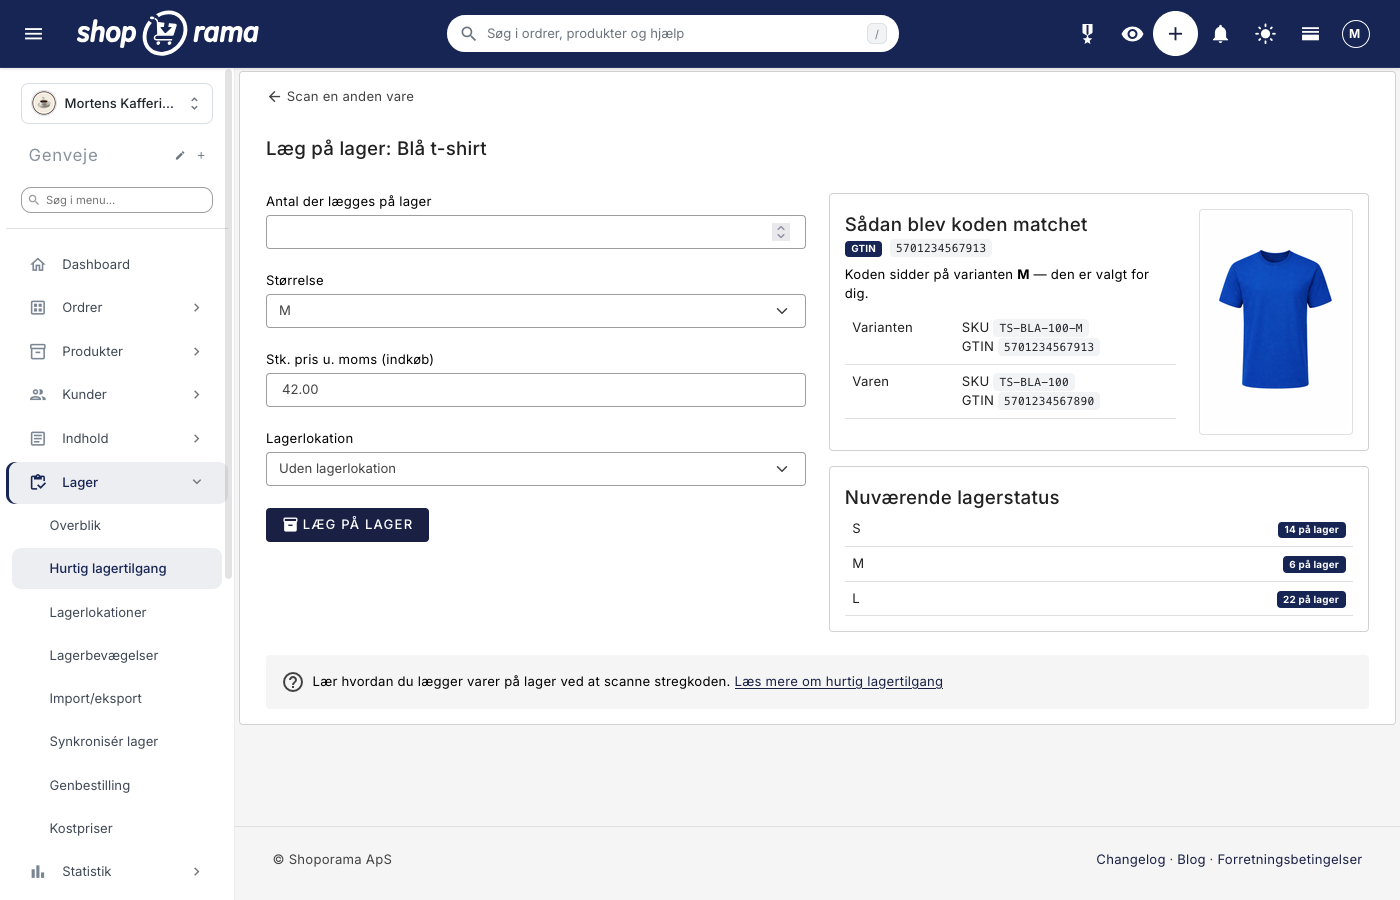
- Click “Find Item.” You’ll be taken to a page titled “Add to Inventory” followed by the product’s name, so you can verify that it’s the correct item.
- Enter the quantity in the “Quantity to Add to Inventory” field. The field is already selected, so you can start typing right away.
- If the item has variants and the code didn’t match a specific variant, select the correct one from the list.
- Check the “Unit Price Excl. Tax (Purchase)” field, which shows the cost price per unit excluding tax.
- If you use warehouse locations or batch management, select the location and batch in the fields below.
- Click “Add to Inventory.” You’ll return to the scan field with a receipt at the top, so you can simply scan the next item.
What You See on the Page
The left side is where you enter data. The right side is your overview, so you can quickly spot if you’ve scanned the wrong item.
- The product image in the right corner is the quickest way to check whether you’ve scanned correctly.
- "How the code was matched" tells you whether the code was found as a GTIN or SKU, and whether it matched a specific variant. Below that are the item’s and variant’s own codes, so you can tell the difference between a variant barcode and the item’s general barcode.
- "Current Stock Status" shows how many items are currently in stock. If the product has variants, each variant gets its own line.
- "Backorder" appears for items without variants if the inventory has gone into the negative. The number indicates how many you still need to deliver.
- "Location" appears if you’ve entered a location for the product, such as a rack or a shelf.
The code must be on the item first
The lookup only works if the code is stored on the item. Open the product under Products, expand the Inventory Management section, and enter the code in the GTIN field, where it says “Barcode, e.g., EAN-13” below. The item number is listed in the SKU field in the same place. If the product has variants, there are both a GTIN and an SKU column in the variant table further down, so each size or color can have its own codes.
If you need to assign codes to many products, you can do so via product import. The system searches for the barcode first and then for the product number, so a product that only has an SKU can also be scanned in. However, secondary fields such as SKU, MPN, and product name will not yield any results.
Items with Variants
If the product has variants, an additional list appears. It’s named after your variant classification, such as Size or Color. The entry is assigned to the exact variant you select. There are two scenarios, and it’s important to understand the difference:
- You scan a variant code. If each size has its own GTIN or SKU, Shoporama finds the product and automatically selects the correct variant. Then you just need to enter the quantity. If, by mistake, the same code has been assigned to multiple variants, the site won’t select any of them, and you’ll have to choose yourself.
- You scan the product’s common code. In this case, the system doesn’t know which variant you have, and the list displays “Select variant.” You can’t save your order until you’ve made a selection, so the items can’t accidentally end up in the wrong size.
This is the main reason for assigning each variant its own barcode: it allows a person with no product knowledge to process incoming goods. Read more about product profiles and variants. Note that a product can have only one variant axis—that is, either size or color, but not both.
The price you enter is the cost price
The “Unit Price excl. Tax (Purchase)” field shows what the item cost you per unit when you purchased it, excluding tax. This is not the selling price, and it remains unchanged.
- The field is pre-filled. If the code corresponds to a variant with its own cost price, the variant’s price is displayed; otherwise, the product’s price is shown. If you change the variant in the list, the price updates accordingly.
- Both commas and periods are accepted as decimal separators. 39 .68 and 39 ,68 are treated the same.
- If you leave the field blank, the items will still be added to inventory, but they won’t be included in your inventory value. However, they will be included in the quantity over which the average price is calculated, so the value per unit will be lower.
- The price is saved only for the receipt itself. The product’s fixed cost price is not updated for this reason.
If you also need to adjust the fixed cost price, you can do so on the product page or via the Cost Price page. For information on how your total inventory value is calculated, see “How is the inventory value calculated?”
How to Use a Physical Barcode Scanner
A standard barcode scanner functions like a keyboard. It enters the digits where the cursor is located, and most automatically send an “Enter” afterward. No installation or setup is required in Shoporama.
- Open Inventory, Quick Inventory Entry. The cursor is already in the field.
- Scan the item’s barcode. If the scanner sends an Enter, the page will search automatically.
- Now the cursor is in the quantity field. Enter the quantity from the register and press Enter.
- You’ll return to the scan field with the cursor ready. Scan the next item right away.
At the top, you’ll see a receipt for what you just added, for example, “+5 Blue T-shirts (M)” and the current total quantity in stock. It remains on the screen while you scan the next item, so you’ll notice right away if a quantity was entered incorrectly.
If the scanner isn’t working properly, test it in a regular text field. If it doesn’t send an Enter, press the Enter key yourself. If incorrect characters appear, the scanner is typically set to a keyboard layout other than Danish; you can adjust this in the scanner’s manual.
When the code isn’t found
If the code doesn’t match either the GTIN or SKU of any item, you’ll see a page titled “No item found.” Nothing will be added to inventory, and no product will be created. You can continue scanning in the field on the left, or click “Create New Item with This Code.” The item will be created with the code set as the GTIN, so you can scan it in right away afterward. The most common reasons a code isn’t found are:
- No GTIN or SKU has been entered for the product yet.
- The code was saved with a space, a hyphen, or an extra character. It must be entered exactly as the scanner reads it.
- You’re scanning a variant barcode that isn’t saved in the GTIN column for that variant.
- The item is in one of your other stores. The search only looks in the store you’re currently in.
- The item is in the trash. Deleted products will not be found.
- You’re scanning a code on the outer packaging—for example, a 14-digit package code—instead of the product’s own EAN-13.
What Happens Automatically
- The item can go back online. If the “Online when back in stock” option is enabled for the product, it will become visible in the online store the moment stock becomes available.
- Customers on the waiting list are notified. If customers have signed up to receive an email when the item is back in stock, it will be sent. View emails when items come back in stock.
- Shared inventory is synchronized. If you run multiple stores from the same warehouse, the other stores will also receive the new stock.
- The inventory value is updated. The figure is calculated overnight, so your new stock is included the next day.
Inventory Location and Batch
If you use warehouse locations or batch management, you can handle product receipt right here on this page. These fields only appear if your store uses them.
- Warehouse location. If you’ve created warehouse locations, use the Warehouse Location field to select where the items are physically stored. If you select none, the items will be assigned no location and will appear in the “No warehouse location” column in the inventory overview. The field is reset between each item, so it must be selected each time.
- Batch and Lot Number. If you’ve enabled batch management, you can either select one of the product’s existing batches or enter a new number in the “Or Create New Batch” field. The list shows only batches associated with the product you’ve scanned. A batch you create here will only have the number itself; you’ll need to fill in the expiration date, supplier, and notes later under Inventory> Batches. When the item is sold, the system automatically deducts from the oldest batch with available stock.
What the page intentionally does not do
- Bulk processing. It handles one product at a time. If you need to update hundreds of item numbers, updating inventory using a CSV file or uploading supplier delivery slips is clearly faster.
What it’s worth
If a manual inventory update takes 40 seconds per SKU and a scan takes 5, you save 35 seconds per item. If you receive 60 SKUs per week, that adds up to a good 30 hours per year. On top of that, there are fewer errors because the item is identified based on the code on the packaging rather than on two SKUs that are confusingly similar.
For those with a technical background
- The codes can be found in two places: on the product as a whole and on each individual variant. The lookup attempts the product level first and then falls back to the variant level. The GTIN is looked up before the SKU.
- If two products have been accidentally assigned the same GTIN, only one will be found. If the same code appears on multiple variants of the same item, the site does not select a variant in advance. Clean up duplicates if you actively use barcodes.
- The quantity field accepts negative numbers. If you enter -3, three units are deducted from inventory. This is a quick way to correct a receiving error.
- If you have disabled “Use Inventory Management with Entries” at the bottom of Inventory Movements, the quantity will be added to an existing inventory line instead of being saved as a separate entry. In that case, the cost price from the receipt will not be retained.
Frequently Asked Questions
Where can I find this page?
Under " Inventory," " Quick Inventory Receipt " in the left-hand menu. The search field at the top of "Inventory," "Inventory Movements" leads to the same place. If you can’t find the option, type "scan" or "barcode" in the menu search bar above the menu.
Can I scan our own product number and not just the barcode?
Yes. The field is labeled “GTIN or SKU.” The page first searches for the barcode and then for the product number, and both are used to look up the product and its variants. If you’ve assigned a product number to each size, scanning the supplier’s SKU label will match the correct variant. The “How the code was matched” card shows which of the two resulted in a match.
Which barcode scanner should I buy?
There’s no specific model. Any handheld scanner that transmits the characters as if they were typed on a keyboard will work, and virtually all USB and Bluetooth scanners do this. Make sure it uses a Danish keyboard layout and that it sends an Enter key press after the code.
I don’t have barcodes on my items. Can I still use this?
Yes, if the items have an item number. The page also searches by SKU, so you can type or scan your own number from the shelf edge or the packing slip. If the item has neither a barcode nor an item number, the page won’t find anything, and in that case, it’s easier to update inventory directly on the product or via a CSV file.
Why does it say “Select variant”? It used to be selected by default.
Because the code matched the item and not a specific variant. Previously, the list was set to the first variant, so a shared barcode could assign the entire shipment to, for example, size S, without anyone noticing. Now you have to select it yourself, and you can’t save until you’ve done so. If the code matched a specific variant, it’s selected for you, and it says “How the code was matched” on the card.
It says “No item found.” What should I do?
This means the code doesn’t match the barcode or item number of any product in the shop. First, check whether you scanned a code on the outer packaging instead of the item’s own code. If the item doesn’t exist yet, click “Create new item with this code.” The item will be created with the code set as the GTIN, so it can be scanned right away.
I entered the wrong quantity. What should I do?
The receipt at the top shows what you added and how many are now in stock, so the error is easy to spot. Scan the item again and enter the quantity with a minus sign in front, for example, -45, if you accidentally added 50 instead of 5. Alternatively, go to Inventory Transactions, find the entry, and click “Edit,” where you can correct the quantity and cost price or delete the entry.
Do I have to enter the cost price every single time?
No. The field is already filled in, and if the barcode matches a variant with its own cost price, that variant’s price will be displayed. You only need to change it if the supplier has changed the price. Remember that the price must be exclusive of sales tax, and that items added to inventory without a cost price are not included in the inventory value.
Can I see who added the items to inventory?
Inventory Transactions show the item, transaction, cost price, sales price, time, and location, as well as an order number if the transaction resulted from a sale. It does not show which user made the entry, so for auditing purposes, the documentation must be included in the delivery notes.
We use inventory locations. Where do the items end up?
There is a “Warehouse Location” field on the page where you select where the items are placed. If you select none, they are assigned “No warehouse location” and appear in the “No warehouse location” column in the inventory overview. The field defaults to “No Storage Location” every time, so you must select a location for each item. If you forget to do so, you can correct the location later under “Edit” on the entry.
Can I create the batch number while I’m at the checkout?
Yes, if your store uses batch management. You can either select one of the item’s existing batches or enter a new number in the “Or create a new batch” field. The batch is assigned only the number itself; you’ll fill in the expiration date, supplier, and notes later under Inventory > Batches. When a sale is made, the system automatically deducts from the oldest batch with inventory.
We receive 300 item numbers at a time. Is scanning still the right way to go?
No, not for this kind of thing. For large deliveries, a CSV file or uploading the supplier’s packing slip is much faster because the entire file is processed at once. Scanning makes the most sense for ongoing receipts, backorders, returns, and inventory counts.
Does the item automatically go back online when I scan it in?
Only if the “Back in Stock” option is enabled for the product under Inventory Management. If it is, the item becomes visible in the store the moment stock turns positive, and customers who have signed up for the waitlist are notified.
Can I use the site without a scanner?
Yes. The field is a standard text field, so you can type in the digits from the barcode and press Enter. It’s still faster than searching for the item in the product list.
If you’re stuck or a code isn’t behaving as expected, please email support@shoporama.dk with the barcode and the product name.
Related articles
Warehouse locations
Learn how to organize your inventory across multiple locations in Shoporama.
Stock records and batch management
Get full traceability of all movements in your inventory. How stock records and batch management work in Shoporama, including FIFO picking,...
Inventory Overview: Your inventory status all in one place
View quantities, variants, warehouse locations, cost prices, and inventory value for your entire product range in a single table. Here’s how to...
Product profiles and variants
Guide to product profiles and variants in Shoporama. Understand how profiles, attributes and variants are related.
Cost Prices and Inventory Value
Fill in any missing cost prices to get a more accurate inventory value and profit margin. Guide to the Cost Prices page.
Related features
Batch Control
Manage batch and lot numbers with expiration dates, supplier tracking, and the FIFO principle. Full traceability from supplier to customer.
Stock integrations
Stock records, stock locations, order list, stock value and automatic notifications. Avoid overselling with Shoporama inventory management.