Print the picking slip and the consolidated picking list
The two printed documents from the picking list: one picking slip per order with a barcode, and a consolidated picking list where the items from all orders are combined and sorted by shelf location.
The picking list can print two different documents: picking slips —one per order—that accompany the package through the packing station, and a consolidated picking list where the items from all orders are combined into a single route through the warehouse. Both are sorted by shelf location, and both are designed to be written on with a ballpoint pen.
Where can you find them?
At the top of Orders → Picking List, you’ll find the two buttons “Picking Slips ” and “Combined Picking List.” They open a new tab where the print dialog appears automatically as soon as the document is loaded. There’s also a Print button at the top if you want to print again. By default, all orders in the picking queue are included—not just the ones on the page you’re viewing.
If you want to include only specific orders, you can select them from the order list instead. A bar will then appear with “Print Picking Slips” and “Print Combined Picking List,” and these options will include only the selected orders.
Picking slip: one slip per order
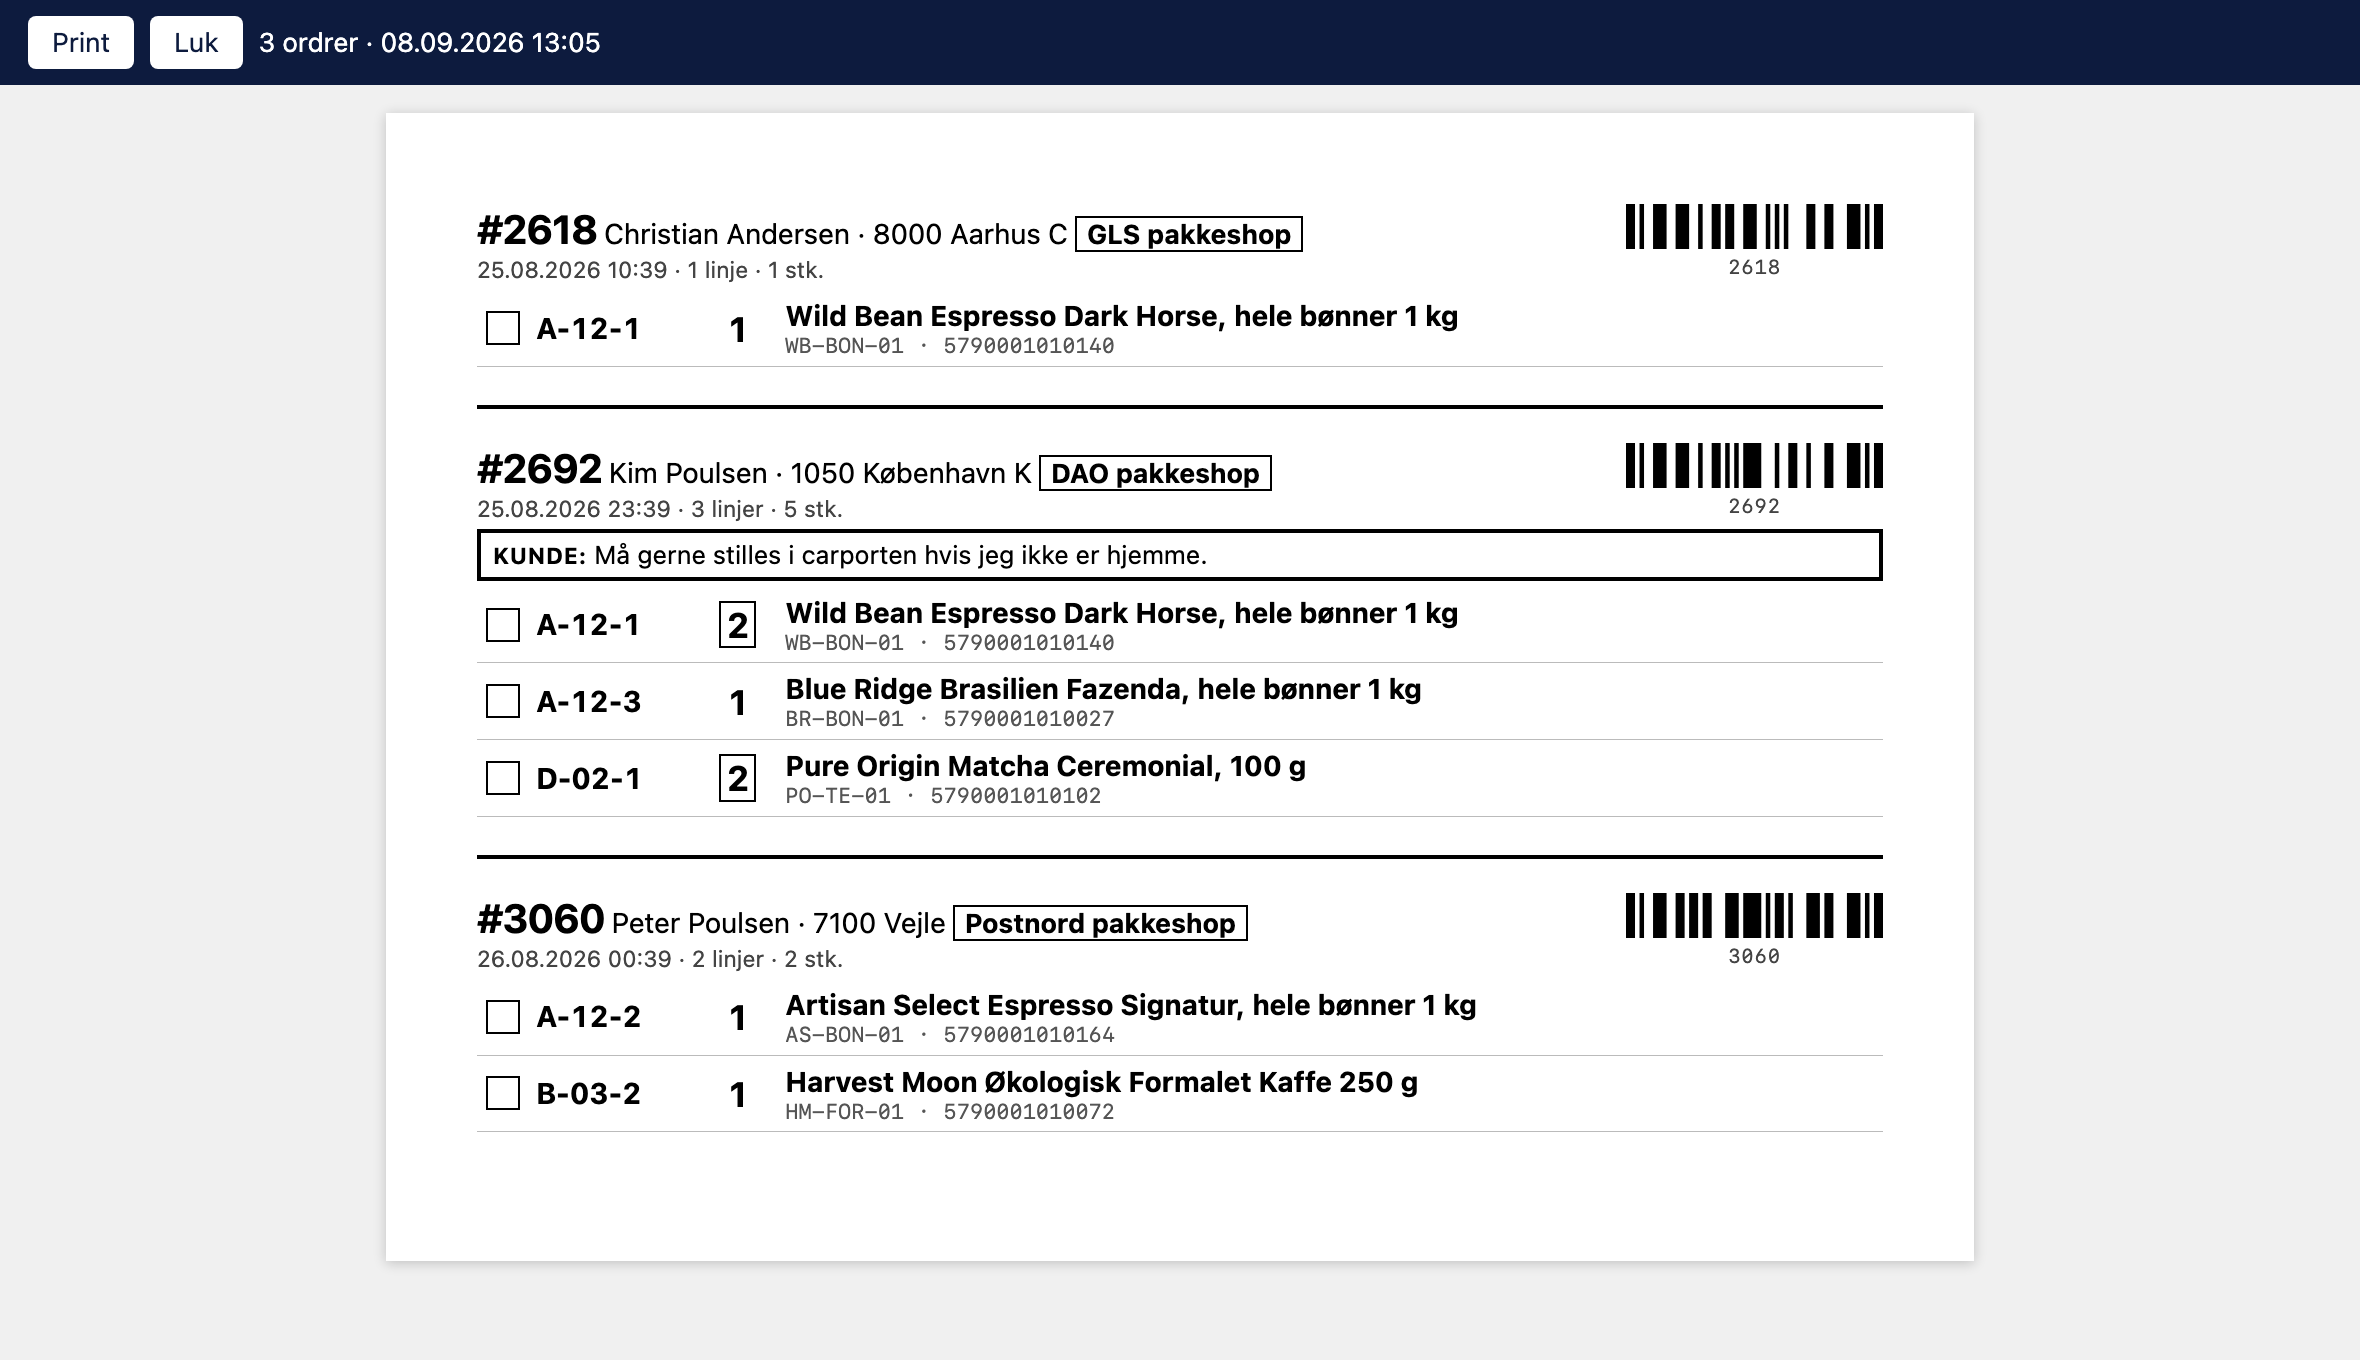
Each order gets its own slip with a thick line separating them, and the slips flow one after another on the sheet. So three short orders share a single sheet instead of using three, and this is intentional: most orders are one to three lines long, and one sheet per order would be a waste of paper. An order is only split across two pages if it’s too long to fit on one.
The slip is structured according to what you need and in what order:
- The order number in large print at the top, with a barcode next to it. The barcode is the order number, so you can scan the slip and jump directly to the order on the screen
- Recipient’s name, ZIP code, and city, so the slip can be matched to the shipping label
- The shipping method in a box. This determines the packaging and which label printer to use, so it’s listed at the very top
- Date, number of lines, quantity, and weight (if calculated), as well as the pickup location if the customer has selected one
- A framed block containing the customer’s comments, the customer’s responses to additional fields, and your internal note. It appears directly below the header, never at the bottom
- Item lines sorted by shelf location, with a checkbox, shelf, quantity, name, variant, item number, and barcode
Why the customer comment appears at the top
"It’s a gift—please don’t include a receipt" isn’t something you notice after you’ve closed the checkout. That’s why this kind of note is displayed in a bold frame directly below the order number instead of as a footnote.
This is intentionally omitted
The picking slip is a work document for the warehouse and not an invoice. That’s why it doesn’t include prices, sales tax, the total amount, payment method, the customer’s email, or phone number. So it’s perfectly fine to leave it on the packing table, and it can go in the trash afterward without anyone giving it a second thought.
If the customer needs a paper copy in the box, you should use the packing slip or the printable invoice instead.
Combined picking list: one trip through the warehouse
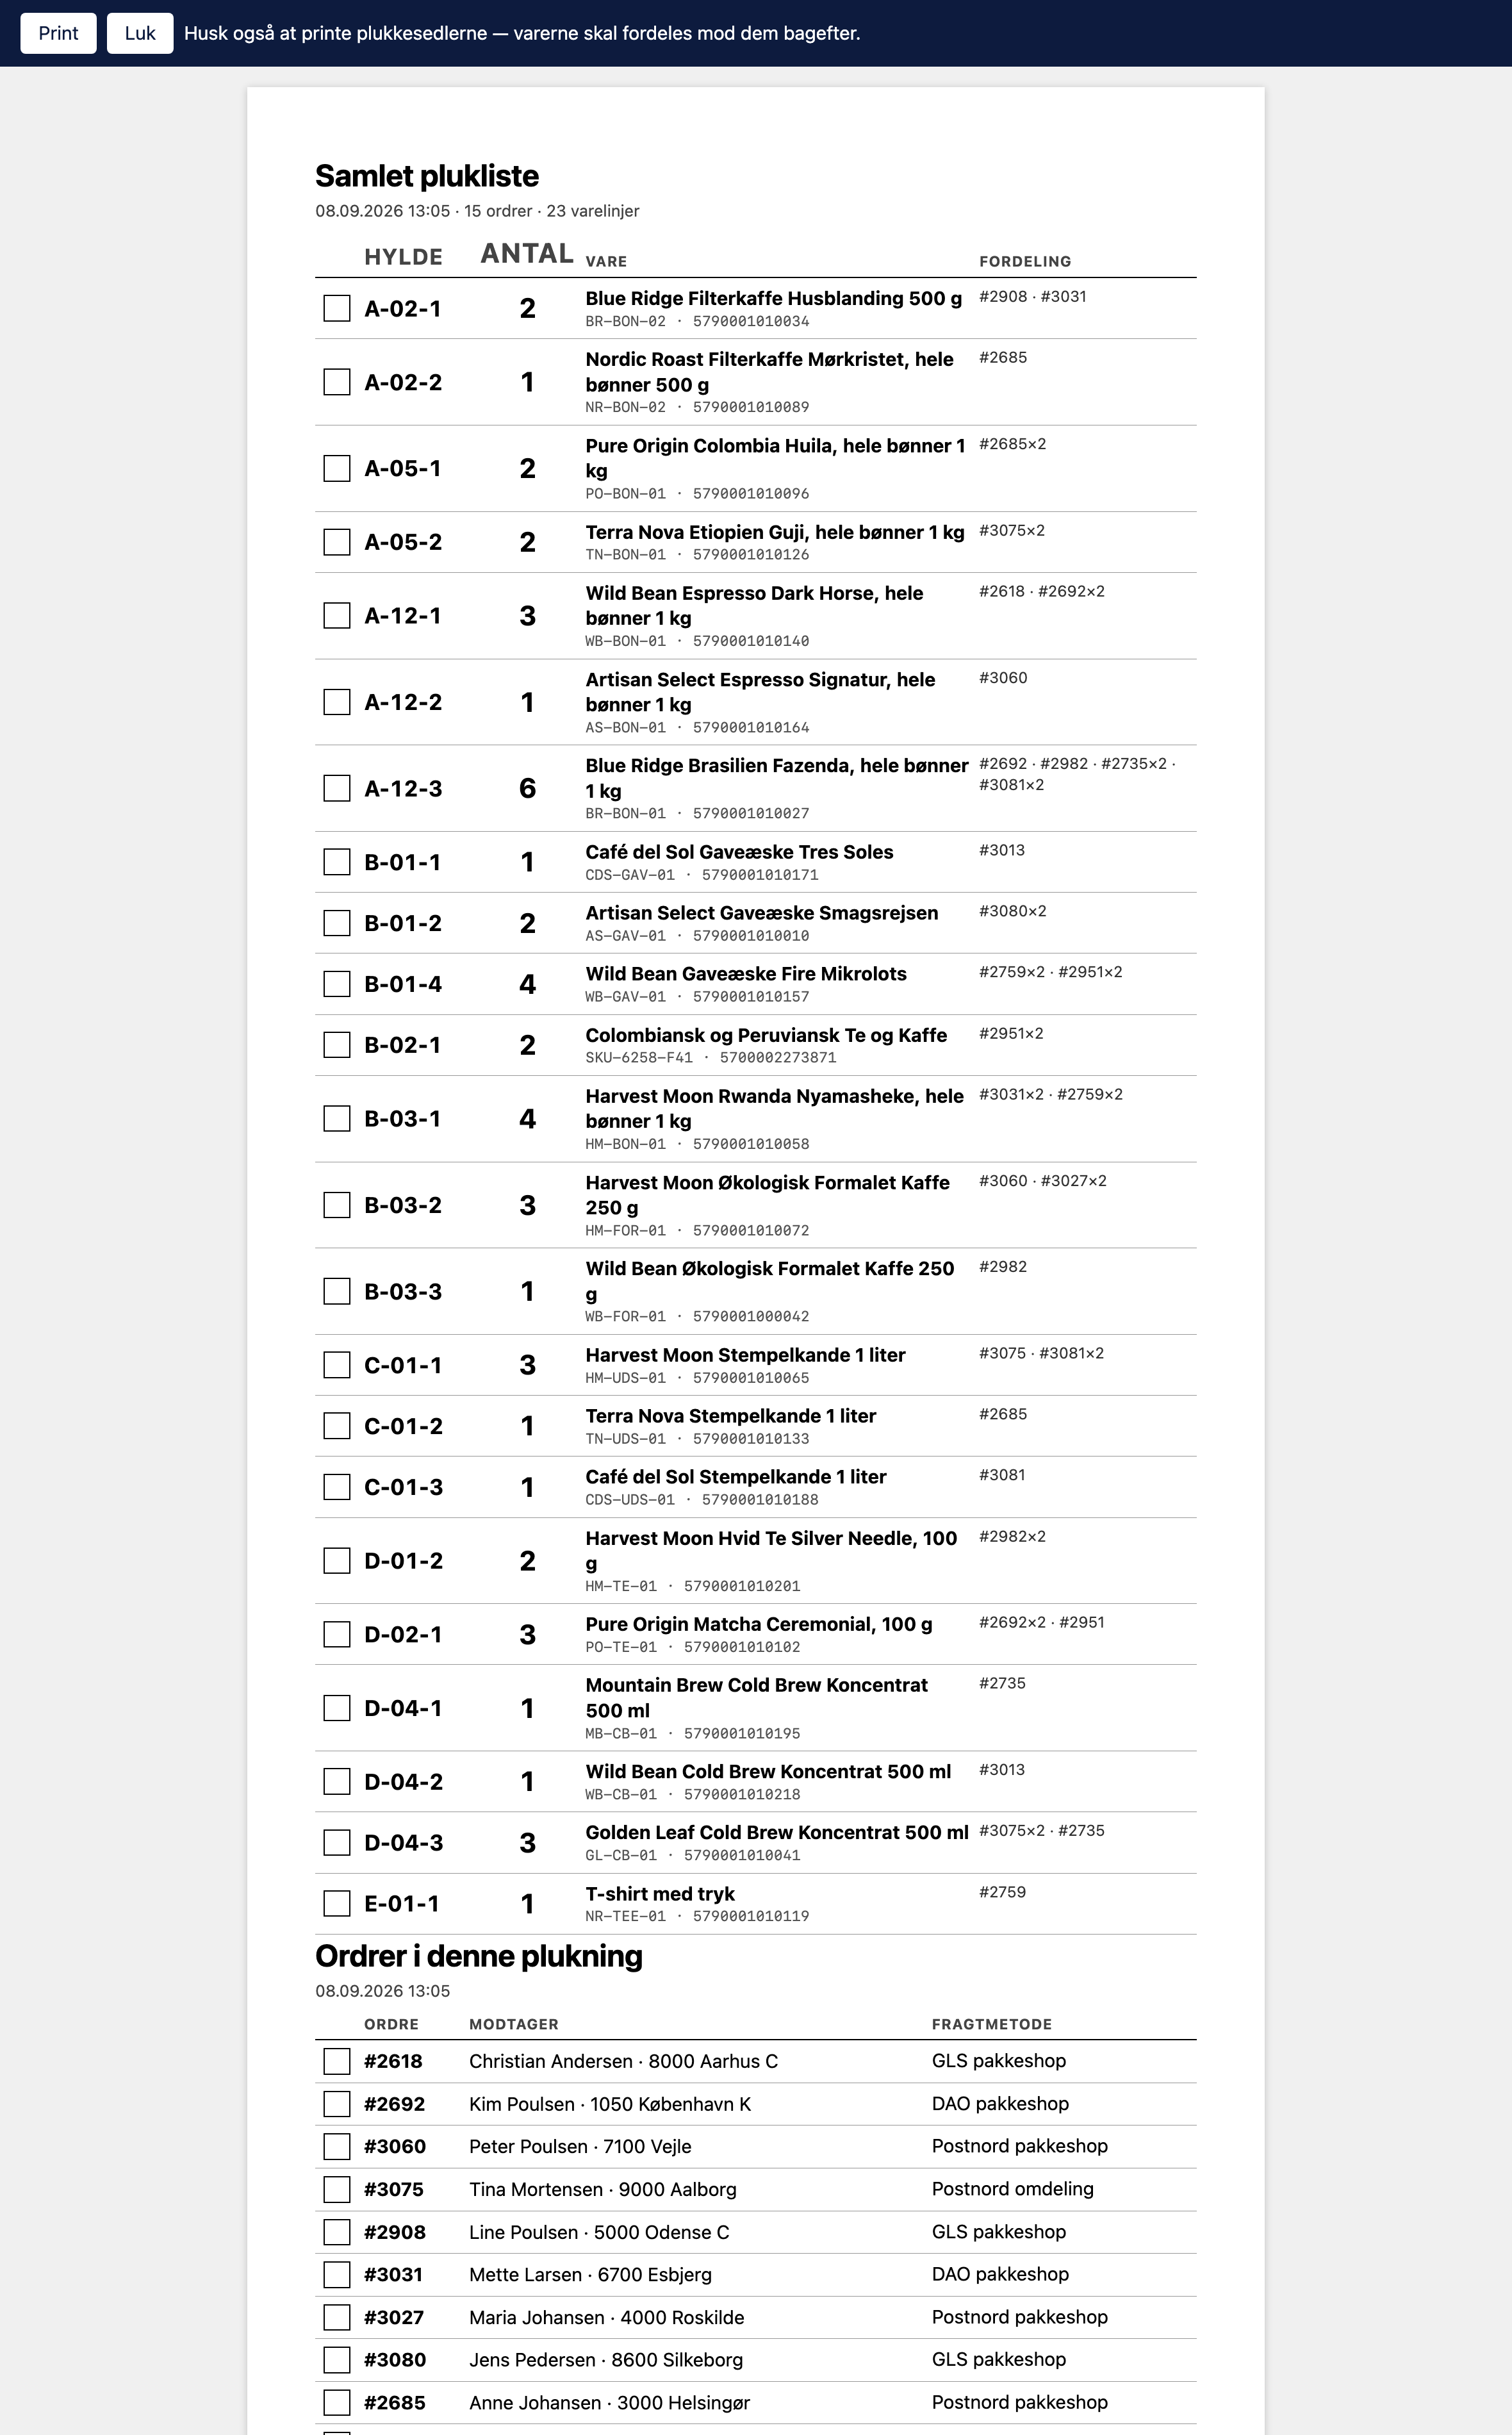
If you have 15 orders that all require the same coffee, it’s a waste of time to go to the shelf 15 times. The consolidated picking list combines the items across all orders and sorts them by shelf location, so you only need to make one trip with the cart.
The far-right column shows the allocation—that is, which orders the item is going to and how many each order is to receive (e.g., #2618 · #2692×2). Without that column, the items cannot be sorted afterward, and the trip would have been a waste. If an item is to be included in more than eight orders, the column simply indicates the total number of orders involved, and the picking lists are the correct source for the distribution details.
Finally, there’s a separate sheet, “Orders in This Pick,” listing the recipient and shipping method, with a checkbox for each order so you can check them off as the boxes are packed.
Print both parts
The combined picking list cannot stand alone. You retrieve the total from the cart based on it, and then distribute the items across the individual picking slips. There’s also a reminder in the bar at the top of the browser tab before you print.
Sorting by Shelf Location
Both documents sort the items by shelf location, just as the picking list does on the screen, and they sort naturally: A-2 comes before A-10, and not the other way around as a pure alphabetical sort would otherwise result in. Items without a shelf location appear at the bottom, so they’re easy to spot.
That’s also the whole reason for spending a few hours assigning locations to the items. Without locations, the order on paper is random, and you’ll end up going back and forth. Read how to set them up in “Warehouse Locations.”
Partially Shipped Orders
If a package has already been shipped for an order, only the items that are still missing will be listed on both documents. If items are in a saved but not yet shipped package, they’ll remain marked on the picking list so you can see that they’ve already been set aside and won’t pick them twice. The overall picking list does not have this mark, so check the list when you’re sorting items.
Frequently Asked Questions
What is the difference between a picking slip and a combined picking list?
The picking slip belongs to a single order and accompanies the package: it specifies what this particular customer is to receive, and you fill it out at the packing table. The master picking list applies to the entire batch and combines the items from all orders so you can retrieve everything in a single trip through the warehouse. You use them together: the consolidated list for picking, the slips for sorting.
Can a customer see the prices if the picking slip is accidentally included in the box?
No. The picking slip contains no prices, sales tax, total amount, payment method, email address, or phone number. The worst that can happen is that the customer receives a sheet with their own order number, their own items, and possibly your internal note—so it’s worth keeping that note professional.
Can I print picking slips for just a few orders?
Yes. Select the orders on the order list and use “Print Picking Slips” or “Print Combined Picking List” in the toolbar that appears. The buttons on the picking list itself always include the entire queue, which is typically what you’ll want to do in the morning when the entire day’s batch needs to be processed at once.
Will there be blank pages?
No. The slips are grouped together on the sheets, and an order that doesn’t fit on the rest of the page is wrapped to the next line instead of being pushed to a new sheet. On the combined picking list, the table’s header row is repeated at the top of each page. We recommend printing without the browser’s built-in headers and footers so that the URL and date don’t appear on the printout.
Can I customize the layout?
No, not on the picking list. It’s intentionally kept consistent so it looks the same in all stores and nothing important gets left out. If you need a document for the customer, however, you can create your own layout for the packing slip. See Delivery Note Templates: Build Your Own Layout.
Why is the barcode on the order and not on the item?
Because the items’ barcodes are already on the items themselves. The order number, on the other hand, has no physical barcode anywhere, and having it on the slip allows you to scan directly to the order on the screen instead of having to scroll through to find it. The items’ own barcodes are listed as numbers on each line, so you can verify that you’ve picked the correct one.
Do I need to print the list every morning, or can I just use the screen?
Both methods work. If you have a screen or a tablet at the packing table, you can manage entirely without paper and use scanning instead. Paper is typically the better option when multiple people are picking simultaneously at different ends of the warehouse, or when items need to be gathered into carts before being distributed.
Related articles
Pick list
How to use the picking list in Shoporama: the queue, shelf location for each item, scanning with a barcode scanner, printing picking slips, and the...
Warehouse Placement: Assign a shelf location to your items
The "Warehouse Location" field indicates where the item is physically located. The picking list and both print documents are sorted by this field,...
Scan the items on the picking list
Pick orders using a standard barcode scanner. You scan the item, and the system automatically finds the order that needs it, counts the quantity,...
Delivery Note Templates: Create Your Own Layout
Create your own shipping labels in Shoporama. Select the form sections, sender, recipient, item lines, and sales tax; save the template; and reuse...
Related features
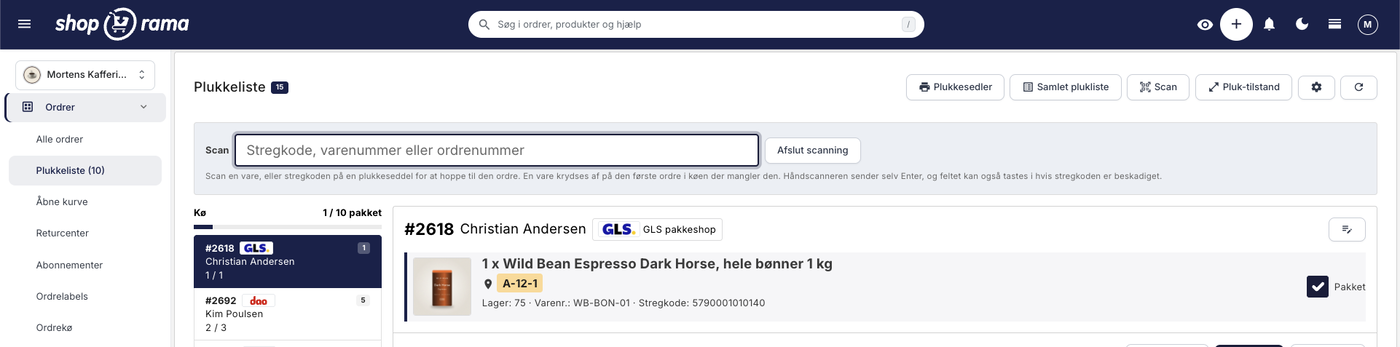
The picking list has been redesigned: scan the items, print the picking slip
The picking list can now scan items, print picking slips and a consolidated picking list, and it remembers what you've checked off. The orders are...
Pick list
Print picking lists directly from Shoporama. Streamline your warehouse work with an overview of orders, products and batch numbers in one clear view.