The picking list has been redesigned: scan the items, print the picking slip
The picking list has been completely redesigned. You can now scan items with a standard barcode scanner, print both a picking slip per order and a consolidated picking list for the entire batch, and your checkmarks will stay where you placed them—even when you reload the page or navigate away on the tablet. Orders are now listed in the order they were received, and there is no longer an unspoken limit of 25.
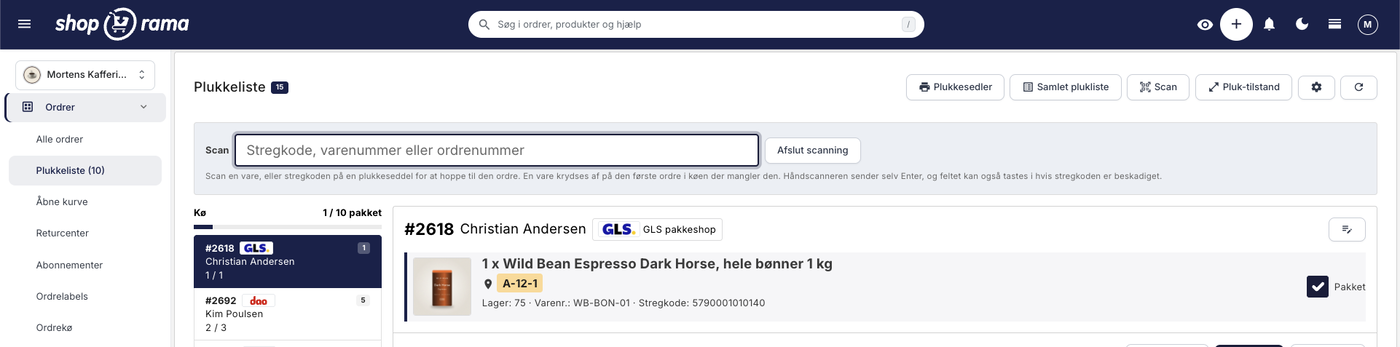
The picking list is the page that’s used the most and seen the least. It stays open on a screen at the packing table from morning until the end of the workday; it’s never shown to anyone, and it’s exactly where a second saved adds up to an hour over the course of a week.
It’s now been updated, and several new features have been added: barcode scanning, two printable documents, saved picking status, and three different layouts depending on whether you’re using a computer, a tablet, or a phone.
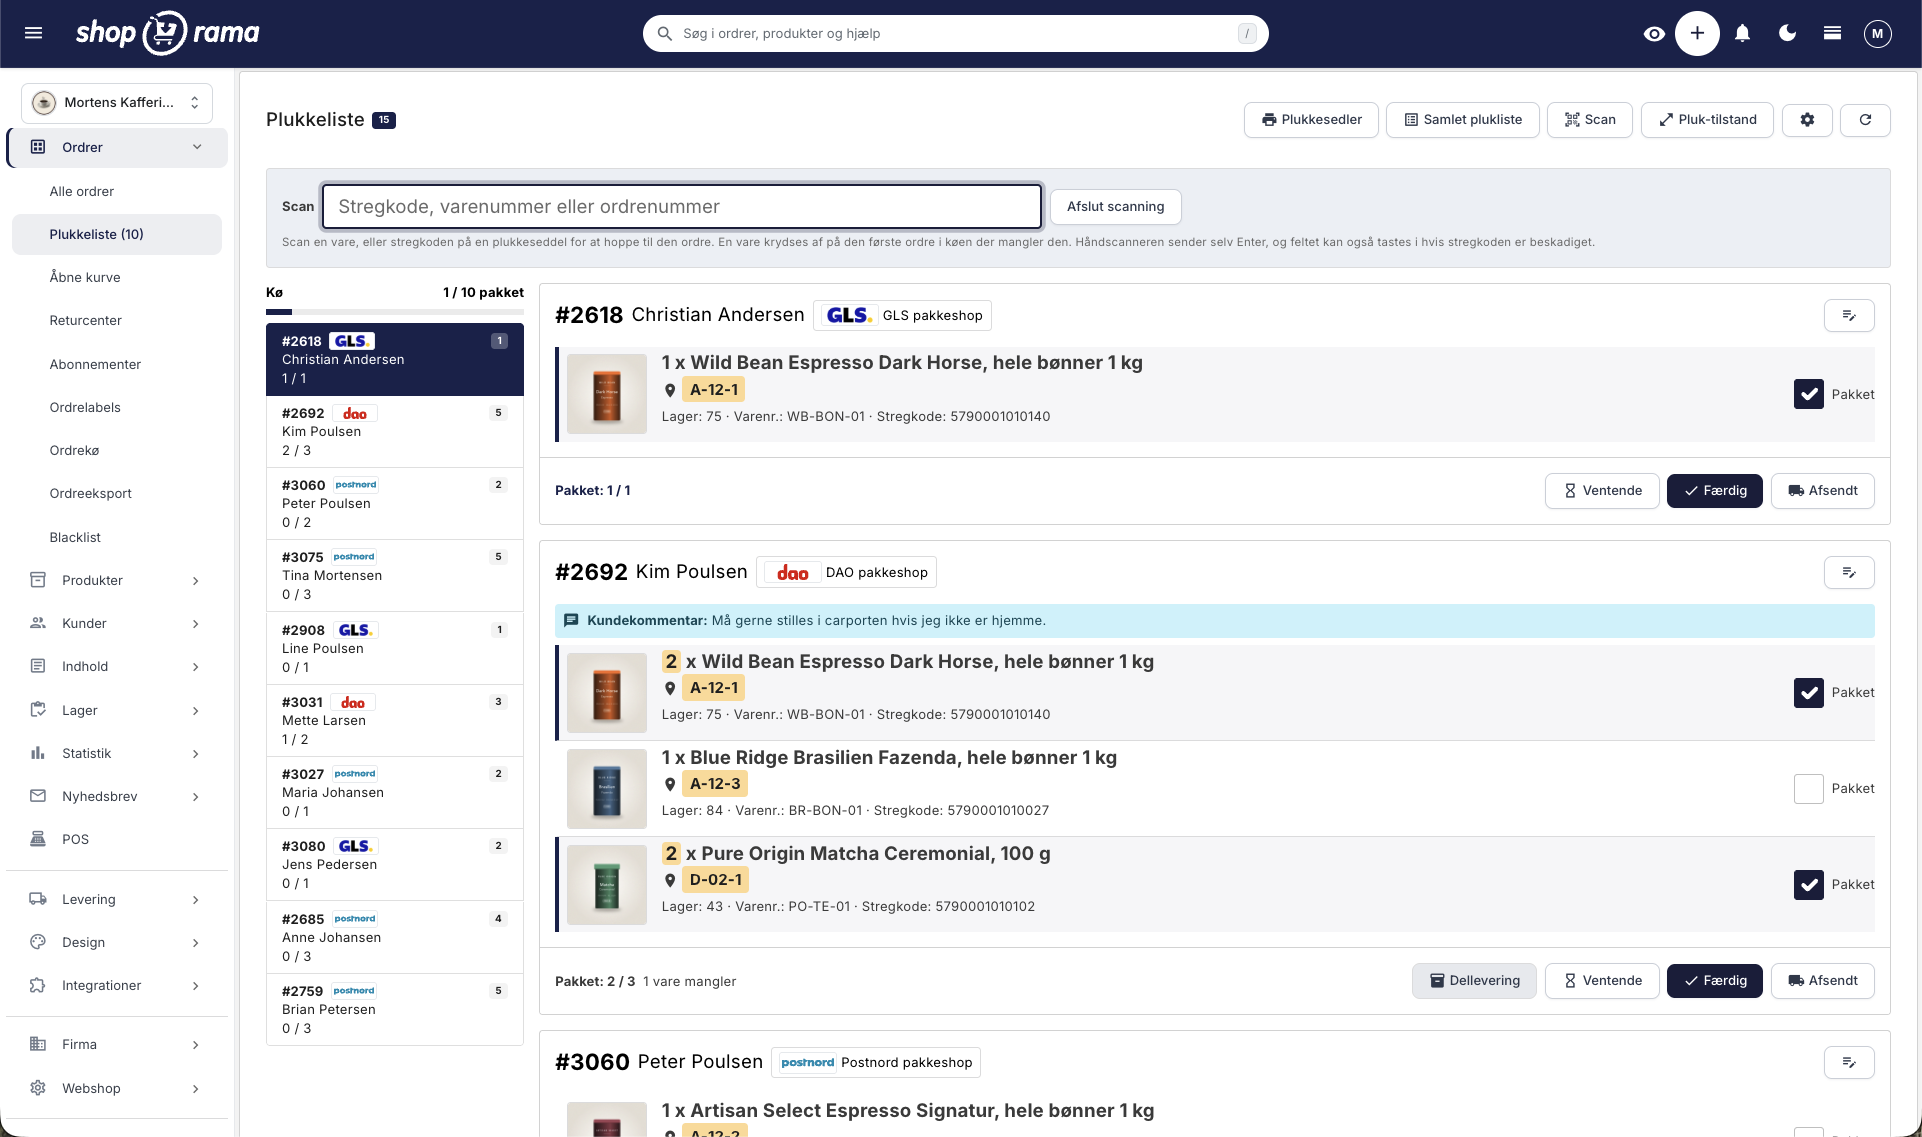
The orders are now in the correct order
We’ll start with the most tedious part, because it’s the most important. Previously, the picking list displayed the most recent orders first, and it showed a maximum of 25 of them without indicating so. If you had 63 orders in progress, the menu would show 63 and the page would display 25, and the customer who had been waiting the longest was buried at the bottom of a pile you’d never get to.
Now the oldest order is at the top, there are pages with page numbers, and the number next to the header shows the entire queue. It sounds like a minor detail. It isn’t, if you’ve had a customer who waited four days because she placed her order on Monday.
Scan the items
There’s now a “Scan” button. Press it, and a field appears. After that, you don’t need to touch the mouse: you pick up an item, scan it, and the system automatically finds the order on the page that’s missing that specific item and checks it off. If two items are needed, scan twice. You’ll hear a confirmation sound, and devices that support it will vibrate, so you can keep your eyes on the item instead of the screen.
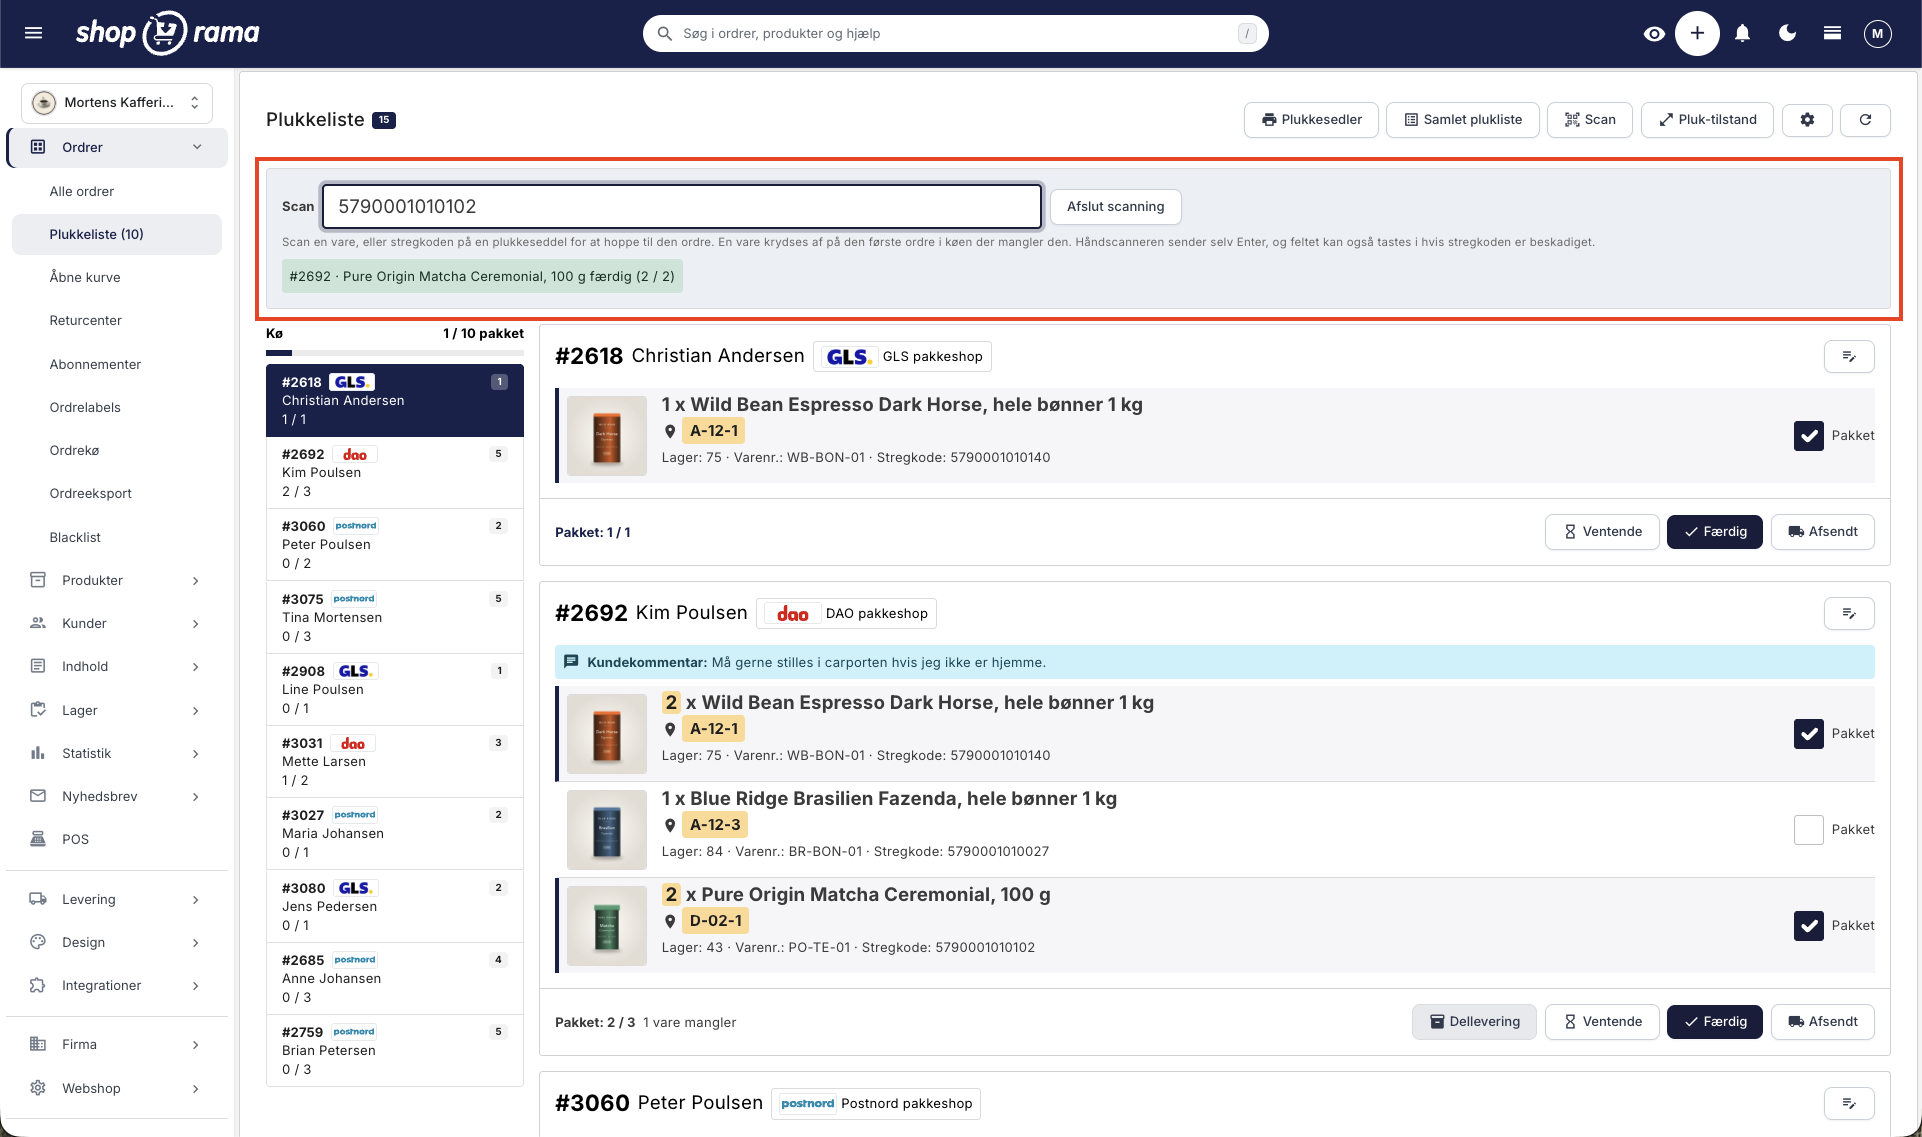
You don’t need to buy anything special. Standard USB and Bluetooth handheld scanners act like a keyboard and work without any setup. If you already have a scanner for the register or for inventory, you can use it starting tomorrow.
There’s also a shortcut we’ve come to love: the barcode at the top of a printed picking list is the order number. If you scan it, the page jumps to the order—even if it’s on a completely different page in the queue. Take the top slip from the stack, scan it, scan the items, close the register, and take the next one.
Two Printed Documents
Printed documents are now available, and there are two different types because they solve two different problems.
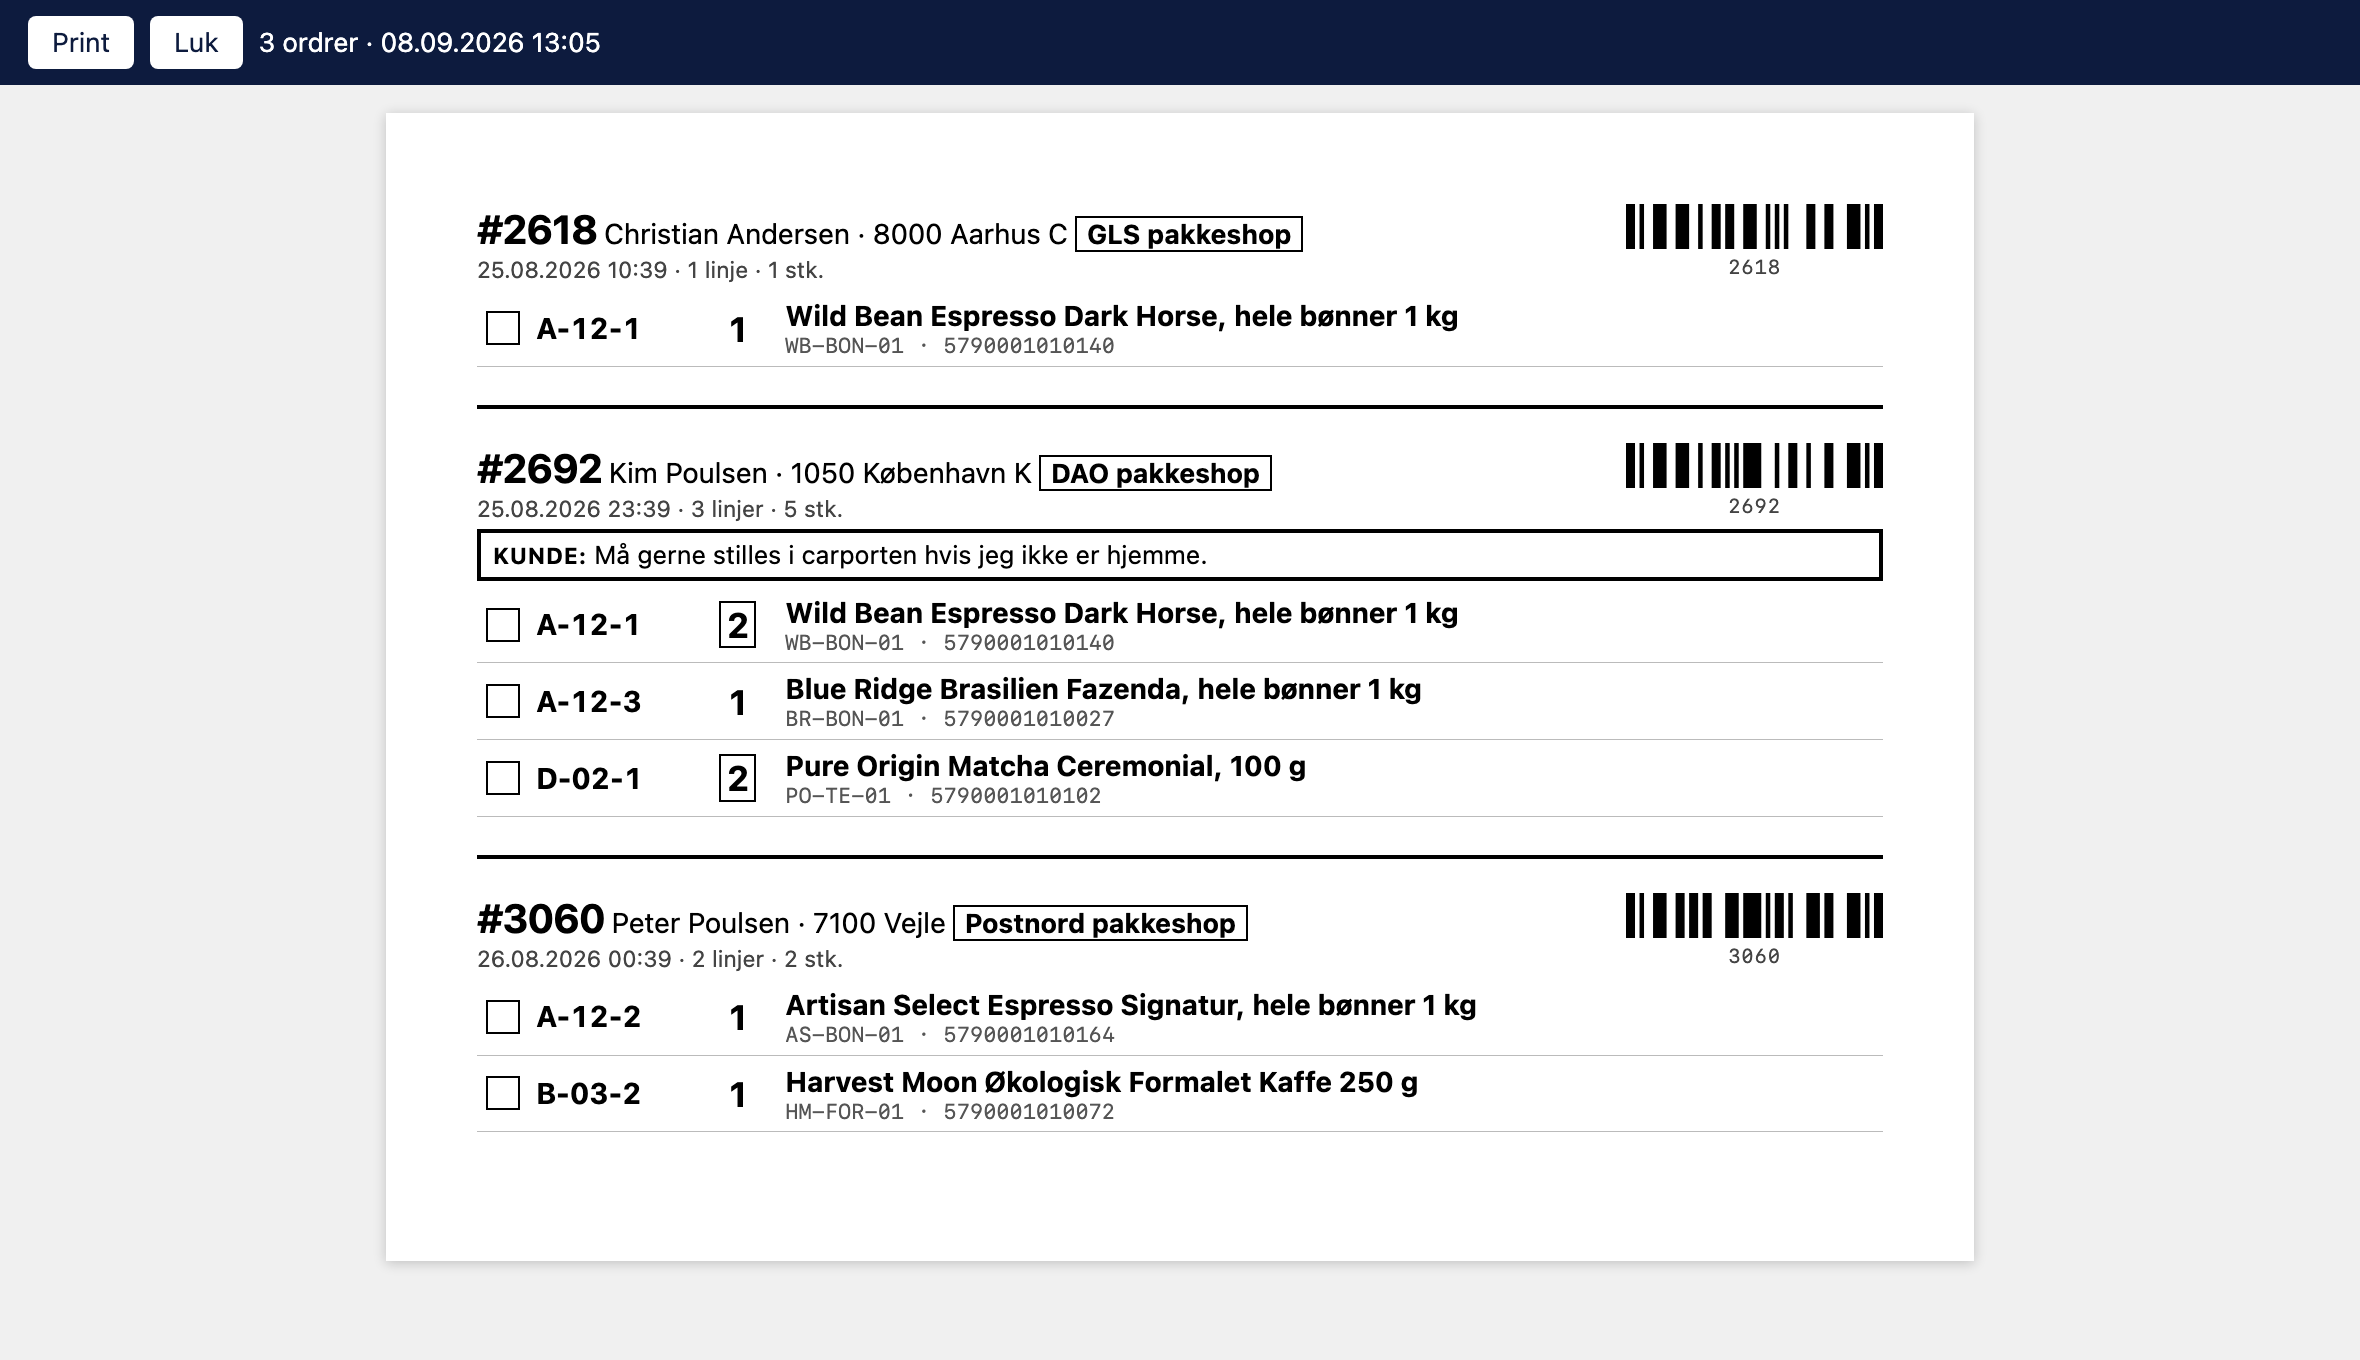
The picking slip is one slip per order, and it accompanies the package. The slips are grouped together on the sheets with a thick line separating them, so three short orders share one sheet instead of using three. The order number is printed large at the top with a barcode next to it; the shipping method is listed in a box because it determines the packaging and label printer; and the items are sorted by shelf location.
The customer’s comment, the customer’s responses to additional fields, and your internal note are placed in a bold frame directly below the header. Not at the bottom. “This is a gift—please do not include a receipt” is not something you want to discover after the box has been sealed.
The note deliberately does not include prices, sales tax, total amount, payment method, email, or phone number. It’s fine to leave it out on the packing table, and it’s fine to throw it in the trash afterward.
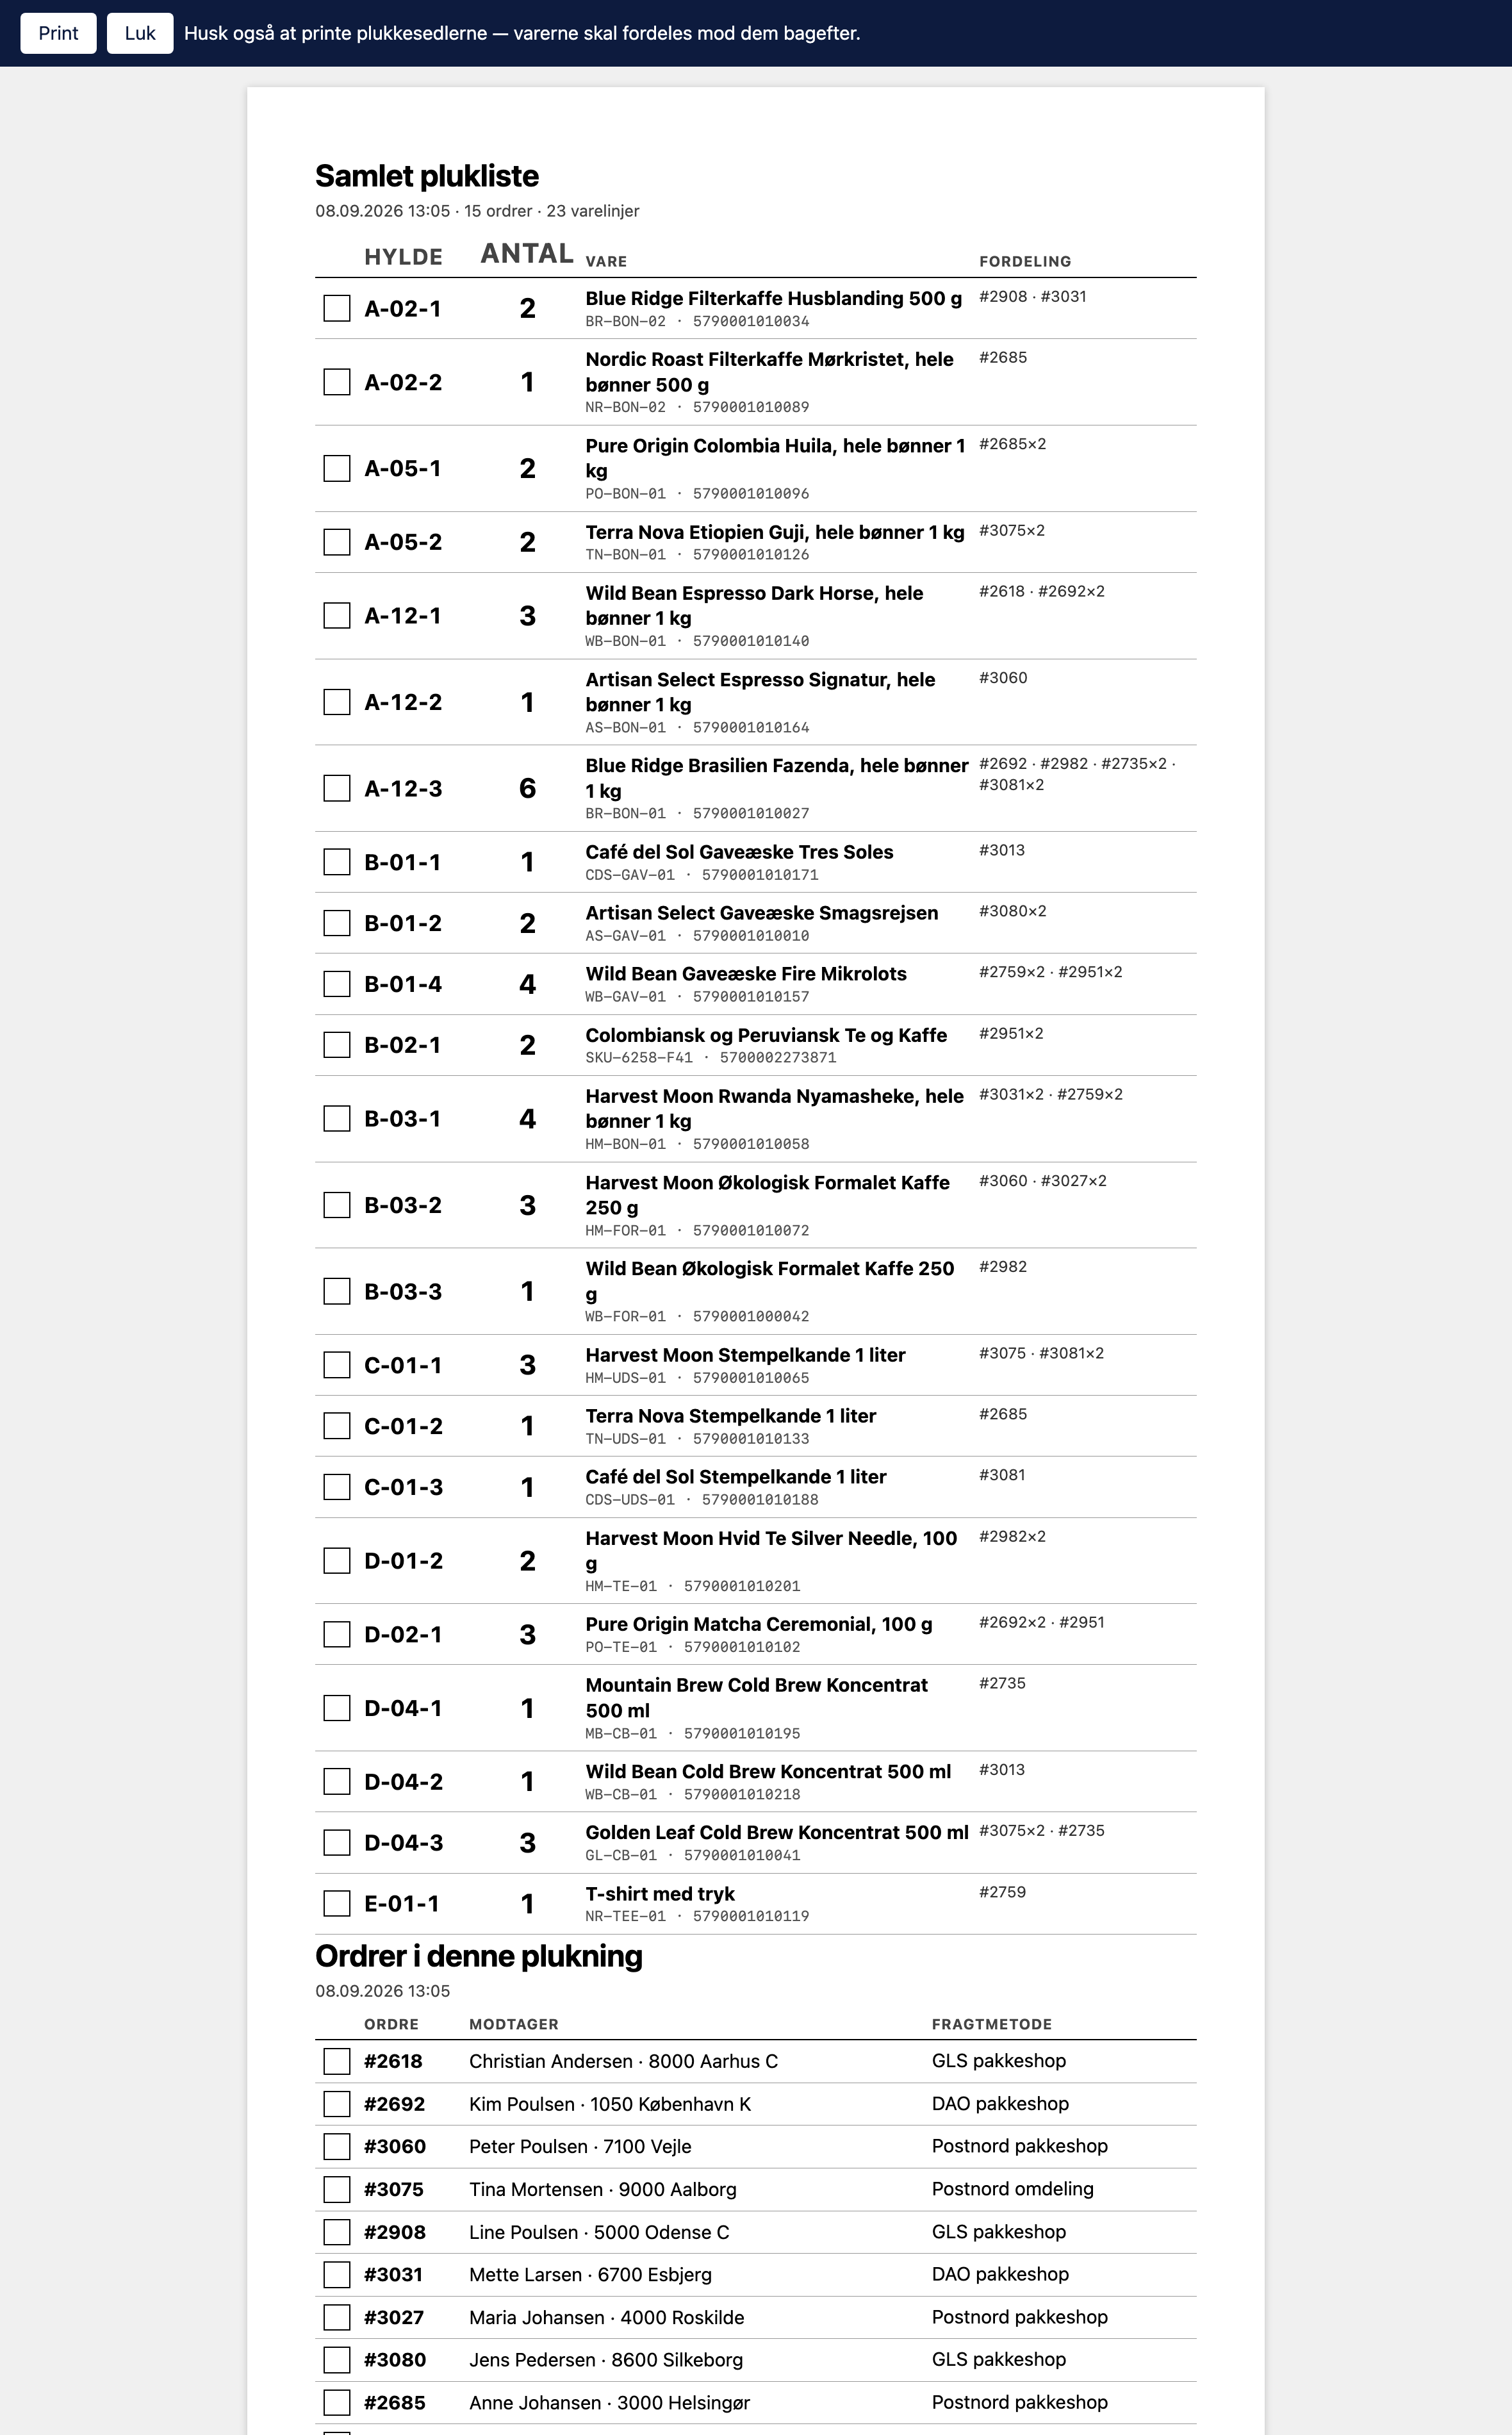
The consolidated picking list combines all the items from the orders and sorts them by shelf location. If 15 orders have the same coffee, you go to the shelf once and take 15. The distribution column is on the far right—it specifies which orders are to receive how many items—because without it, the items cannot be sorted afterward, and the trip would have been a waste.
The two must be used together: you retrieve the total from the consolidated list and allocate it to the picking slips. There’s also a reminder in the top bar before you print.
The checkmarks stay where you put them
Previously, the “Packed” checkmarks only existed in the browser. A click on “Refresh,” a status change, or a lost connection would reset everything without warning, and the “Packed: 3 / 8” counter looked authoritative but couldn’t be trusted. That’s worse than having no counter at all.
Now they’re saved in your store. This immediately offers three benefits: your work survives a page reload, you can start at your computer and continue on your tablet out in the warehouse, and if two of you are packing, you’re working from the same list. They clear themselves automatically when the order leaves the “In Progress” status, and in the case of a partial shipment, only for the items that actually went into the box. There’s nothing to clean up.
Three screens, three layouts
On the computer, the queue stays fixed on the left side with today’s orders as you work your way through them. On the tablet, the queue becomes a horizontal strip, so the orders take up the full width and the tap targets are large enough for gloves. On the phone, the queue becomes a bar at the top that shows where you are in the stack, and two large buttons let you jump to the previous and next orders.
There’s also a picking mode that hides the admin menu, so the entire screen is a picking list. It’s actually been there for a long time, but there was no button to turn it on—and absolutely no way to turn it off again. Now there are both.
A bug worth mentioning
Along the way, we found something that had been causing trouble without anyone being able to pinpoint it. If you saved a partial shipment without sending it, the entire order could disappear from the picking list, even though nothing had been shipped. The items were reserved for a package that had never been shipped, and the order was therefore marked as complete.
Now the order remains active until the items have actually been shipped, and the lines in a saved package are marked so they aren’t picked twice. The “Split Delivery” button also only appears when there is more than one item left to ship, so it no longer offers to split an order that cannot be split.
What you can do to get the most out of it
- Assign a shelf location to each item. Both the screen and the printouts sort by this location. Without locations, the order is random, and you’ll end up running back and forth across the warehouse
- Get barcodes for your best-selling items. Scanning matches by barcode or item number, so you don’t have to scan them all at once
- Check the settings. You can have the system automatically complete an order once the last item has been scanned, if you’re comfortable with that
There’s nothing you need to turn on. The picking list is, as always, under Orders → Picking List, and all the new features are already there. If you want to read the details, you’ll find them under Picking List, Scan Items on the Picking List, and Print Picking Slip and Combined Picking List.
Related articles
Pick list
How to use the picking list in Shoporama: the queue, shelf location for each item, scanning with a barcode scanner, printing picking slips, and the...
Scan the items on the picking list
Pick orders using a standard barcode scanner. You scan the item, and the system automatically finds the order that needs it, counts the quantity,...
Print the picking slip and the consolidated picking list
The two printed documents from the picking list: one picking slip per order with a barcode, and a consolidated picking list where the items from...
Warehouse Placement: Assign a shelf location to your items
The "Warehouse Location" field indicates where the item is physically located. The picking list and both print documents are sorted by this field,...
More from the blog
How much should shipping cost? Here's how to find the answer in your own store
A new shipping rate can improve conversion by 21% and still generate less revenue. That’s why Shoporama’s A/B tests of shipping rates are based on...
05. september 2026
Product filtering is here, and you build the filter yourself
Product filtering is currently available in the Montana and MontanaB2B themes and can be added to your own theme. You can set up the filter...
02. september 2026
The newsletter sign-up form shouldn't always pop up
Your sign-up form no longer has to be a pop-up. Now you can copy it right where you want it to appear and run multiple different forms, each for...
31. august 2026