Product Filtering in Your Online Store
Guide to Product Filtering in Shoporama. You build the filter yourself under Design → Filter, select which facets customers will see (brand, supplier, subcategories, product labels, profile attributes such as size and color, price, and stock status), and decide what they’ll be called in the shop. This article walks you through the setup step by step, including combining values such as “S” and “Small,” price ranges and promotional prices, setting up the filter as its own page at /filter/, and what the customer sees in terms of quantity, selected filters, and how the filter appears on mobile. Filtering only works in the Montana and MontanaB2B themes.
A category page with 400 items is hard to navigate. With product filtering, customers can narrow down the results themselves to what’s relevant—for example, black shoes in size 42 under 800 kroner—instead of scrolling past everything else. The filter appears on your category pages and in search results, and you can set it up yourself in the admin panel without help from a developer. Note, however, that product filtering only works in the Montana and MontanaB2B themes, and we’ll come back to that in the next section.
Customers can find the right product faster, and you’ll have pages that feel like a real online store rather than a long catalog. This article explains how to create a filter, which facets you can choose from, how to name them, and what customers see in the store. If you’re looking for the older version of filtering on your online store, that article is still available.
Filtering works only in Montana and MontanaB2B
Product filtering works only in two themes: Montana and MontanaB2B. If your store uses a different theme—such as Delaware, California, Washington, Alaska2, or a theme built specifically for you—you cannot use product filtering.
You can see this right away in the admin panel: if your theme doesn’t support filters, the menu item Design → Filter won’t appear at all. If you’re unsure which theme you’re using, you can check the list of themes in Shoporama or email support@shoporama.dk.
How to create a filter
- Go to Design → Filter in the admin panel and click Create Filter.
- Give the filter a name. The name is only visible in the admin panel, so choose something that’s easy for you to recognize, such as “Clothing and Shoes” or “Default Filter.”
- Under “Show filter on,” select whether the filter should be used on category pages, in search results, or both. You can limit it to selected categories; if you don’t select any categories, the filter applies to all category pages.
- Add the facets from the dropdown menu. A facet is a group of options, such as Brand or Size.
- Give each facet the name you want customers to see, and expand it to select which options to include if the facet has settings.
- Drag the facets up and down until the order is right. The most important one should be at the top.
- Save, and view a category page in the store to see the result.

The facets you can choose from
You decide which facets to include and where they appear. The values themselves come from your products, so you don’t need to enter them manually.
- Stock Status. A single checkbox that filters the results to show only items in stock. This is invaluable in a store where part of the inventory is backordered, as it prevents customers from clicking on an item they can’t purchase.
- Brand. The customer’s shortcut to the brand she already knows. A sports store can let the customer go directly to her favorite brand instead of scrolling through the entire category. Read more about brands.
- Supplier. Same principle, but based on the supplier the item comes from. This is especially useful in a store where customers are familiar with the wholesaler, such as a home improvement store or an auto parts store.
- Subcategories. Displays the subcategories for the category the customer is currently in. If the customer is in the “Coffee” category, she can narrow it down to “Whole Beans” or “Ground Coffee” with a single click. See also the article on categories in your online store.
- Product labels. You choose which labels customers can filter by. A pet store, for example, can let customers select “Organic” or “Grain-Free” if the products are labeled as such.
- Profile attributes. Variants such as Size, Color, or Language. You choose which attributes to include, and the values are displayed with the number of options next to each one. For example, a bookstore can filter by Language, while a clothing store can filter by Size and Color.
- Price. Ranges the customer can choose from, such as under 100 kroner or over 500 kroner. See the section on price ranges below.
The filter also applies to search results if you enable it. This allows customers to start with a broad search and then narrow it down, rather than having to get the perfect search on the first try. Read more about the search function in Shoporama.
Names and Combining Values
Each facet is given a name that the customer sees, and it doesn’t have to be the same as in the admin panel. If you’ve used a field for something other than what the name suggests, name the facet based on what you’ve actually entered in the field. If “Author” is in the “Brand” field, the facet is called “Author,” and if “Importer” is in the “Supplier” field, it’s called “Importer.” Choose the word your customers actually use.
If your products come from multiple suppliers, it’s common for the same size to be written in two different ways. If you have both “S” and “Small” listed for the products, they’ll typically be displayed as two separate options. You can fix this by giving them the same name—for example, “Small”—and they’ll be combined into a single option for the customer.
You don’t need to go through the entire list. The values you leave unchanged will appear automatically with the text printed on the products.
Price ranges
Enter price ranges one per line, for example, 0–100, 100–250, and 500–. The last range covers everything from 500 kroner and up. If you leave the field blank, the system will automatically generate rounded intervals based on the prices in your own store, and this is usually a good starting point.
The price facet calculates the price the customer sees—that is, the sale price when an item is on sale. Promotional prices, however, are not included because they are calculated only when the page is displayed. If you run a lot of promotions, be aware that an item with a promotional price may fall into a different price range than the price the customer actually pays.
The filter as its own page
A filter can also have its own page at the address /filter/summer-sale, where the last part is the word you choose for the page. On a category page, the category determines which products are displayed, but on the filter’s own page, you choose the selection yourself based on categories, product labels, brands, or only in-stock items.
This is handy when you want to put together a selection across categories—for example, all items with the “Sale” label—and direct traffic there from a newsletter, an ad, or a menu item.
Here’s how it looks to the customer
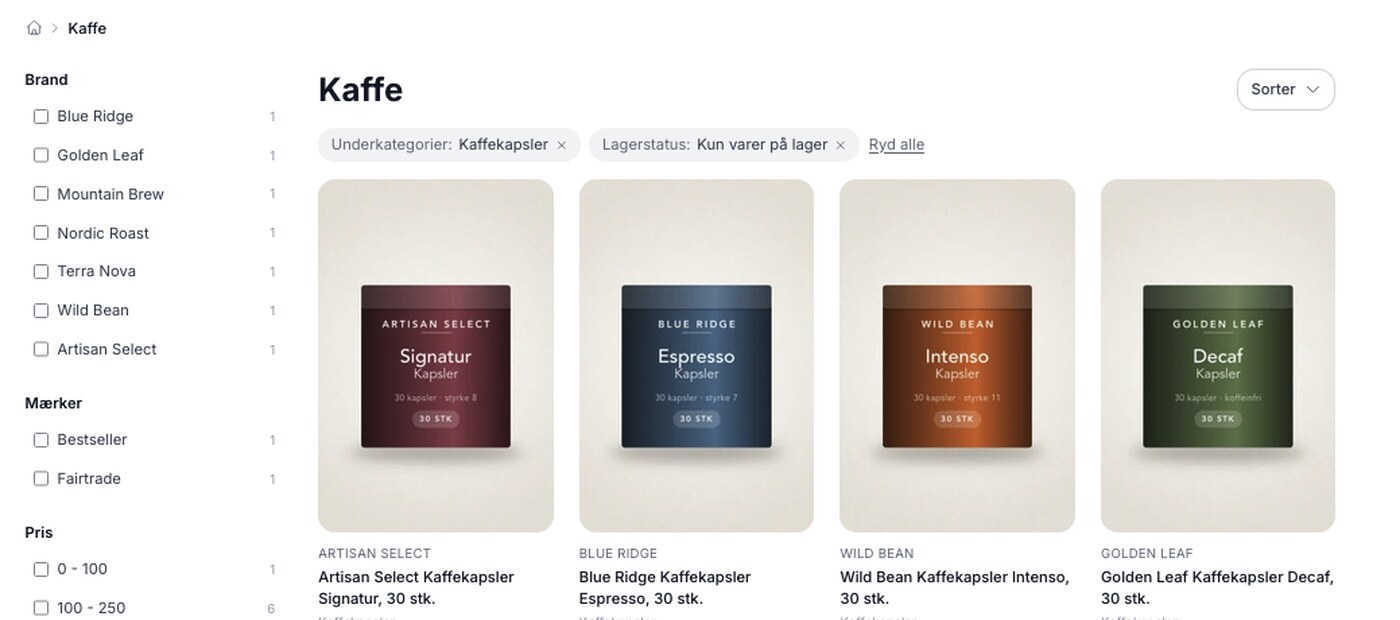
Next to each filter option is the number of products, and this number is calculated based on the settings of the other filters. If the customer first selects a brand, the numbers in the other filters update so she can see how many items each subsequent selection yields before she clicks. A filter with no values isn’t displayed at all, and the same applies to a single option with no products. If there are no items with a specific product label in the results, the entire filter is skipped instead of appearing empty. However, if the customer combines multiple facets, the results may still end up being empty.
The selected filters appear as small buttons above the products, each with a checkmark that deselects that option, and there’s a button to clear everything at once: “Clear All.” On mobile, the filter is hidden behind a “Filter” button that expands it into a full-screen panel so it doesn’t take up space from the products. Pagination and sorting are preserved when the customer applies filters, so she isn’t sent back to page 1.

The customer’s selection is included in the page’s URL. This allows her to bookmark or share a filtered page, and you can copy the URL yourself to use as a link in a newsletter or ad. The filter also works even on slow connections and older phones. If your theme needs to fetch products in the background instead, there’s a technical article on AJAX filtering.
Hide the category menu when a filter is active
In Montana, the category menu and the filter share the same left column, and on some stores, this can be overwhelming. That’s why the “Hide the category menu when a filter is active” setting is available under Design → Theme Settings → Category Pages. If you enable it, the category menu disappears on pages where a filter is displayed, so the customer has only one place to click.
If you still want the subcategories within easy reach, you can add the “Subcategories” facet to the filter. Then the customer can click their way further down into the category they’re currently in, directly from the filter.
For developers: Enable filtering in your own theme
This section is intended for those who build or maintain a theme. If you’re using Montana or MontanaB2B, everything described below is already in place, and you can skip this section.
A theme tells Shoporama itself that it can display filters. This is done with a single line in the theme’s `theme_settings.json` file:
{
  "info": "My Theme",
  "supports_filters": true
}
Without that line, the Design → Filter menu item won’t appear, and the store owner won’t be able to create a filter. With it, however, the theme guarantees that it will actually display the filter where products are shown, so set it only after the templates are in place.
The flag intentionally does not specify which types of facets the theme can display. All facets have the same structure—a name, a list of options, and a count next to each one—so a new facet type will work in your theme without you having to make any changes. The template variables themselves, a complete code example, and how the filter’s own page is structured are described in the theme documentation under the section on product filtering.
Frequently Asked Questions
I can’t find Design → Filter in my admin panel. Is this something I need to enable in my account?
It’s not an account setting—it’s a theme setting. The menu item only appears when you’re using a theme that supports filtering, and only Montana and MontanaB2B do. If, for example, you’re using Delaware, California, Washington, Alaska2, or a custom-built theme, the option won’t be there at all. If you’re unsure which theme your store is using, please email support@shoporama.dk.
I’ve had my own theme built on top of Delaware. Can I just enable the filters there?
No. The theme itself must support filtering, and only Montana and MontanaB2B do. A theme built on top of Delaware, or another theme created specifically for you, does not support filtering, and therefore the menu option isn’t visible in the admin panel either. If you want to use product filtering, you’ll either need to switch your store to Montana or MontanaB2B, or update your theme to support filtering. Email support@shoporama.dk, and we’ll figure out what makes the most sense for your store.
I’ve created a filter, but it doesn’t appear on the category page. What did I do wrong?
Check the “Show filter on” field. The filter must be set to appear on category pages, and if you’ve also selected specific categories, it will only apply to those. If you don’t select any categories, the filter will apply to all category pages. Also, keep in mind that a facet with no products in the results won’t show up at all, so in a small category, the filter might look sparse even though everything is working as it should.
My product selection is constantly changing. Do I need to go in and adjust the filter every time?
Almost never. New brands, suppliers, sizes, and colors appear automatically because the values come from the products. But if you create a completely new product label or a completely new attribute—for example, “Material”—you’ll need to add it yourself under Design → Filter, because you’re the one who chooses which labels and attributes are included. The number next to each option is calculated based on the current results, and options with no products associated with them are skipped. If you leave the price ranges blank, they’ll adjust automatically as well. Otherwise, you only need to go to Design → Filter if you want to change names, order, or which labels, attributes, and other facets are included.
What happens to a facet if there are no products left in it?
It won’t be displayed. For example, if there are no products with a specific product label in the results, the entire facet is skipped instead of appearing empty, and the same applies to a single option with no products. That’s why the same filter may look slightly different from category to category, and that’s entirely by design.
Does the price filter work correctly when I run sales and promotions?
The price facet calculates the price the customer sees—that is, the sale price when the item is marked down. Promotional prices, however, aren’t included because they’re calculated only when the page is displayed. An item with a promotional price may therefore fall into a different range than the price the customer actually pays, and this is worth keeping in mind if you run promotions for most of the year.
What happens from an SEO perspective when customers click through the filters?
Filtered pages are automatically set to “noindex” with a canonical tag pointing back to the plain category or search page, so Google doesn’t index all the combinations. So you won’t wake up to hundreds of new URLs in the search results. The selections are still included in the URL, so you can share a filtered link yourself whenever you need to.
Can I send traffic directly to a filtered page from a newsletter or an ad?
Yes. Set the filters as you’d like them, copy the URL from your browser’s address bar, and use it as a link. If you’d like a cleaner URL and a selection that spans categories, you can instead give the filter its own page at /filter/summer-sale and select the products yourself based on categories, product labels, brands, or only items in stock.
If you have any questions or would like help setting up your first filter, please email support@shoporama.dk.
Related articles
Filtering on your online store
Guide to setting up filtering on your Shoporama online store so customers can filter products.
Ajax filtering
Technical documentation for Shoporama's /ajax endpoint for filtering products. For developers and theme designers.
Categories in your webshop
Learn how to create and manage categories in your Shoporama online store. Guide to hierarchical structure, SEO settings, importing via CSV, sorting...
Brands and brands in Shoporama
Guide to brands and brands in Shoporama: create brands, upload logos, link to brand pages, use in filtering, Google Shopping and statistics.
The search function in Shoporama
Everything you need to know about Shoporama's search function - how it works, what is searched and how to optimize it.
What themes are there on Shoporama?
Complete overview of all free themes on Shoporama: Delaware, DelawareDK, California, Alaska 2, Washington, Montana, and the classic Smarty 2 themes...
Related features
Product filtering is here, and you build the filter yourself
Product filtering is currently available in the Montana and MontanaB2B themes and can be added to your own theme. You can set up the filter...
Product filtering: Customers can find the item without having to scroll
Narrow down a large selection to the relevant items using filters for brand, price, inventory, profile attributes, and categories. Requires Montana...