GLS QR Returns: Set up return labels and send them automatically
Guide to GLS QR Returns in Shoporama: Choose the format for return labels (PDF, QR, or both), automatically send the label to the customer, test the workflow, and understand how it differs from PostNord.
With GLS QR Return, your customers can return an item without having to print a label themselves. They receive a QR code via email, show it on their phone at a GLS PakkeShop, and the staff scans it and prints the label for them. It’s the same return experience many are familiar with from PostNord, and you can enable it with a single selection in your shipping settings. Here’s the entire setup process, step by step.
In short: Under “Delivery,” choose whether GLS return labels should be PDFs, QR codes, or both. Enable automatic generation in the Return Center, and the customer will receive their return label or QR code directly via email.
Choose the format for your GLS return labels
You select the format in one place, and it applies to all GLS returns in your online store:
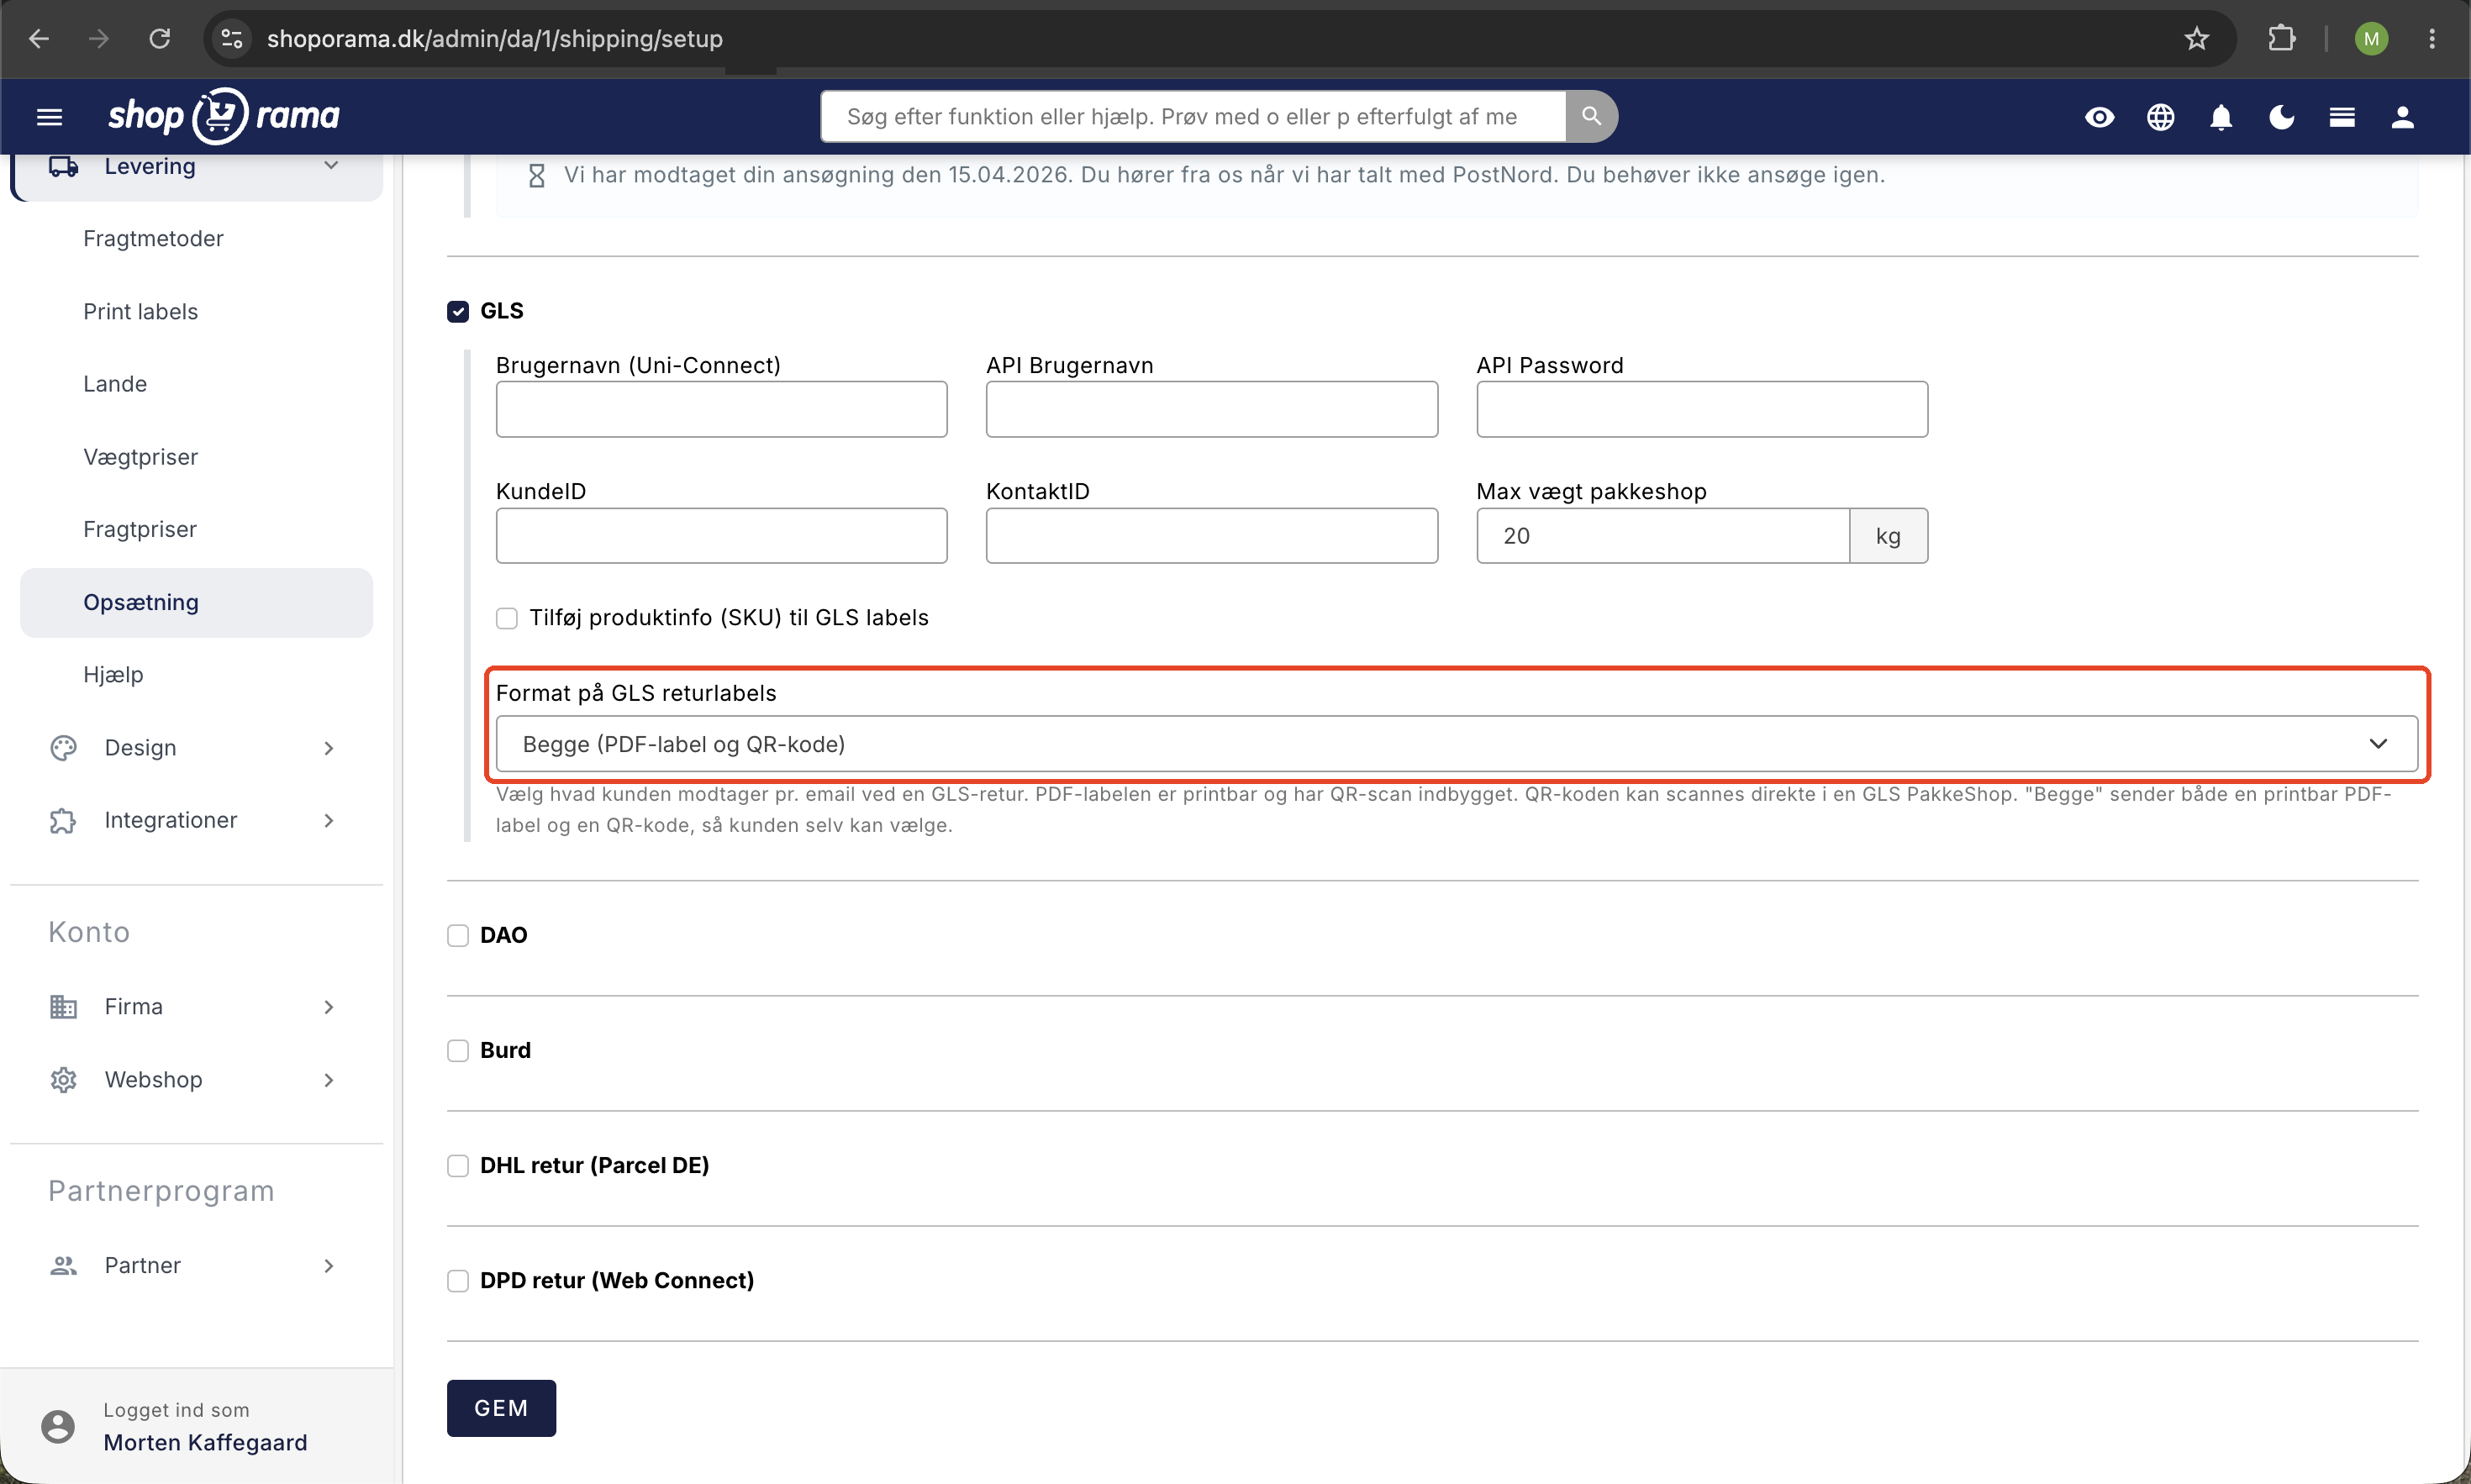
- Go to Delivery → Setup
- Scroll down to the GLS section
- Find the "Format for GLS Return Labels" dropdown
- Select the format you want to use (see below)
- Click Save
You have three options:
- PDF label (printable) is the default option. The customer receives a label that can be printed at home and attached to the package. The PDF label also includes a built-in QR code.
- A QR code means the customer doesn’t need a printer at all. The customer shows the QR code on their phone at a GLS PakkeShop, where the staff scans it and prints the label.
- Both options (PDF label and QR code) send both the printable PDF label and the QR code, so the customer can choose which works best for them.
Requirements: QR Return works for returns where the carrier is GLS and requires that your GLS integration be set up with API credentials under Delivery → Setup. If you haven’t connected GLS yet, start by setting up the GLS integration first.
What name appears on the return label?
The return label must show where the customer is sending the package back to. By default, we use the name and address from your company profile. If you want something else on the label, you can set it per online store: in the GLS section under Delivery → Setup, you’ll find the fields Sender Name, Sender Address, ZIP Code, and City. If you leave them blank, the company profile will be used, and the value from there will appear as gray tooltip text in the field so you can see what’s being used.
Multiple online stores under the same company: If you have two stores with the same company profile and the same GLS agreement, return labels from both stores will otherwise display the same name. Fill in the “Sender Name” for each store, and each store will have its own name on the return label. The fields are saved per online store, so they must be entered in both stores. See “Set Up GLS Integration.”
Automatically send the return label to the customer
The format you choose determines what is generated by GLS. To ensure the customer also automatically receives the return label or QR code via email, you must enable two settings in the Return Center:
- Go to Return Center
- Enable “Automatically Create Return Labels”
- Enable “Automatically send return label to the customer”
Once both are enabled, Shoporama will generate the return label and send it to the customer as soon as a return is created. The QR code is attached to the email as an image that the customer can view on their phone. If you select "Both," both the printable PDF label and the QR image will be attached to the same email.
Important: The email uses your theme’s return_label.html template. If your theme does not have this template, the return email will not be sent, and you’ll receive a notification that the template is missing. Most themes include it, but if you’re using a custom theme, check to make sure it’s in the theme’s “mails” folder.
Here’s how the customer sees it
Once a return is created, the customer receives an email at the address listed on the order. If you’ve selected the QR code option, the code is included as an image attachment. The customer opens the image on their phone, goes to a GLS PakkeShop, and shows the QR code. The staff scans the code and prints the label on the spot. This means the customer doesn’t need a printer or to write anything down. If you’ve selected “Both,” the customer can instead choose to print the PDF label from home.
How to Test the Workflow
There is no separate field where you can enter a test recipient. The confirmation email is always sent to the email address listed on the order itself. If you want to see what it looks like to the customer, follow these steps:
- Create or find an order with your own email address on it
- Make sure the order uses GLS for shipping
- Initiate a return for the order, either from the online store’s returns center or directly on the order in the admin panel
- Check your inbox: the return email with the QR code (or PDF label) will be there
Difference between GLS and PostNord QR Returns
If you’re already using PostNord’s QR Return, the good news is that the customer experience remains the same: the customer scans a QR code at a package drop-off location without having to print anything. However, there’s a difference behind the scenes that’s worth knowing:
- PostNord sends the QR code to the customer itself via email or text message. This is handled within PostNord’s own system.
- GLS does not send the QR code itself. Instead, Shoporama retrieves the QR code from GLS and attaches it to your own return email (return_label.html). That’s why it’s especially important for GLS that your theme includes the return_label.html template and that automatic forwarding is enabled in Returcenter.
For you as a store owner, the difference in practice simply means that you need to remember these two Return Center settings and the template when using GLS QR Return. Everything else works just as you’re used to.
Frequently Asked Questions
Do I need to do anything manually every time a customer wants to return an item?
No. Once you’ve selected “QR Code” or “Both” under “Delivery” and enabled “Automatically create return labels” and “Automatically send return label to the customer” in the Return Center, everything happens automatically. The customer receives their QR code via email without you having to lift a finger. If you’d rather manage this manually, you can instead create a GLS return for each individual order.
Does the format selection apply to the entire store or per order?
The format is set per online store and applies to all GLS returns in that store. You select it in one place under Delivery, Setup, in the GLS section. This means you don’t have to decide on the format for each individual order.
Can I offer both a QR code and a printable label to the customer?
Yes. Select the format “Both (PDF label and QR code).” The customer will then receive both in the same email and can choose to either print the PDF label at home or scan the QR code at a package shop. The PDF label also has a built-in QR code scanner, so no customer is left without an option.
What happens to the order when a GLS QR return is generated?
The QR code is retrieved from GLS and saved to the order, and a separate return tracking number is assigned to the order at the same time. This is separate from the delivery tracking, so you can track the return shipment on its own. The QR code is also attached to the return email sent to the customer.
We have two online stores under the same company. Why do the return labels from both stores show the same name? (Jonas, multiple online stores)
Because, by default, the name comes from the company profile that the two stores share. Fill in the “Sender Name” in the GLS section under Delivery → Setup in each of the two stores, and each store will use its own name. Note that this only applies to return labels: on regular shipping labels, the sender is taken from the registration associated with your GLS customer number, and you can change that directly with GLS.
The return email isn’t being sent to the customer. What could be wrong?
Check three things. First, make sure that both “Automatically create return labels” and “Automatically send return label to the customer” are enabled in the Return Center. Second, ensure that your theme includes the email template return_label.html; otherwise, the email will not be sent. Third, make sure the label itself didn’t fail at GLS—for example, due to incorrect API information or an invalid address. You can view the error message from GLS in the order queue, and the article “Errors when transferring to GLS” provides help with these types of issues.
Are customers already familiar with QR returns?
Yes, for most of them. It’s the same type of QR Return that many have already tried with PostNord, where you show a QR code at a package shop without having to print anything. It’s very familiar, so lengthy explanations are rarely needed, and that makes the return process simple and hassle-free for the customer.
Related articles
GLS settings on shipping options
Explanation of the GLS-specific settings per shipping option in Shoporama: shipping module, DepositService, PrivateDelivery, FlexDelivery and...
Handle returns
Guide to Shoporama's returns center - handle returns, create credit notes, and manage customer return requests.
Return center
Learn how to set up and use Shoporama's Return Center so your customers can easily request returns and you can handle them efficiently from...
Set up GLS integration
Guide to setting up GLS integration in Shoporama so you can print GLS labels directly.
Error when transferring to GLS
Overview of typical GLS transfer errors in Shoporama and solutions for them.