Order labels
Guide to order labels in Shoporama. Create color-coded labels to organize and categorize your orders and set up automatic allocation based on customer or order type.
Order labels are color-coded stickers that you can attach to your orders to organize and categorize them. For example, you can create labels such as "Shipped," "Awaiting Stock," "VIP Customer," or "Return," and use them to quickly filter and find orders.
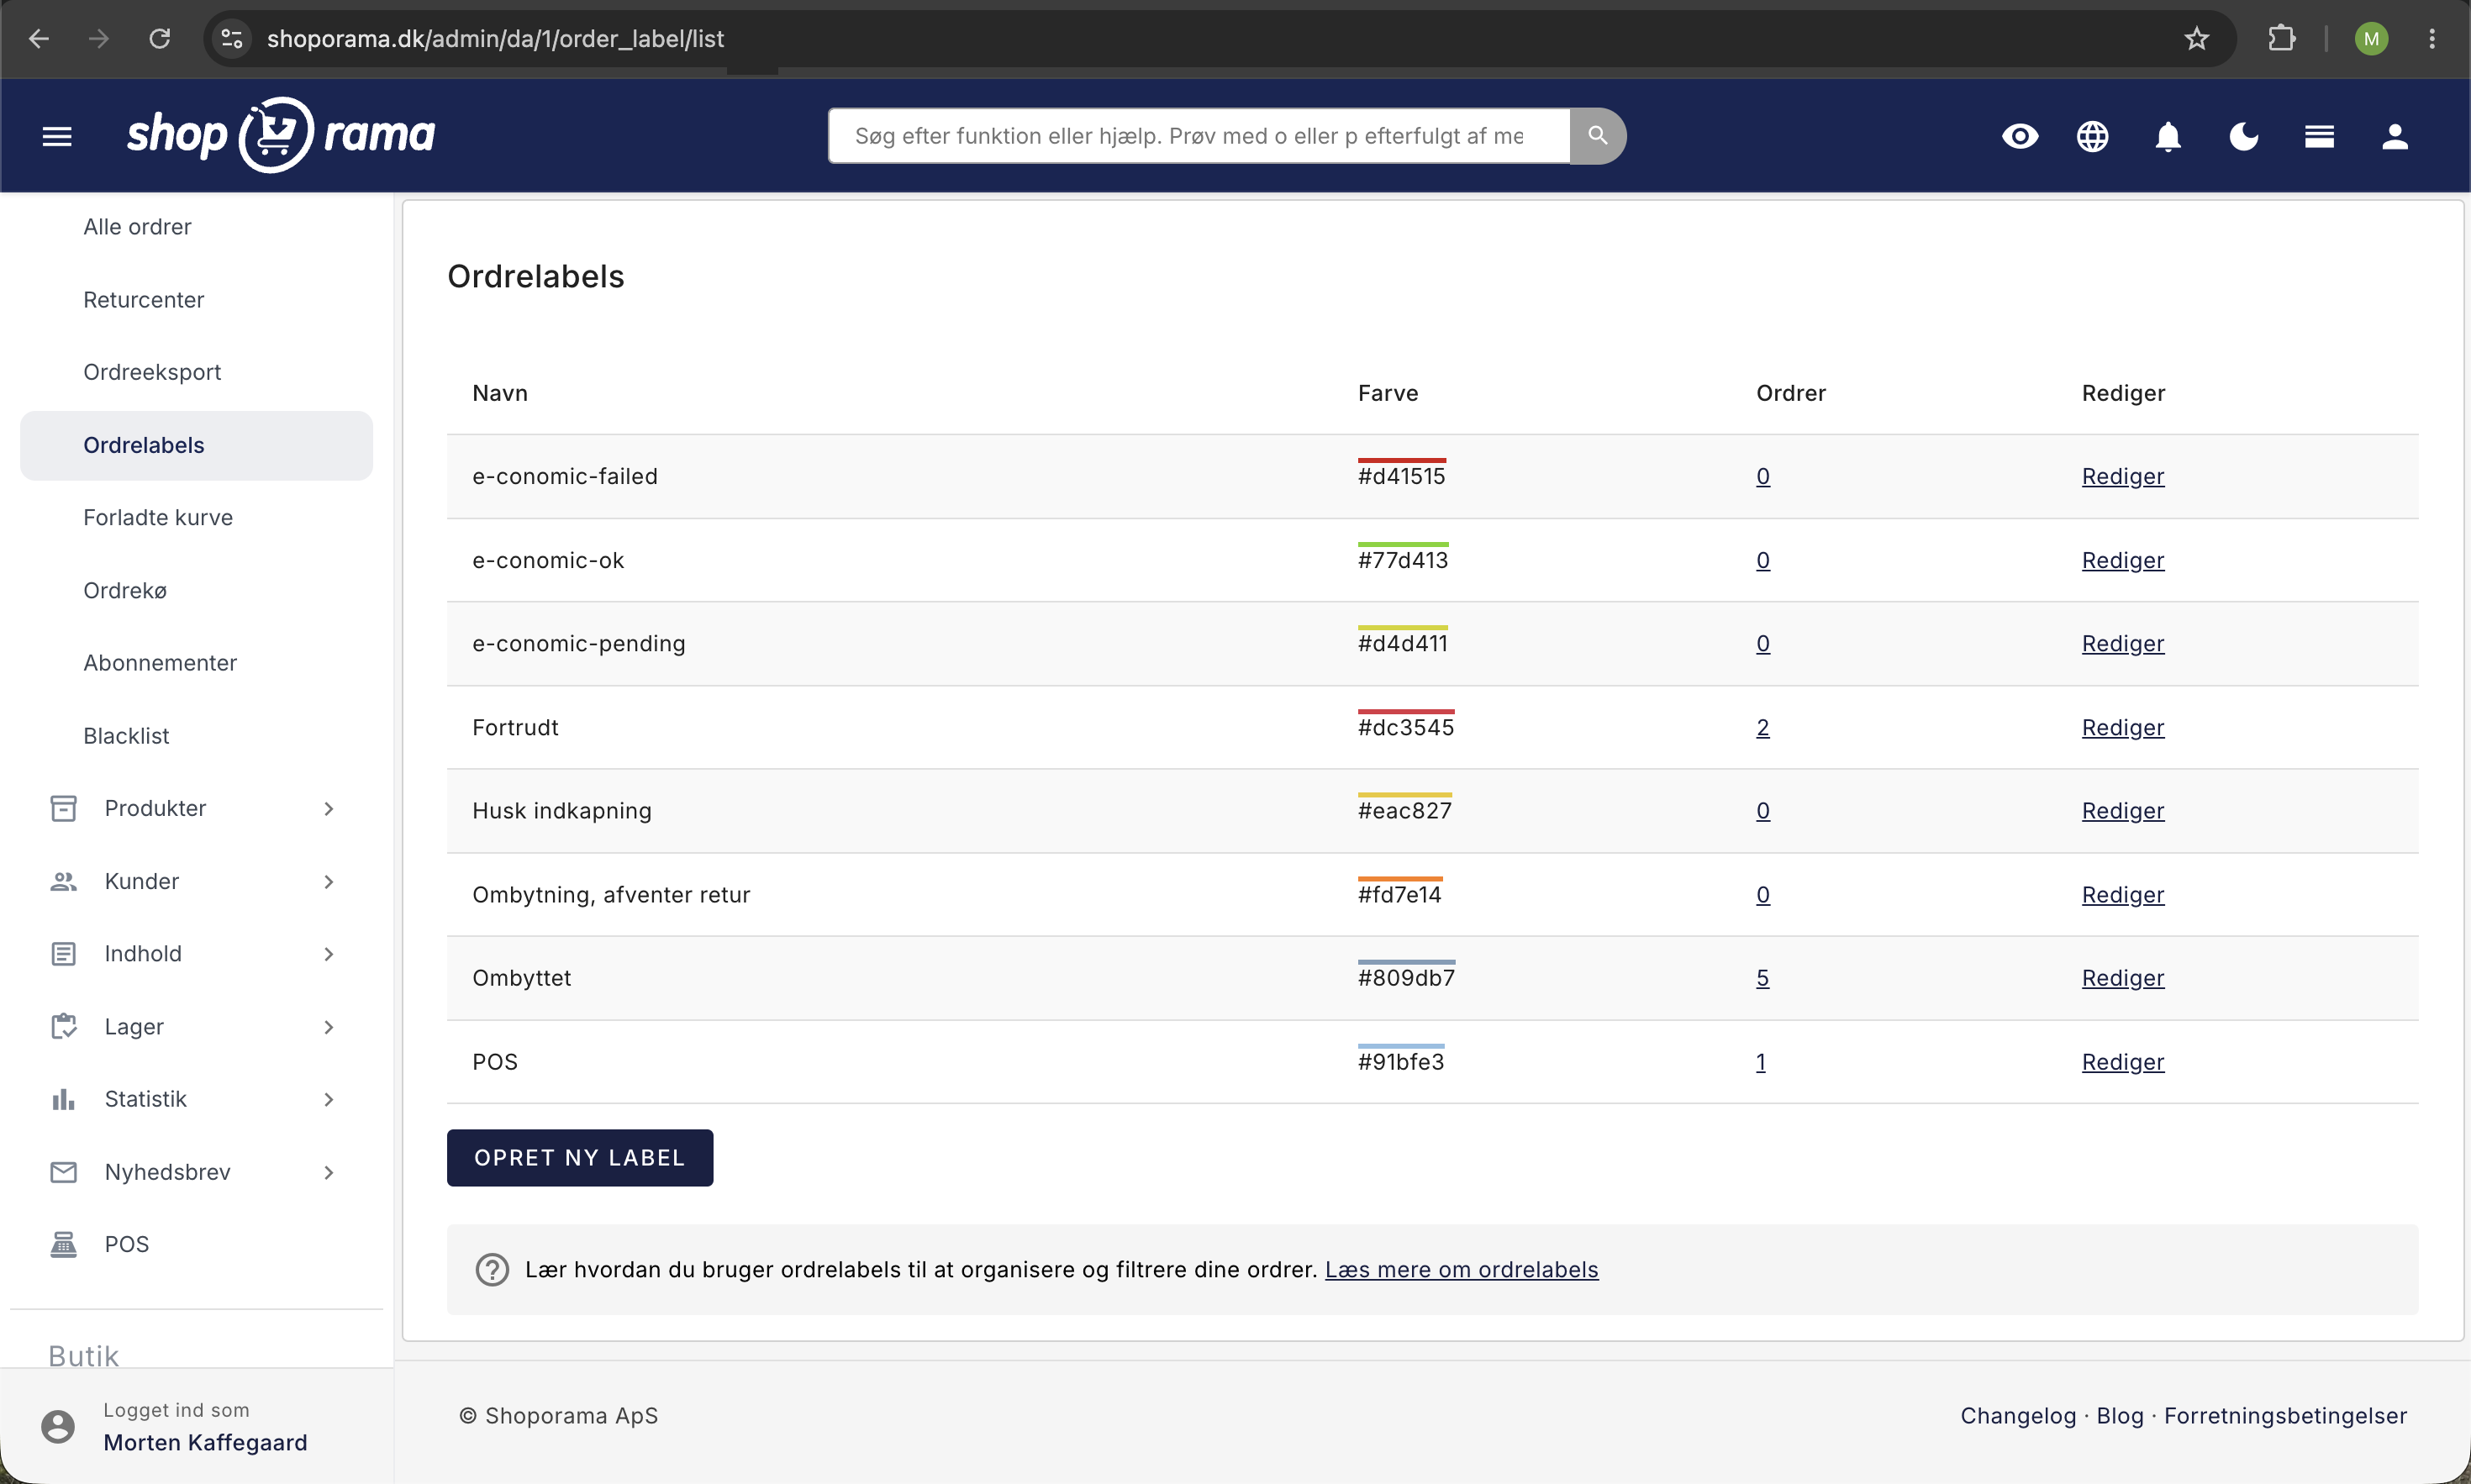
Overview of Labels
Under Orders > Order Labels in the menu, you’ll find an overview of all your order labels. For each label, the following is displayed:
- Name — the label’s title.
- Color — the color code used to mark orders with this label.
- Orders — the number of orders with this label. Click the number to view the orders directly in the order list.
- Edit — a link to edit the label.
Create a new label
- Go to Orders > Order Labels.
- Click Create New Label.
- Enter a name for the label (e.g., "VIP," "Pending Payment," "Complaint").
- Select a color using the color picker.
- Click Save.
Edit and delete labels
Click "Edit " next to a label to change its name, color, or automatic settings. You can also delete a label from the edit page.
Automatic assignment
You can set up labels to be automatically added to orders based on specific criteria:
- Specific customers — enter email addresses or phone numbers (separated by commas) for the customers who should automatically have the label applied to their orders. Useful for VIP customers or B2B customers, for example.
- Orders from bundles — automatically add the label to orders that contain products from bundles. Useful for identifying orders that require special picking and packing.
- Orders from subscriptions — automatically add the label to orders that come from subscriptions. Only appears if your store has subscriptions enabled.
- Customers with a profile — automatically add the label to orders from customers who have created a profile (are logged in).
How the rules for automatic assignment work
The rules are listed on the label itself, so you set them up once and can forget about them. Here are the details you need to know before relying on them blindly.
When the rules run
The rules for customers, bundle orders, and customer profiles run the moment an order is created through the store’s checkout. The rule for subscriptions runs when a subscription generates the next order. In practice, this means three things:
- The rules only apply going forward. If you create a new rule today, it won’t be applied retroactively to your previous orders.
- The rules only add labels. They never remove a label, even if you later remove an email address from the field or uncheck a box.
- The same label is applied only once to an order, even if multiple rules apply.
If you want to apply a label to orders you’ve already received, you’ll need to do so manually from the order list. This is described further down the page.
How the customer rule matches
The “Automatically add for the following customers” field compares what you enter with the order’s email address and phone number. The comparison is exact, not approximate:
- Separate multiple customers with commas. Spaces and line breaks around the commas don’t matter, so feel free to enter one customer per line for clarity.
- You can mix email addresses and phone numbers in the same field.
- There are no wildcards. This means you cannot enter an entire domain to match all employees at the same company. Each address must be entered separately.
- The phone number must be entered exactly as the customer entered it in the field—that is, with the same spaces, hyphens, and any country code.
If your B2B customer places an order from multiple email addresses, enter them all in the field, separated by commas. The label will then apply regardless of which employee in the company places the order.
Multiple rules on the same label
You can easily check multiple boxes on the same label. The rules operate independently of one another, so the label will be applied if just one of them matches. If you want to distinguish between “orders from subscriptions” and “orders from bundle packages” in the order list, you should therefore create two labels, each with its own rule, instead of a single label with two checkboxes selected.
Labels from newsletter campaigns
There’s a fifth way to have labels applied automatically, and it doesn’t appear on the label itself. When you create a campaign in the newsletter module, under “Order Labels,” you can select the labels that should be automatically added to orders generated by the campaign. Afterward, you can filter the order list by label to see what results a specific newsletter has generated.
System Labels: Returns and Exchanges
In addition to the standard automatic assignment, a label can be linked to built-in functions in Shoporama. Two of these relate to returns, and both are selected on the label’s edit page (and when you create a new one). You can only have one label of each type per online store, and you’re welcome to rename the label or assign it a different color. The link remains intact.
- Use this label for cancellations —the label is automatically applied to an order when the customer cancels the purchase via the digital cancellation feature. This makes it easy to see in the order list which orders the customer has canceled. Read more in the article Digital Cancellation.
- Use this label for exchanges —the label is automatically applied to the new order created when you approve an exchange at the returns center. The exchange order has been created and is ready for picking, but the customer’s returned item may not have been received yet. The label makes this clear in the order list so you don’t accidentally ship the new item too early. Manually remove the label from the order once the returned item has been received.
If your online store doesn’t already have a label for this purpose, Shoporama automatically creates one the first time the feature is used (for exchanges, for example, an orange “Exchange, awaiting return”). You can freely customize the name and color afterward.
Use labels in the order list
Once you’ve created labels, you can use them to filter the order list. In the order list, you can:
- Filter orders by label using the filter options.
- View the label color directly on the order in the list.
- Add and remove labels from individual orders.
Filter the order list by labels
Filtering is where labels really pay off for the time you spend setting them up. Here’s how:
- Go to Orders > All Orders.
- Click the Label button in the filter row above the order list.
- The Select Labels window opens. If you have many labels, you can type in the Search for Label field to quickly find the right one.
- Check one or more labels.
- Click Apply Filter.
When the filter is active, a small number appears on the Label button indicating the number of selected labels, so you can see that the list does not show all orders. The filter is included in the page’s URL, so you can bookmark the view or send the link to a colleague.
If you select multiple labels, the order must have all of them
The label filter is an “and” filter, not an “or” filter. If you select both “Gift Wrapping” and “Urgent,” you’ll only see orders that have both labels. Orders with only one of the labels will be removed from the list, and if no orders have both labels, you’ll end up with an empty list. If you want to see orders with either one label or the other, you’ll need to filter by one label at a time.
Combine the label filter with the other filters
The label filter takes precedence over the other filters in the order list, such as status, paid, withdrawn, date range, free-text search, supplier, shipping, country, and payment method. All active filters apply simultaneously, so you can, for example, search for “orders with the ‘Urgent’ label that are paid and have not yet been shipped.” The button labeled “Reset” on the far left of the filter row clears all filters.
Shortcut from the label overview
In the label overview under Orders > Order Labels, there is a number in the Orders column. If you click the number, the order list opens with the filter already set to that specific label. This is the fastest way to go from “how many orders have this label?” to “show me those orders.”
Export the filtered orders
If you’ve filtered by a label, you can export exactly that selected group of orders. Click Export in the Bulk Edit bar at the bottom of the page, and select CSV file (all in the search). The file is generated in the background, and you can download it once it’s ready. It contains a column called " Labels" with the order’s labels. If an order has multiple labels, they appear in the same cell separated by a plus sign. Read more in the article " Export Orders as CSV."
Add and remove labels from multiple orders at once
Labels don’t have to come from a rule. You can add them manually, and you can do so for multiple orders at once:
- Find the orders in the order list, for example by filtering or searching for them.
- Check the box on the far left of each order you want to change.
- Click the " Labels " button in the " Bulk Edit " bar at the bottom of the page.
- Check the boxes next to the relevant labels. You can select multiple labels at once.
- Click Add to apply labels, or Remove to remove them.
The " Labels" button will only appear once you have created at least one order label. This action only affects labels. The orders’ status, payment, and contents remain unchanged.
Labels on a Single Order
If you only need to edit a single order, you can do so while the order is still open. Open the order, locate the "Labels" field, and select the labels you want to apply to the order. Hold down Ctrl (Cmd on Mac) to select or deselect multiple labels. Note that when you save, this field will replace the order’s labels with exactly what you’ve selected. Any label you deselect will be removed from the order.
Remove labels from orders
If you want to remove the same label from multiple orders, do so from the order list using the Labels menu, as described above. The shortcut from the label overview is the fastest way to select the orders. Only the label is removed. The order and its contents remain unchanged.
Frequently Asked Questions
Why aren’t my old orders getting the label now that I’ve just created the rule?
Because the rules only run when an order is created. A new rule therefore applies only going forward. If you want to apply the label to orders you’ve already received, filter or search for them in the order list, check the boxes next to them, open the Labels menu, and click Add. Then the old orders will be included.
My regular customer isn’t getting their VIP label automatically. What’s wrong?
Nine times out of ten, it’s because the text doesn’t match exactly what’s on the order. Check that the email address is spelled correctly, that there’s a comma between customers, and that the customer actually placed the order using the address or phone number you entered. If the customer sometimes orders from home and sometimes from work, both addresses must be entered in the field. Also, remember that the rule only applies to orders placed after you’ve saved it.
I selected two labels in the filter, and now the list is empty. Is there an error?
No. The filter requires that the order have all the labels you’ve selected. If no orders have both labels at the same time, the list will be empty. Uncheck one of the boxes and filter by one label at a time if you want to see both groups.
I accidentally applied the wrong label to a bunch of orders. Can I undo that?
Yes, and it takes less than a minute. Filter the order list by the incorrect label so you only see the affected orders, check the boxes next to them, open the Labels menu, select the label, and click Remove. The orders themselves remain unaffected. Only the label is removed.
Can I include labels in my accounting?
Labels aren’t an accounting field, but they’re included in the order export. If you export orders to CSV, there’s a column called “Labels” that lists the order’s labels separated by plus signs. You can first filter the order list by a label and then export it so that the file contains only the orders you need—for example, all orders marked as exchanges within a specific time period.
Can I see which orders came from a specific newsletter?
Yes. Select one or more order labels for the campaign under “Order Labels” when you create the newsletter. Orders linked to the campaign are automatically assigned the selected labels, and you can then filter the order list by them. We recommend creating one label per campaign if you want to be able to compare campaigns over time.
Can I set labels from my own system?
Yes, if you or your developer uses our REST API. Labels can be retrieved and created via the /order-label endpoint, and when you update an order, you can send the add_label_id and remove_label_id fields to add or remove a label. The order list in the API can also be filtered using the `order_label_id` parameter. This makes labels a convenient way to mark orders that have been processed by a warehouse or an accounting system.
How many labels can I have, and in what order are they displayed?
There is no fixed limit, but keep the number low enough to manage easily in the filter window. Labels are displayed alphabetically by name in both the label overview and the filter, so a naming pattern such as “Warehouse: missing” and “Warehouse: partial delivery” keeps related labels grouped together in the list.
Tip
Use labels for what order status cannot. Status already covers New, In Progress, and Shipped, so labels provide the most value across statuses: gift wrapping, rush orders, customers who need to be called, or orders a fulfillment center has been notified about.
Need help? Contact us at support@shoporama.dk.
Related articles
Pick list
Guide to Shoporama's pick list. Pick and pack orders efficiently with barcode scanning, batch management and mobile-friendly interface.
Order queue
Guide to the order queue in Shoporama. See the status of automatic order actions such as capture, invoicing and stock pull, and learn how to manage...