Self-Service POS: Let customers scan and pay on their own
With self-service POS, your customers can scan the barcodes of items on their own phones, add them to their cart, and pay online. Ideal for B2B reordering from the warehouse, wholesale sales, farm stands, and booths at markets and trade shows.
Self-service POS is a checkout system that customers operate themselves using their own phones. You place a QR code next to the items; the customer scans it with their camera, and then they’re in a simple online store: they scan the barcode (or search for the items), add them to their cart, and pay online. There are no lines, no cashier, and no extra hardware.
The customer handles the entire purchase themselves. What sets self-service POS apart from a solution you’d have to build yourself is that it runs directly within your Shoporama online store. Prices, discounts, inventory, and orders are integrated with the rest of your store, so you don’t have to keep track of two separate systems.
What is self-service POS?
In short, self-service POS is a full-screen self-checkout located at your store’s URL behind a secret link. Customers land on the page by scanning a QR code, see your store’s name and logo at the top, and can start scanning items right away. Everything is calculated by the same pricing engine as your regular online store checkout, so you can trust that the total is correct.
Self-service POS is ideal for:
- B2B reordering from the warehouse, where an employee scans items that are running low and places an order at the company’s own prices without having to return to a computer.
- Wholesale and cash-and-carry sales, where customers pick their own items and pay on the spot.
- Farm stores, roadside stands, and self-service stalls that are open without permanent staff.
- Stalls at markets, trade shows, and events where a permanent, staffed checkout is unnecessary.
Self-service POS is not the same as a standard, staffed POS. If an employee needs to serve customers over a physical counter, you’ll need a POS (Point of Sale) system. The two can easily operate side by side in the same store.
How to enable self-service POS
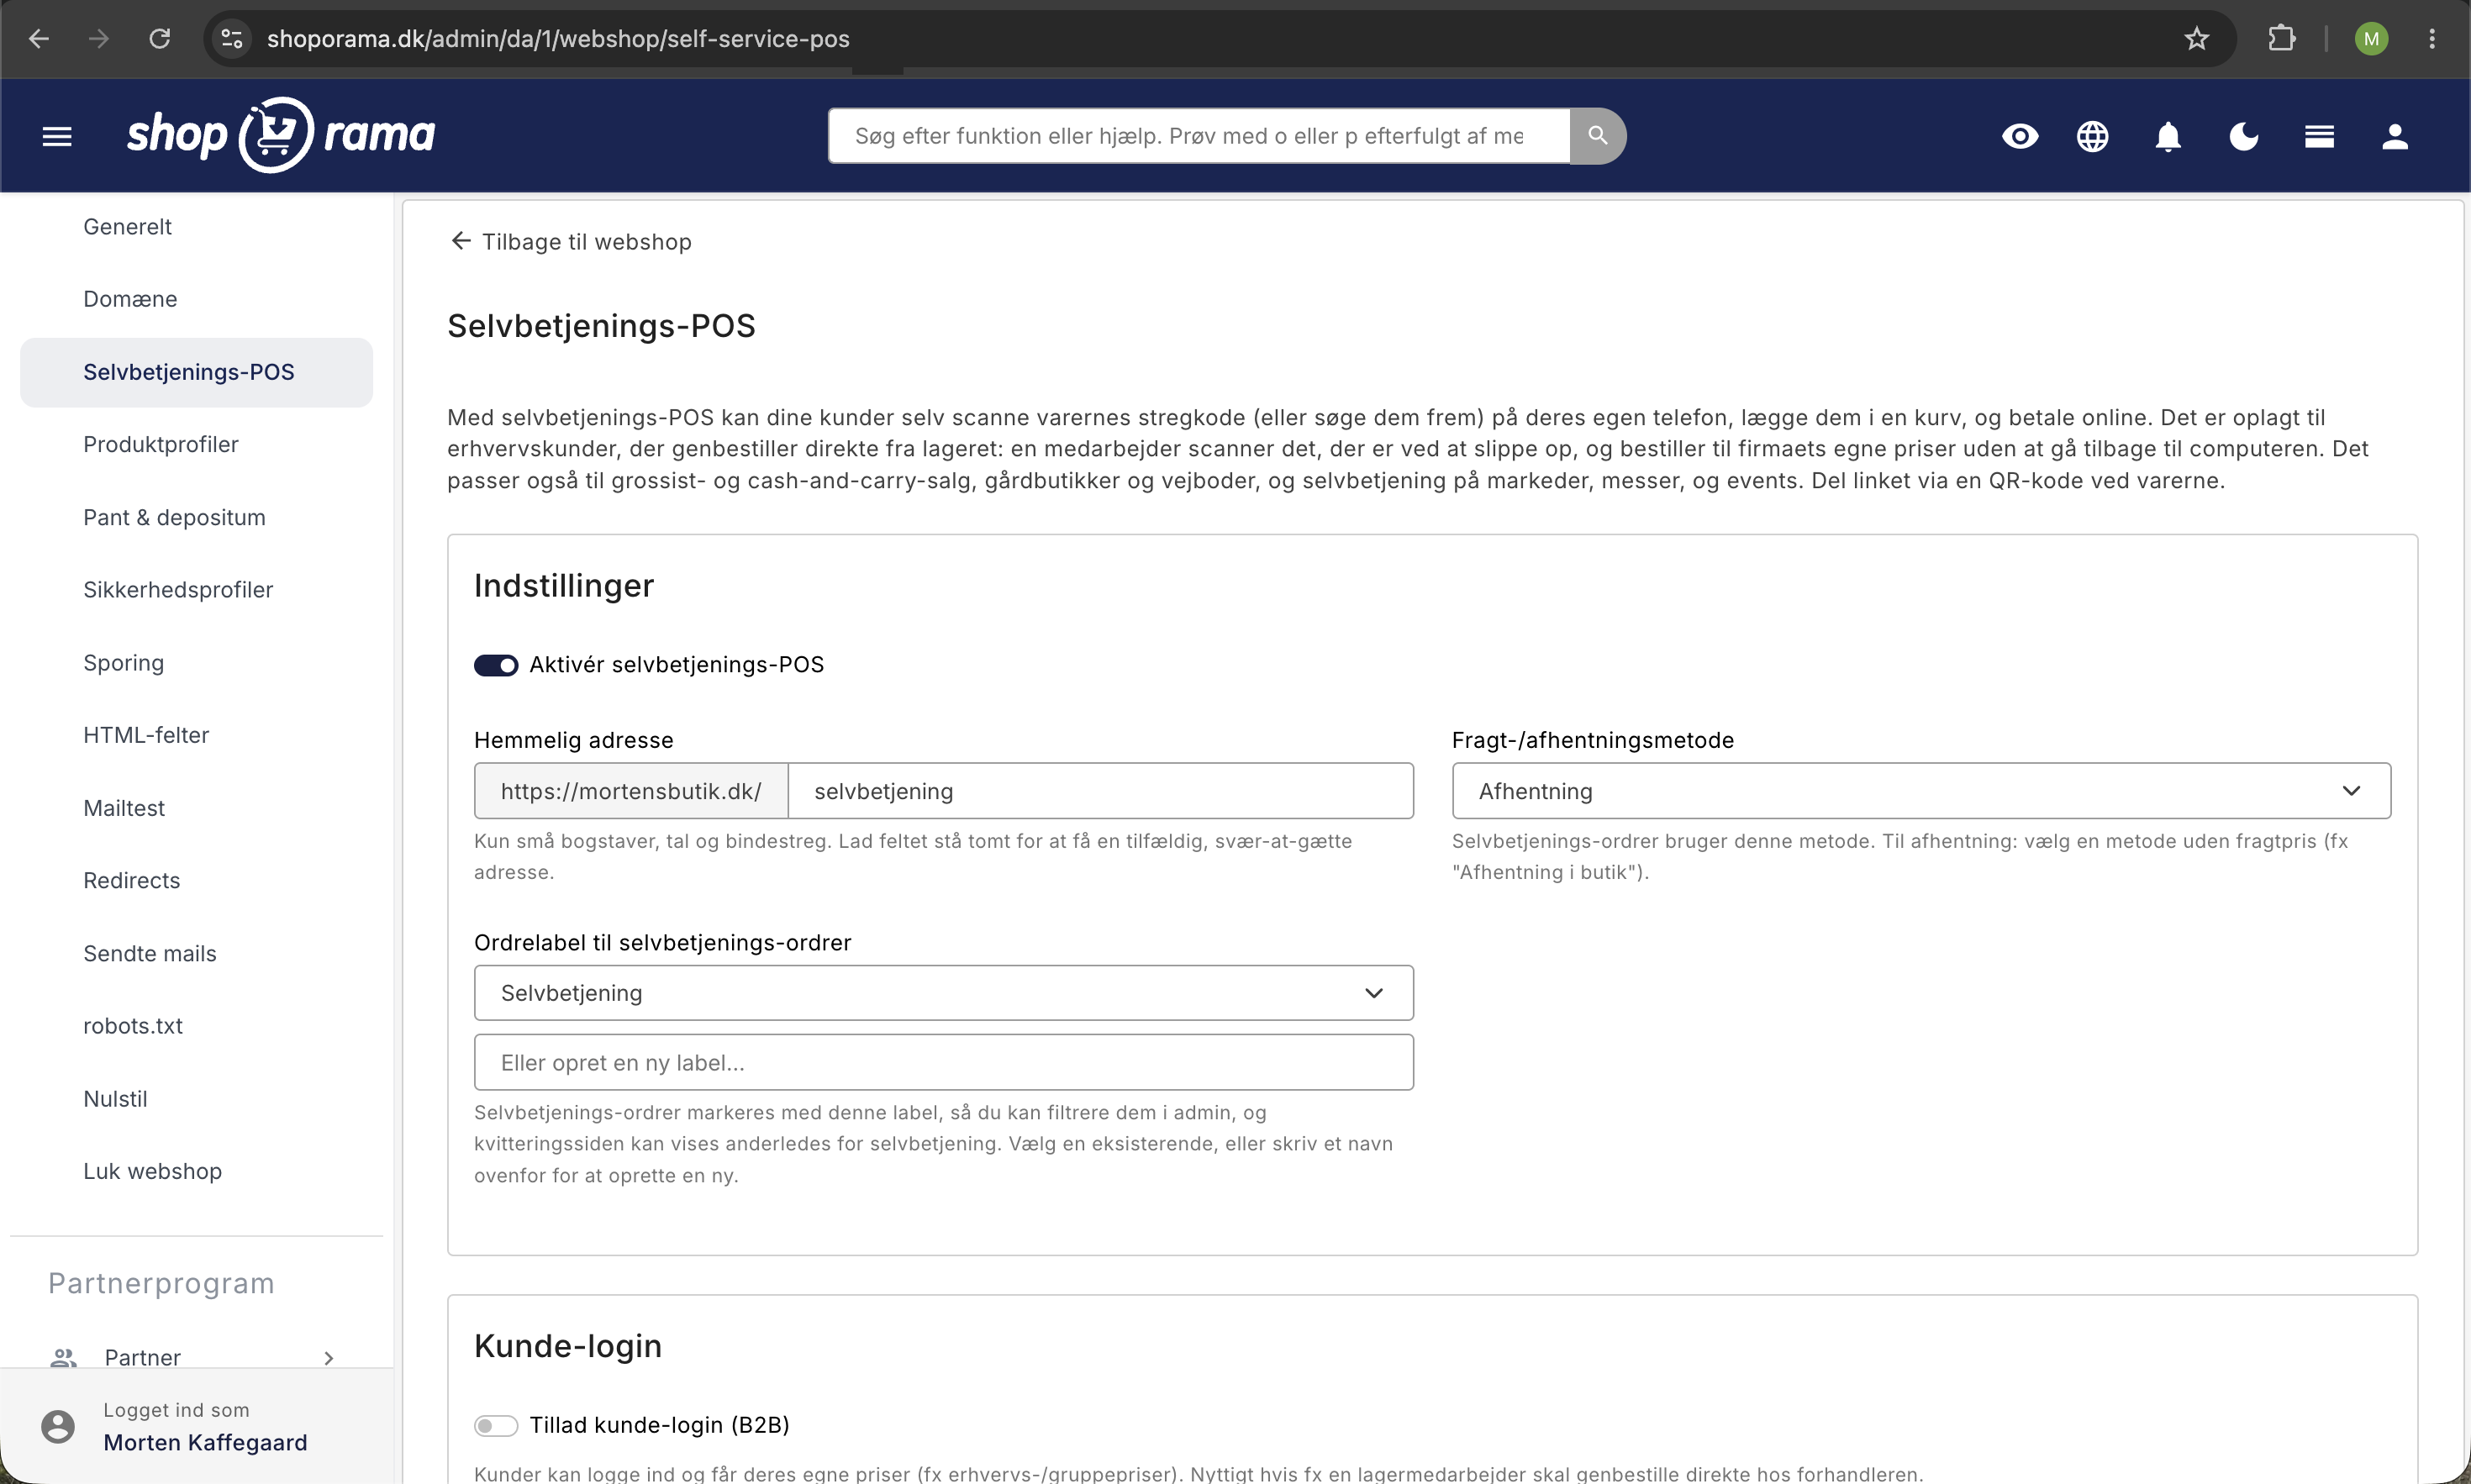
You’ll find the settings under Webshop, Self-Service POS in the admin panel. From here, you can manage everything from a single page.
- Check the box next to “Enable Self-Service POS.”
- Choose a secret address. This is the URL the customer will land on, for example, yourstore.com/self-service-abc123. The address may only contain lowercase letters, numbers, and hyphens. If you leave the field blank, you’ll automatically get a random, hard-to-guess address, so only people with the QR code can access it.
- Select a shipping or pickup method. For a physical self-service location, you’ll typically choose a method with no shipping cost, such as “In-Store Pickup.” Both the cart total while the customer is scanning and the final order will use the method you select here.
- Click Save.
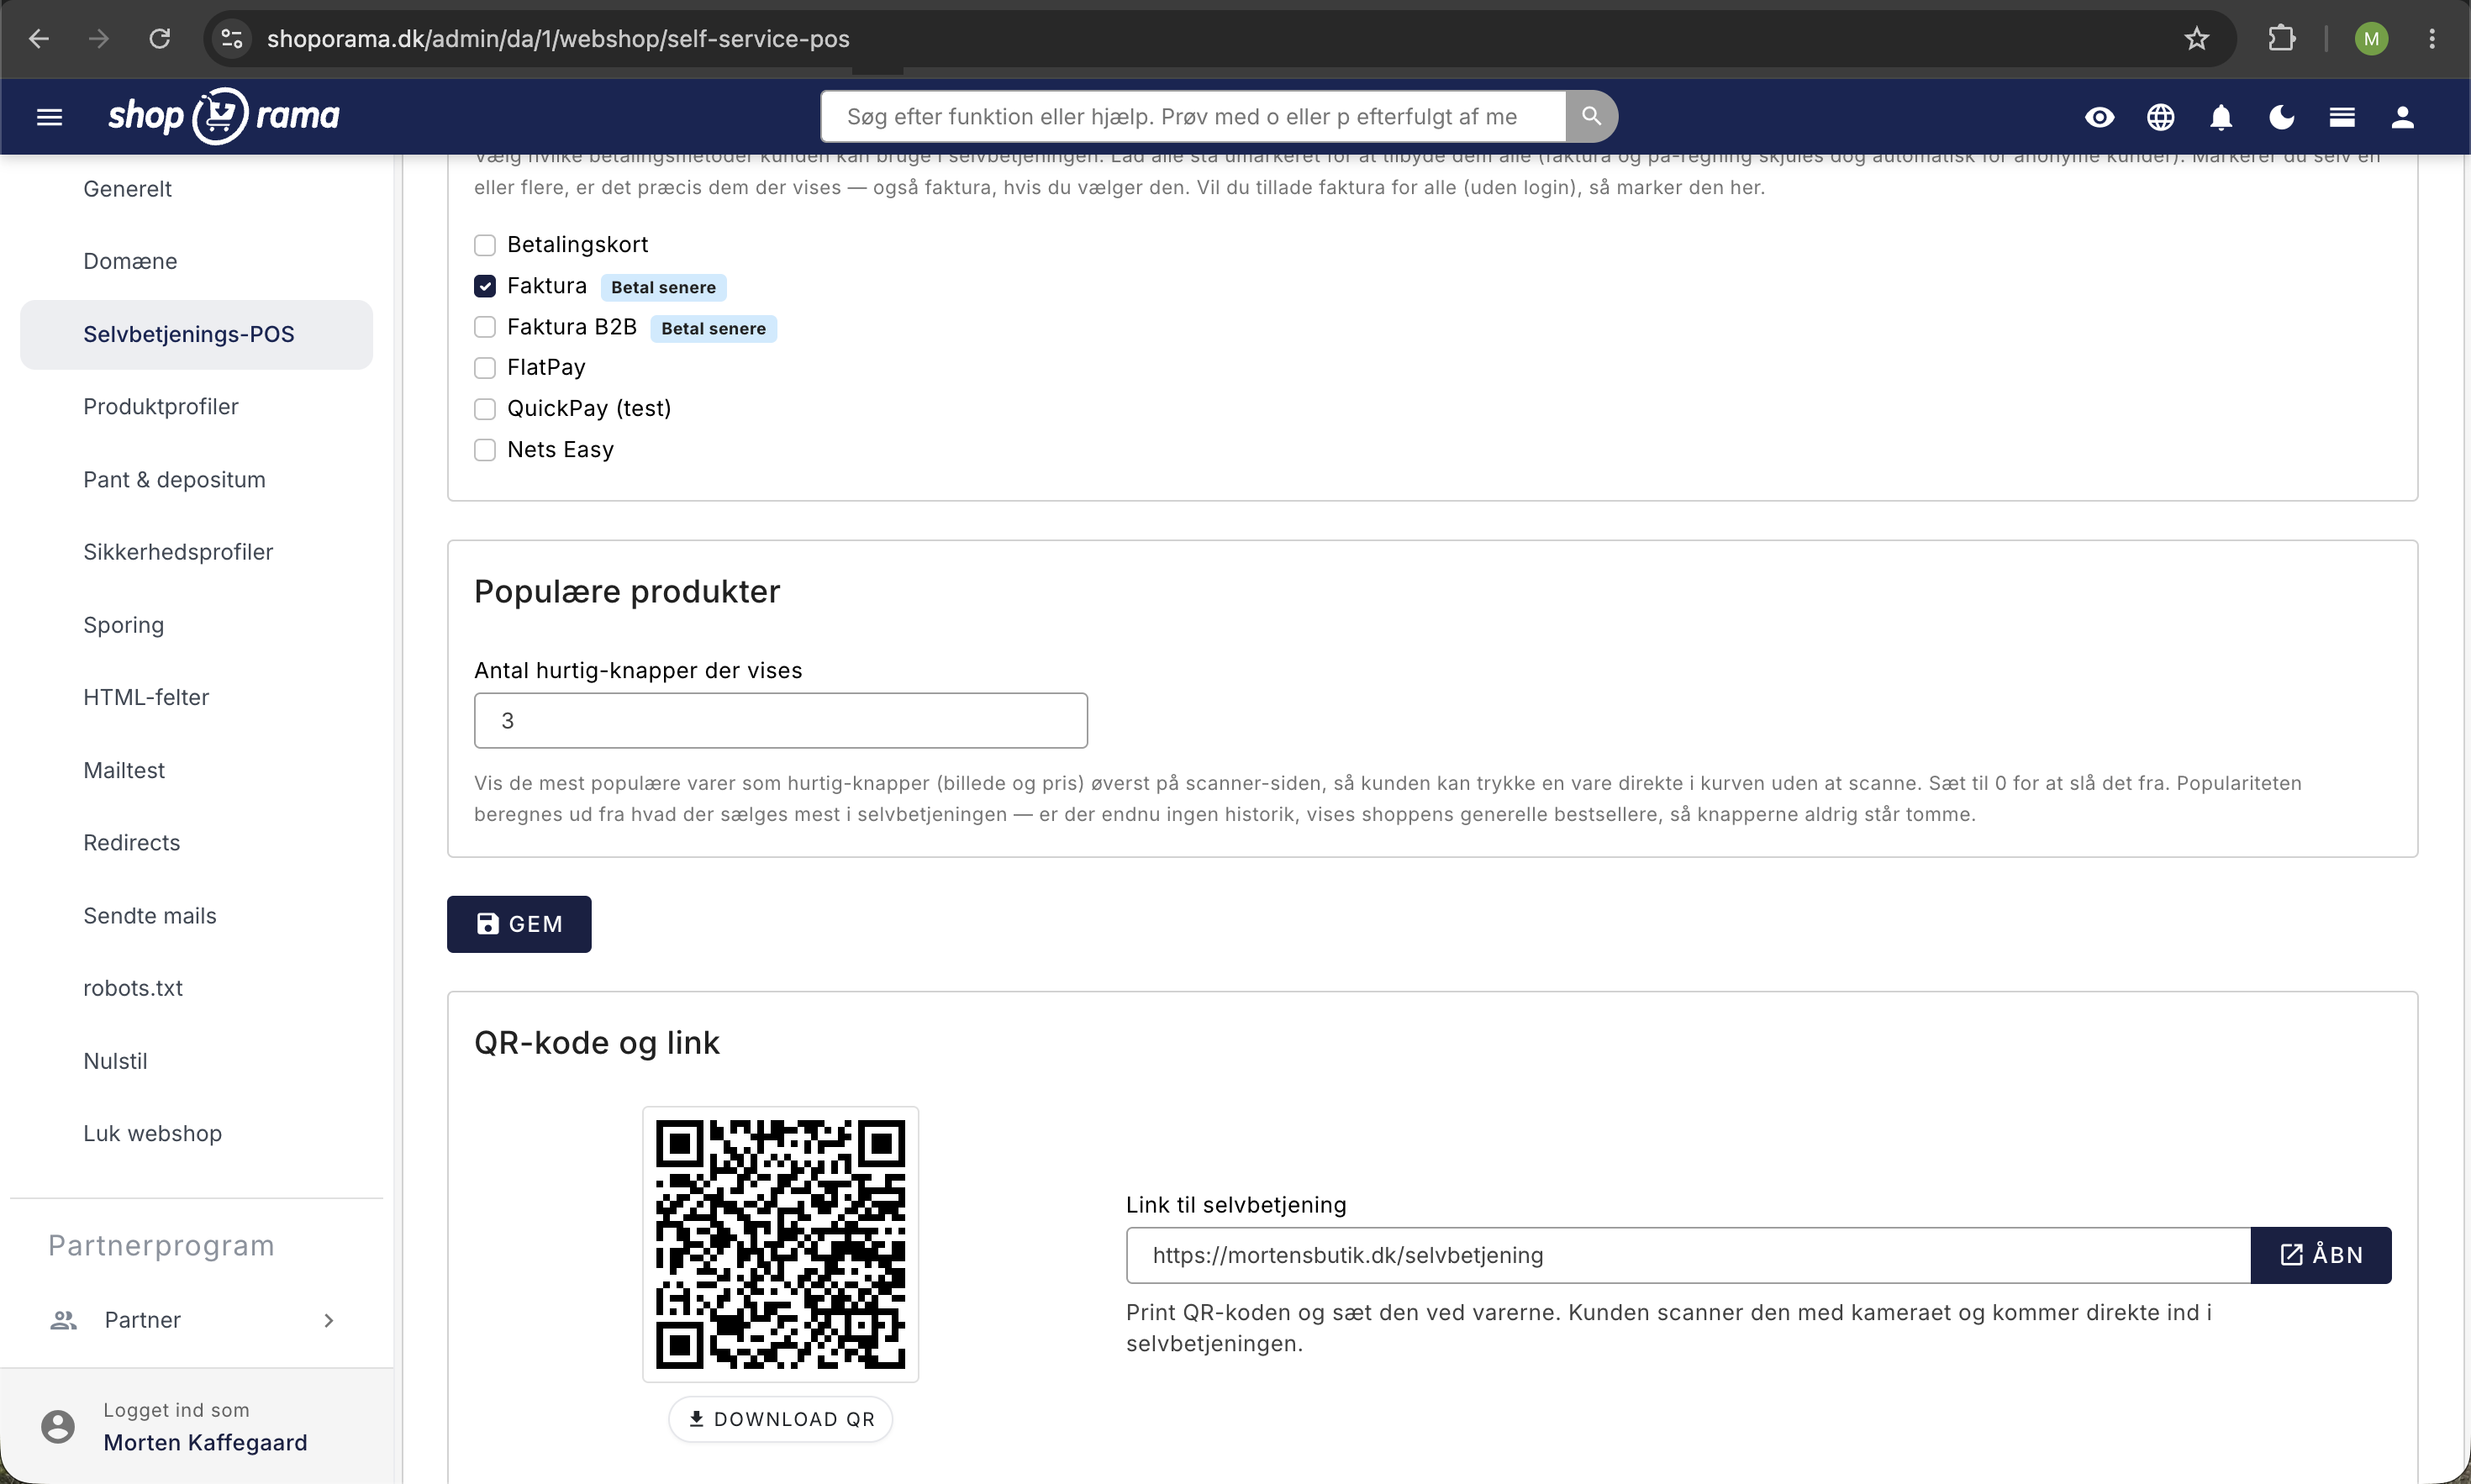
Once self-service is enabled, a QR code will appear on the page. It is generated directly in Shoporama in high-resolution black and white with a light border around it (the border is necessary for reliable scanning), so you can download it, print it, and display it next to the products. Next to the QR code is a direct link with an “Open” button that you can use to test the entire process before displaying the code.
Customer Login and B2B
In the settings, you decide whether customers should be able to log in and whether logging in should be required. You have two options to adjust:
- Allow customer login (B2B). If you enable this, customers can log in with their account and see their own prices, such as business or group prices. The order is linked to their account, and the invoice or receipt is sent to their email. This is useful when a warehouse employee needs to reorder directly from their supplier.
- Require login (no anonymous purchases). If you enable this, the self-service portal becomes a dedicated business terminal: users must log in before they can make a purchase. This requirement is enforced on the server, so it cannot be bypassed in the browser.
If you leave both options disabled, the self-service portal is open and anonymous: customers can shop without logging in or providing any information at all. If you want to dive deeper into business sales, you can read more in “B2B Sales in Shoporama ” and “Quick Reordering for Business Customers.”
Select Payment Methods
You can choose exactly which payment methods the self-service portal is allowed to use. If you leave all options unchecked, your online payment methods will be displayed automatically, while invoicing and “pay later” are hidden from anonymous customers for security reasons, so no one can leave with merchandise without paying. If you select one or more methods yourself, those are the exact ones that will be displayed. If you want to allow invoicing in the self-service portal—for example, on a trusted business terminal—select that option here.
Shortcuts to the Most Popular Items
You can display a number of quick-select buttons featuring your best-selling items, complete with images and prices, on the scanner page. The customer simply taps an item to add it directly to the cart, without having to scan or search. You set the number yourself in the settings; entering 0 turns this feature off. Popularity is calculated based on actual sales in the self-checkout system. If there is no sales history yet, the store’s general bestsellers will be displayed so the buttons are never empty.
Here’s how the customer experiences it
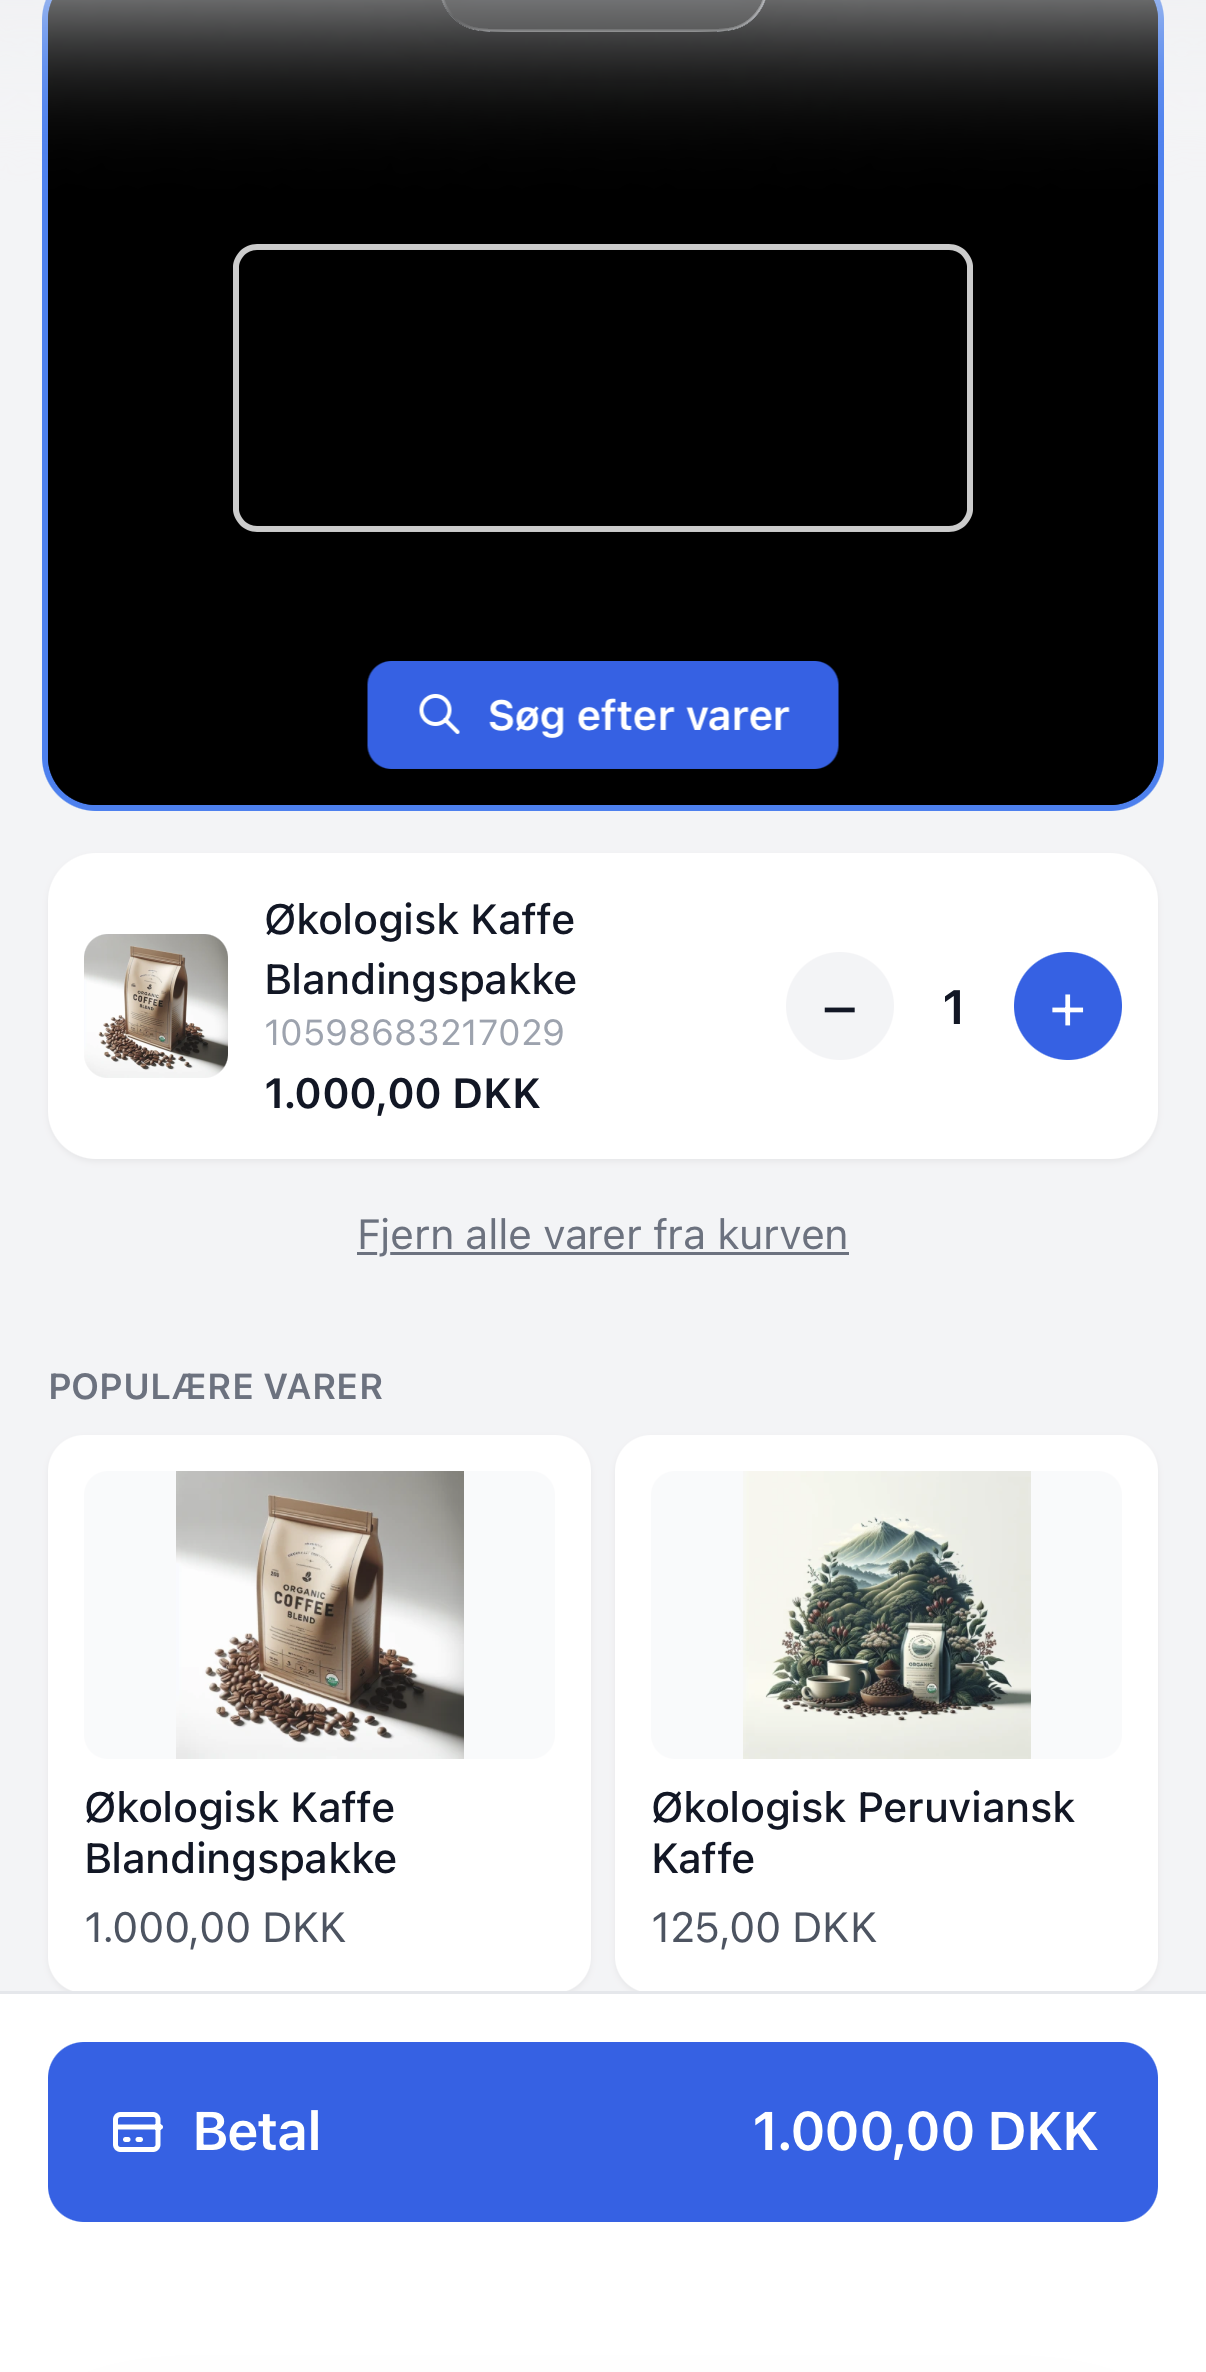
For the customer, it’s designed to be as simple as possible. From scanning to receipt, there are just a few steps on their own phone:
- The customer scans the QR code with their phone’s camera and is taken to the self-service interface.
- They scan the product’s barcode with their phone’s camera, or tap “Search for Products” and find them by name or product number.
- The items are added to the cart, where the customer sees the quantity and total price and can adjust the quantity using the plus and minus buttons.
- The customer taps “Pay,” accepts the terms and conditions, and, if desired, enters an email address to receive the receipt.
- Payment is processed online, for example, with a card or MobilePay. After payment, the customer receives their receipt, and the order appears in your Shoporama store just like any other order.
Throughout the entire process, prices are calculated by the same engine as your regular online store checkout. This means that special offers, volume discounts, bundle deals, promotions, discount codes, and B2B prices (when the customer is logged in) are applied exactly as they are in the online store. If the customer scans a bundle, the cart clearly displays what the bundle contains. If you have age-restricted items, a small badge appears on the item so the customer knows that a 16- or 18-year-old age restriction applies.
Good to know
- Orders are real orders. A self-service order appears in your order overview along with the rest, is included in your statistics, and automatically deducts stock.
- Payment is made online. The self-service feature uses your standard online payment methods, so the money is paid before the customer leaves. If you haven’t set up any payment methods, purchases cannot be completed.
- The address is private, not public. The self-service portal can only be accessed via the address you’ve chosen. It isn’t linked from your store, and it doesn’t appear in menus or search results.
- Your logo is included. If you’ve uploaded a logo to the store, it will appear at the top of the self-service portal, so the customer sees a recognizable brand identity instead of an anonymous page.
Frequently Asked Questions
Does it require special equipment?
No. The customer uses their own phone, and you just need to print the QR code. There’s no scanner, terminal, or app to install. If the phone’s camera can’t be used for some reason, the customer can always find the items by searching instead.
How do I ensure that customers actually pay?
Payment is made online before the order is completed. This means the customer cannot finalize a purchase without paying, and you receive the money the same way you would with a regular online store purchase.
Can I have both a staffed checkout and self-checkout?
Yes. Self-service POS and regular POS are two different things, and you can easily use both. You operate the staffed POS yourself at the counter, while the self-service system runs on the customer’s own phone. You set up self-service under Web Store, Self-Service POS.
Do self-service sales count toward my accounting and statistics?
Yes. A self-service order is just like any other order. It appears in the order overview, is included in your revenue and statistics on the same basis as Webshop orders, and automatically updates inventory, so you don’t have to enter anything twice.
What if someone finds the secret address?
The address is hard to guess, but it’s not a password. If you want full control over who can shop, enable “Require login” so that only customers with an account can complete purchases. This requirement is enforced on the server and cannot be bypassed in the browser.
Does the customer have to provide an email address?
No. The customer can complete the purchase without providing an email address at all and simply receive the on-screen receipt, just like at a physical checkout. If the customer provides an email address, we’ll send an order confirmation and invoice just as we would for a regular order. To protect privacy, the on-screen receipt does not display the customer’s name or address, and the email address is partially hidden unless the customer is logged into their own account.
Can my business customers get their own prices?
Yes. Enable customer login so that customers can log in and see their own group prices. This is ideal for B2B reordering from inventory, where an employee scans items that are running low and places an order at the company’s own prices. Learn more about B2B sales in Shoporama.
Do bundle deals and discount codes work in the self-service portal?
Yes. Prices are calculated by the same engine as your online store, so bundle deals, volume discounts, promotions, and discount codes work the same way as in the regular checkout. When a customer scans a bundle, the bundle’s contents are clearly displayed in the cart.
Do products with variants—such as size or color—work?
Yes. If the variant has its own barcode, the customer scans it, and that exact variant is added to the cart. If the customer searches for the item or clicks on it among the popular items, a small list appears where the customer selects the variant before it’s added to the cart. That way, the correct size or color always ends up in the cart.
What about products with an age restriction?
If you’ve set an age restriction on an item—for example, 16 or 18 years—a badge appears on the item in the cart to alert the customer to the restriction. It serves as a reminder in the self-service system, just as you’re used to seeing at the physical checkout counter.
How do I test this before setting up the QR code?
In the settings, there’s a direct link with an “Open” button next to the QR code. Open it on your phone or computer and go through a purchase before you post the code next to the products. That way, you’ll see exactly what the customer will see.
If you have any questions about the self-service POS, you’re always welcome to email us at support@shoporama.dk.
Related articles
POS - Point of Sale
Learn how to use Shoporama's POS system to sell products in your physical store. Log in with your Shoporama account, scan barcodes, add products to...
B2B sales in Shoporama
How to sell to businesses (B2B) and public institutions (B2G) in Shoporama with CVR, EAN and differentiated VAT.
Hurtig genbestilling for erhvervskunder
Related features
Self-service POS—customers scan and pay on their own
Omnichannel
Omnichannel connects online, in-store, social media and customer service into one experience. Learn the difference from multichannel and the...
Webshop with cash register
Combine webshop with cash register at Shoporama. Web-based POS, shared inventory, barcode scanning and automatic synchronization with your online...