Content Types: Create your own content with custom fields
Create your own content types—such as recipes with cooking times and ingredients—and customize the fields yourself. Learn how to add entries, assign them a page in the store, and display them in the Page Designer.
Do you have content that isn’t a product but still helps you make sales? This could include recipes, size guides, or a list of retailers. With content types, you can create a new type of content yourself in the admin panel with the fields you need—such as preparation time, ingredients, and recommended products. You fill out each entry in one place, and the entries can link directly to your products. If you’re using one of Shoporama’s newer themes, such as Montana or Delaware, the entries can be displayed in the store immediately, without needing a developer’s help. The content types belong to the store and not the theme, so they’ll carry over if you switch themes.
What is a content type?
A content type is a fixed template for a specific kind of content. You decide what to name the type and what information each post should include. Once the type is created, it gets its own menu item under “Content,” right after “Blog,” and this is where you create and edit the posts.
Content Type, Fields, and Entries
- The content type is the template, e.g., Recipes.
- The fields are the details each post contains, such as Cooking Time (a number), Difficulty Level (a selection from a list), and Recommended Products (a link to your products). All posts also always have a title, and they can include a photo gallery.
- The posts are the individual recipes, such as “12-Hour Cold Brew” and “Vanilla Iced Coffee.”
Here are some examples of how a store can use content types:
| Store | Content Type | Examples of fields |
|---|---|---|
| Food and Cooking | Recipes | Cooking time, difficulty level, an ingredient list, and the store items included |
| Coffee and Tea | Brewing guides | Brewing method, grams of coffee per liter of water, step-by-step instructions, and recommended equipment |
| Furniture and Interiors | Materials | Care instructions, can withstand direct sunlight (yes/no), and care products |
| Travel and Vacations | Hotels | Number of stars, distance to the beach, amenities, and a link to book |
| Manufacturer and retailers | Retailers | Address, region, website, and the product categories the retailer carries |
| B2B | Data sheets | Applies to (products), certifications, valid until, and a link to the data sheet |
Content type, additional fields, or theme settings?
Content types are for a new kind of content with many similar entries. For other needs, Shoporama already has a better solution:
- Additional information about your products, such as material or ISBN: use the custom fields in the “Product Fields” card. Read more in “Extended Fields.”
- Fields that your theme has added to products, categories, and pages—such as a video or a badge—can be found in the Theme Settings card. Read more in Theme Settings for Products and Pages.
- A single page, such as “About Us” or “Terms and Conditions”: use a static page.
- News and articles that you write on an ongoing basis: use the blog.
The rule of thumb is simple. If you need to create many of the same type of content, and they all need to include the same fixed information, then it’s a content type. One doesn’t exclude the other: for example, a custom theme can give your blog posts a field where you select a recipe.
How to create a content type
- Go to Content → Content Types, and click Create Content Type. If you don’t have any types yet, you can also use the Create Your First Content Type button in the middle of the page.
- Fill out the General tab with the name in both plural and singular forms.
- Under “Display in the Shop,” choose whether the posts should have their own page in the shop and whether they should have an image gallery.
- Click Create Content Type. Once the type is saved, you can add fields and configure the overview page.
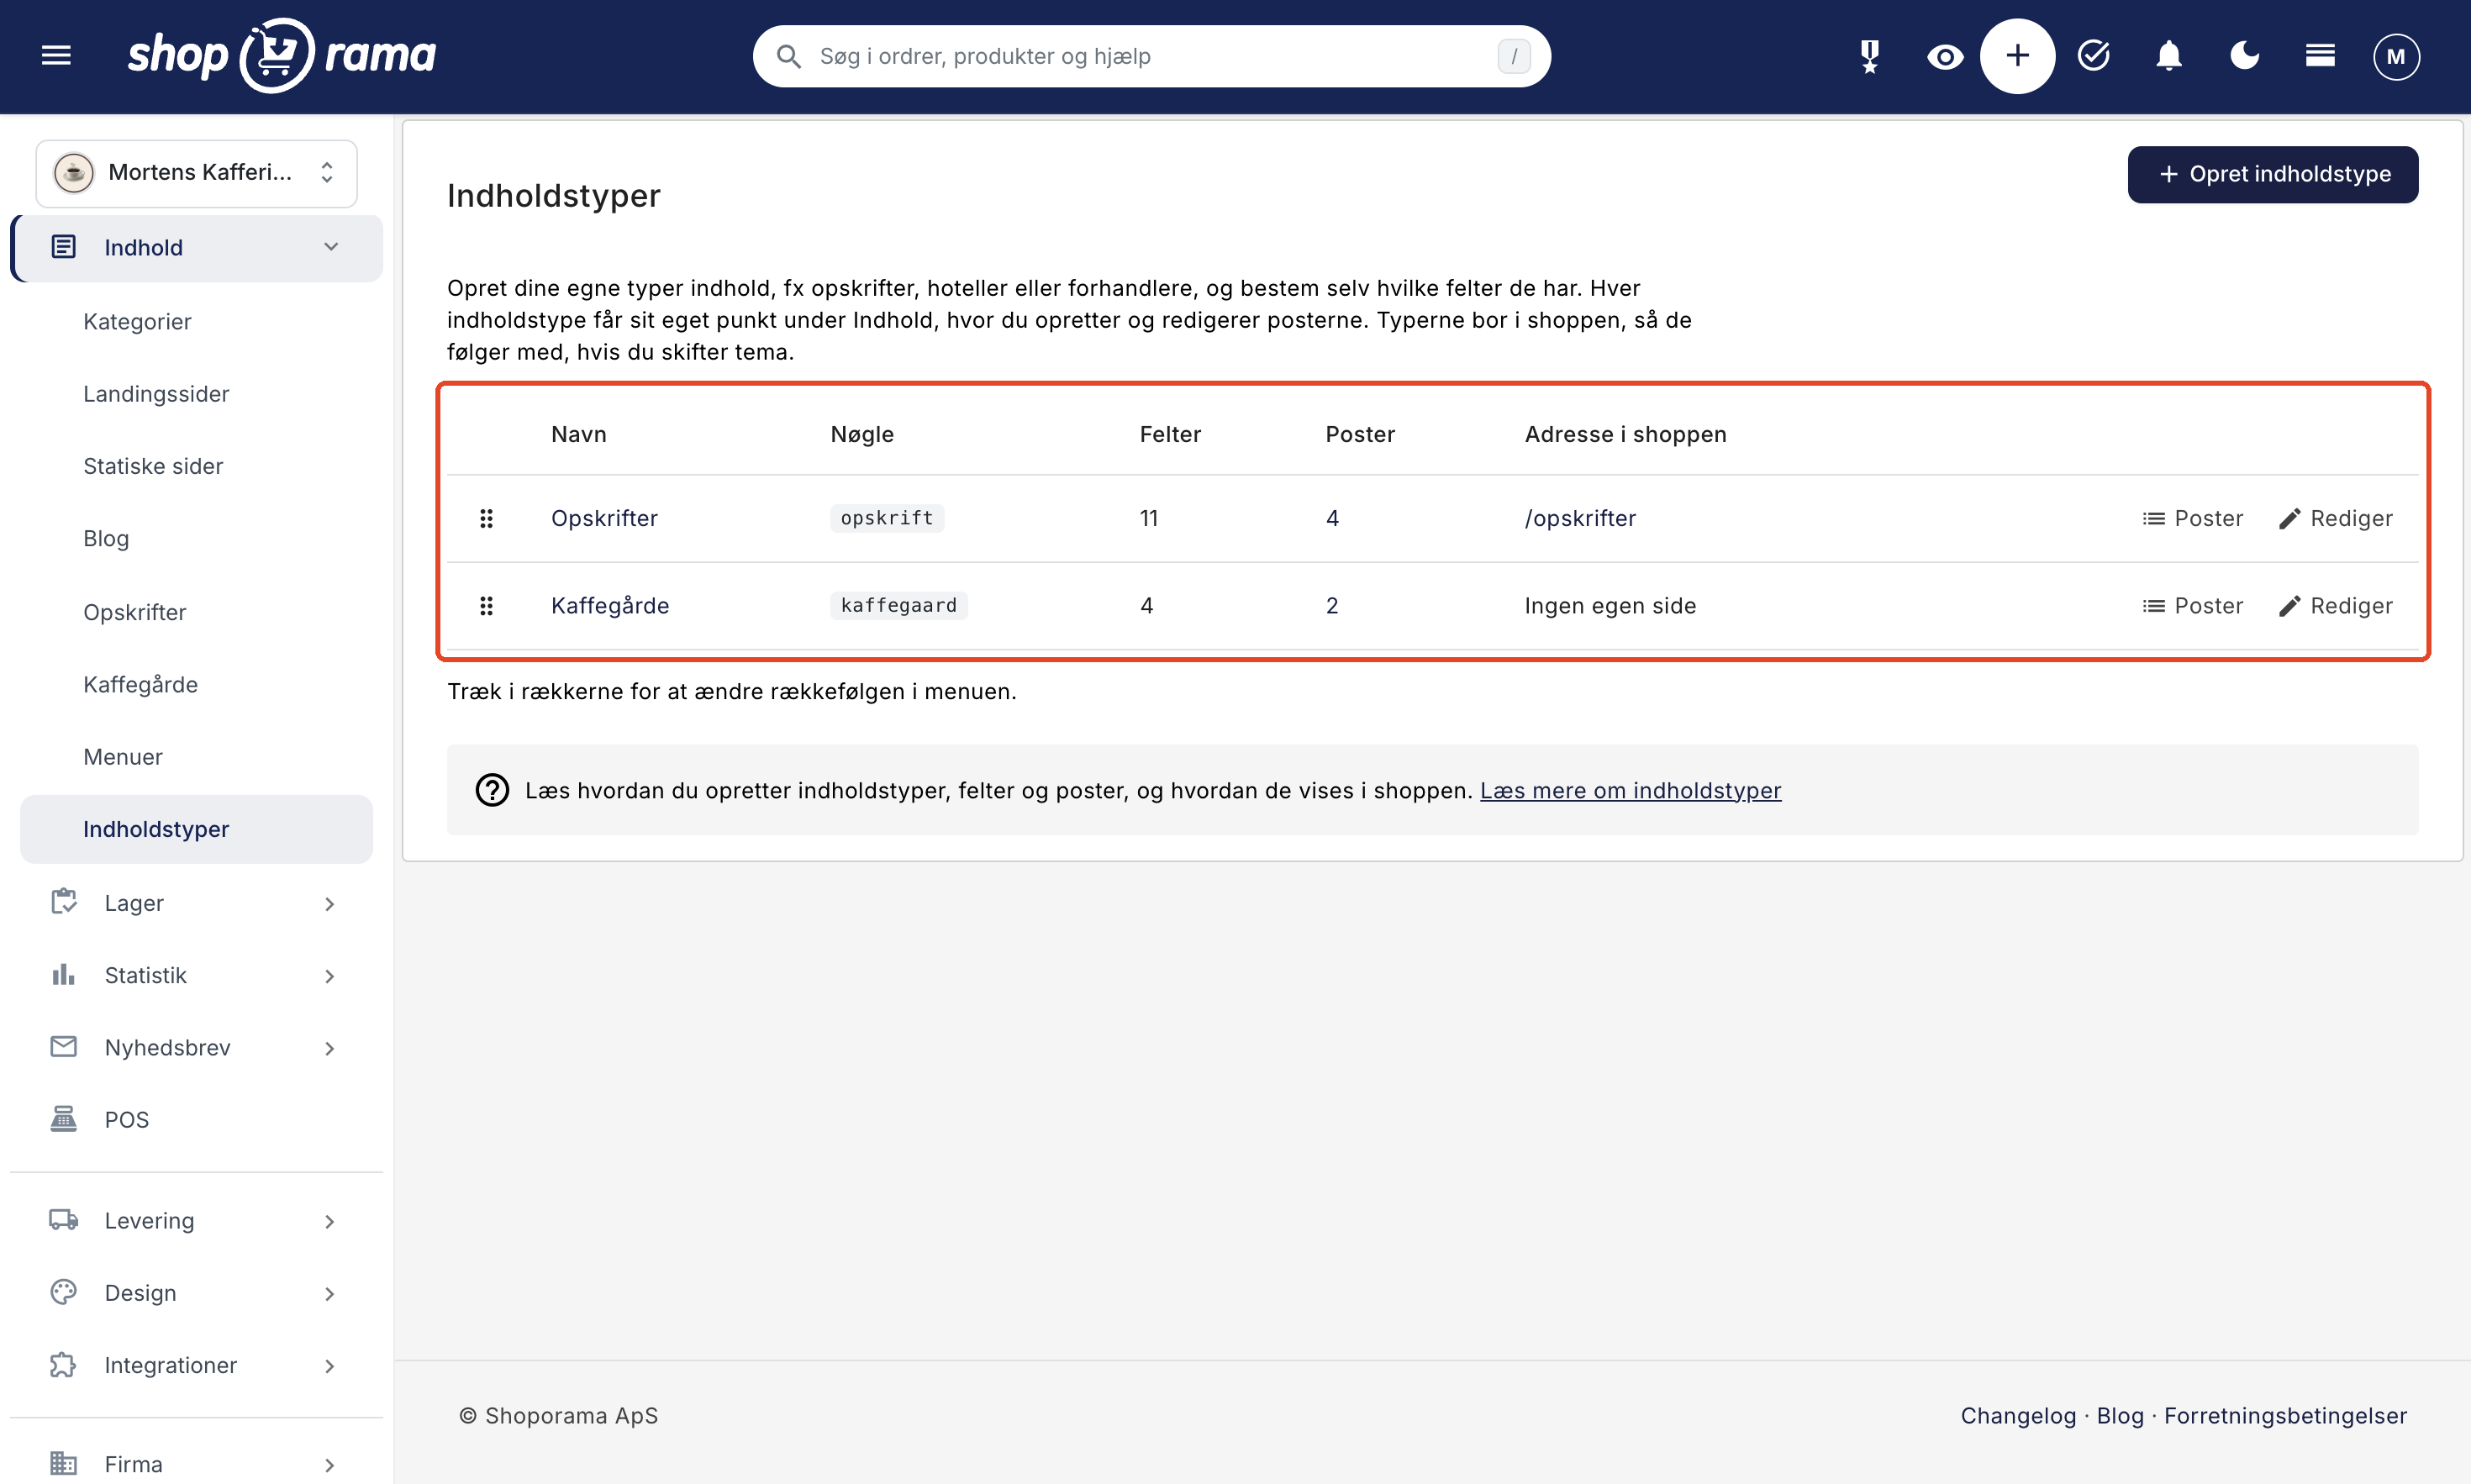
The order on the Content Types page is also the order in the menu under Content. You can change it by dragging the rows. There is no limit to how many types you can create.
Name and Key
The Name (plural) appears in the menu, e.g., Recipes. The Name (singular) is used on the buttons, e.g., “Create Recipe.” You can freely change both later.
The key is automatically generated from the singular form of the name, so “Recipe” becomes “recipe.” It consists only of lowercase letters, numbers, and underscores, and “æ,” “ø,” and “å” are converted to “ae,” “oe,” and “aa.” The key is what the theme uses to identify the type, so it cannot be changed once the type has been created. If you’re using one of Shoporama’s themes, the key doesn’t matter to you. If you have your own theme, agree on the key with your developer before saving.
Custom URL: Give Each Post Its Own Page
If you enable the “Custom URL: Each post gets its own page in the shop ” option, the type will have an overview page, and each post will have its own page. In the “Address” field, enter what you want to appear in the URL, such as “recipes.” Then the overview page will be located at /recipes, and each recipe at, for example, /recipes/iced-coffee-with-vanilla. If you leave the field blank, the URL will be generated based on the name.
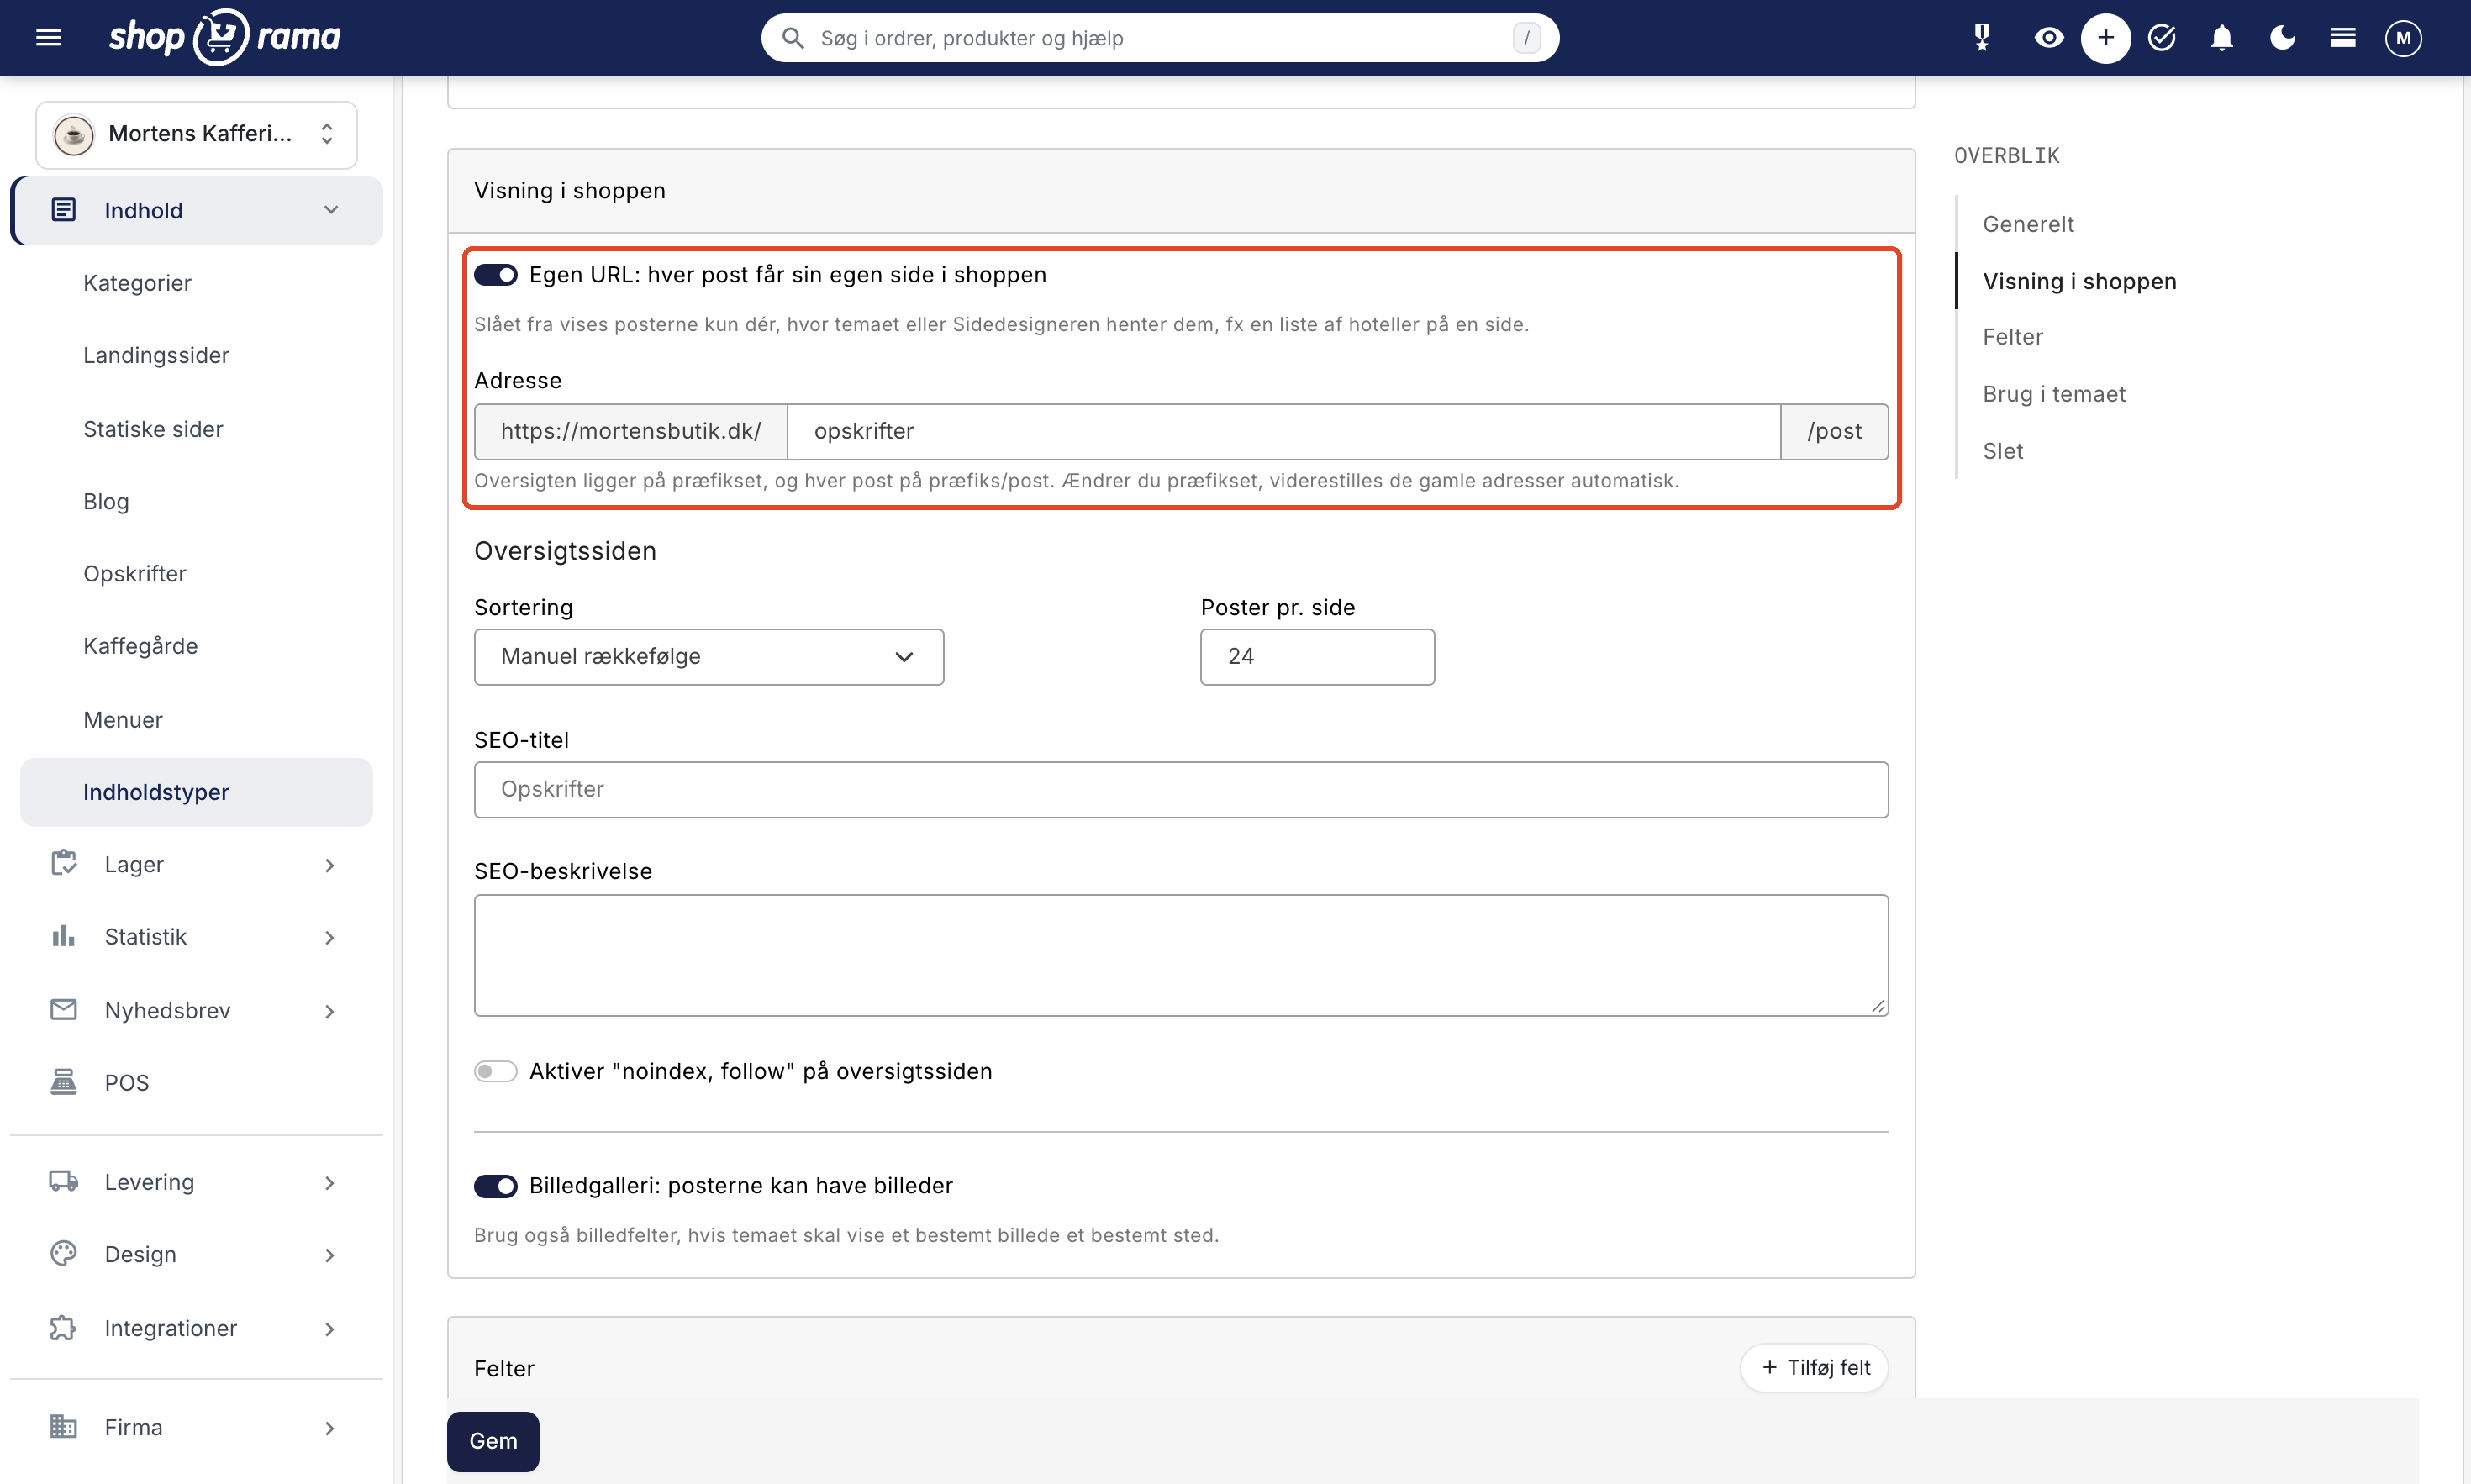
The URL must not already be in use. It must not be the same as a page or category in the store, nor one of the store’s fixed URLs such as blog, search, and basket. If it’s taken, you’ll see the message “The URL prefix is already used by another page in the store. Choose another one.” or “The URL prefix is reserved by the store. Choose another one.”
If you change the address later, Shoporama automatically sets up 301 redirects from the old addresses, both for the overview and for each post. This ensures that neither your customers nor Google end up on an error page. Read more in The Complete Guide to Redirects.
If you disable “Custom URL,” the entries won’t have their own pages. They’ll only appear where you display them, such as in the “Content Entries” section of the Page Designer, or as a reference from another type. This works well, for example, for a dealer list that should appear on only one page, or for the “Coffee Farms” type in the example, which is used solely to indicate where the beans in a recipe come from.
The Overview Page: Sorting, Count, and SEO
Once the type is saved, you can configure the overview page under “Overview Page”:
- Sorting: Manual Order, Title (A–Z), Newest First, Oldest First, or Last Updated. Manual order is the order in which you drag the entries. Newest First and Oldest First are based on when the entry was created, not on a date you entered in a field.
- Items per page: from 1 to 100, with the default being 24. If there are more items, the overview is split into multiple pages.
- SEO title and SEO description: what Google displays for the list. If the SEO title is left blank, the category name is used.
- Enable "noindex, follow" on the overview page: This instructs search engines not to display the overview in search results. Read more in Set "noindex" on a page, product, or category.
Image Gallery
With the Image Gallery toggle enabled : entries can have images, and each entry gets a card with images, just like a product. The cards in the overview and in the Content Entries section display the first image in the gallery, not images from image fields. This setting is enabled by default when you create a type. If you want the theme to display a specific image in a specific location, you can also create a field of the “Image” type.
How to Add Fields
You add fields in the “Fields” tab for the type. Click “Add Field” and fill in the following:
- Title: the field’s name, as you see it when editing a post and as it appears in the store.
- Key: Generated from the title. Like the type’s key, it is used by the theme and cannot be changed afterward.
- Type: the type of information the field contains (see the next section). The type cannot be changed once the field is created, so choose carefully.
- Tooltip: Displays below the field when editing entries. Useful if multiple people are creating entries.
- Placeholder text and Default value: a gray sample text in the empty field and a value the field is populated with when you create a record in the admin panel. Entries that you import, create in “Edit in Table,” or have Claude create do not receive the default value. These are only available for field types where they make sense.
- Required: A record without a value here cannot go live. See the section on required fields.
- Show in the list of entries: Displays the field as a column in the list of entries in the admin panel. In Shoporama’s themes, these are also the fields that appear on the cards in the overview and in the “Content Entries” section. This option is available for simple field types (text, number, dropdown, date, color, and link), but not for images, references, and repeat rows.
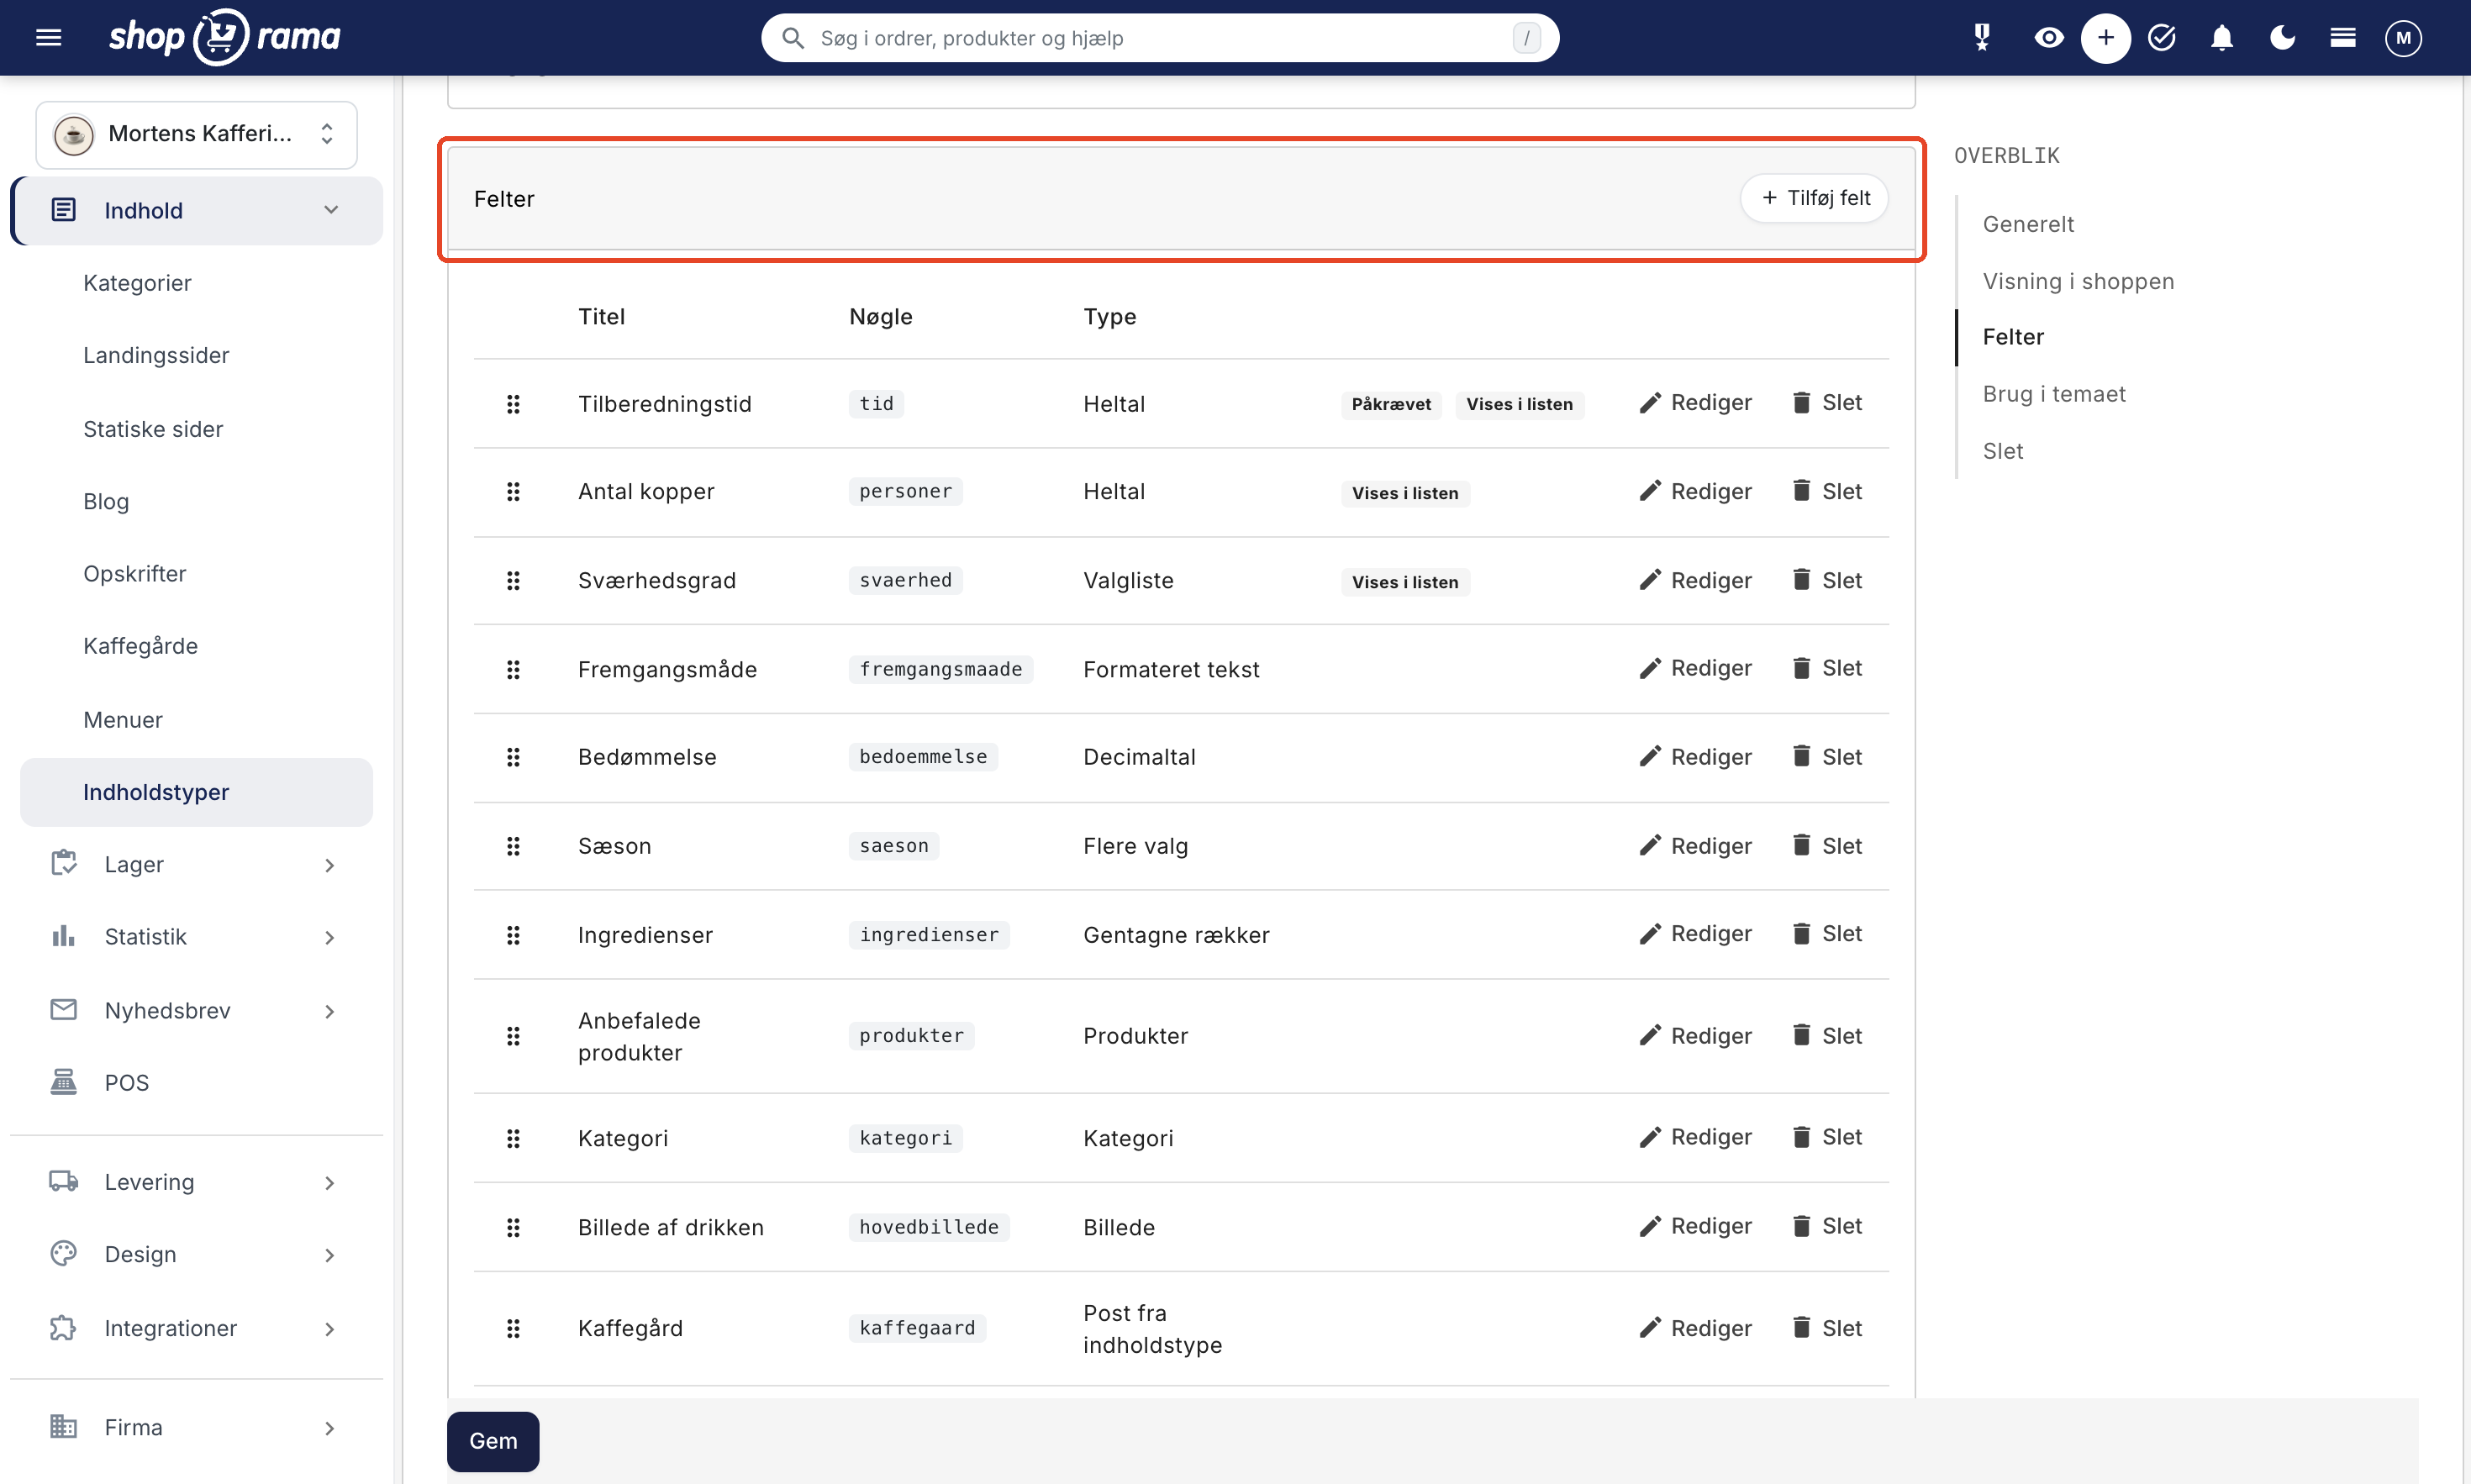
You can create as many fields as you need. Drag the rows to change their order in the form.
Field Types
| Group | Field Types | Good to Know |
|---|---|---|
| Text | Text, Text Area, Formatted Text, Link | Text is a single line, Text Area is multiple lines, and Formatted Text can include, for example, bold text and lists. A Link is a full URL (https://...), a URL within your own store that starts with /, or a mailto: or tel: link. If you simply enter www.forhandler.dk, Shoporama automatically adds https:// at the beginning. Anything else—such as text with spaces—is not saved, and the field remains empty. |
| Numbers | Integers, Decimals | Integers are whole numbers from 0 and up. If you need to use a decimal point (2.5 km) or negative numbers (degrees below zero), you must use Decimals. With Minimum and Maximum, you set limits, such as 1 to 5 stars. |
| Selection | Yes/No, Dropdown, Multiple Choices, Color | A dropdown menu offers a single option, while “Multiple Selections” allows for more than one. Enter the options one per line under “Options.” |
| Date | Date, Date and Time | For example, a publication date or the start time of an event. |
| Images | Image, Gallery | One image or multiple images in a specific field, in addition to the post’s image gallery. |
| References | Product, Products, Category, Categories, Post from content type, Posts from content type | Points to something that already exists in the store. See the next section. |
| Advanced | Repeated rows | A list of rows with the same subfields, such as an ingredient list. |
There is no field type for uploading files. If, for example, a record needs a data sheet as a PDF, place the file somewhere where it has a URL and use a Link field.
Link to products, categories, and other entries
These references are what make the content types sell. In a “Products” field, you select the products using the search function and drag them into the order in which they should appear. In a recipe, for example, these might be the ingredients. In Shoporama’s themes, they appear as product cards below the post, so the customer can add them to the cart right away.
The fields “Post from Content Type ” and “Posts from Content Type” refer to posts from a different type. Under “Posts from,” you select which one. In this example, the “Coffee Farm” field in the recipes points to the “Coffee Farms” type, so each recipe can indicate where the beans come from.
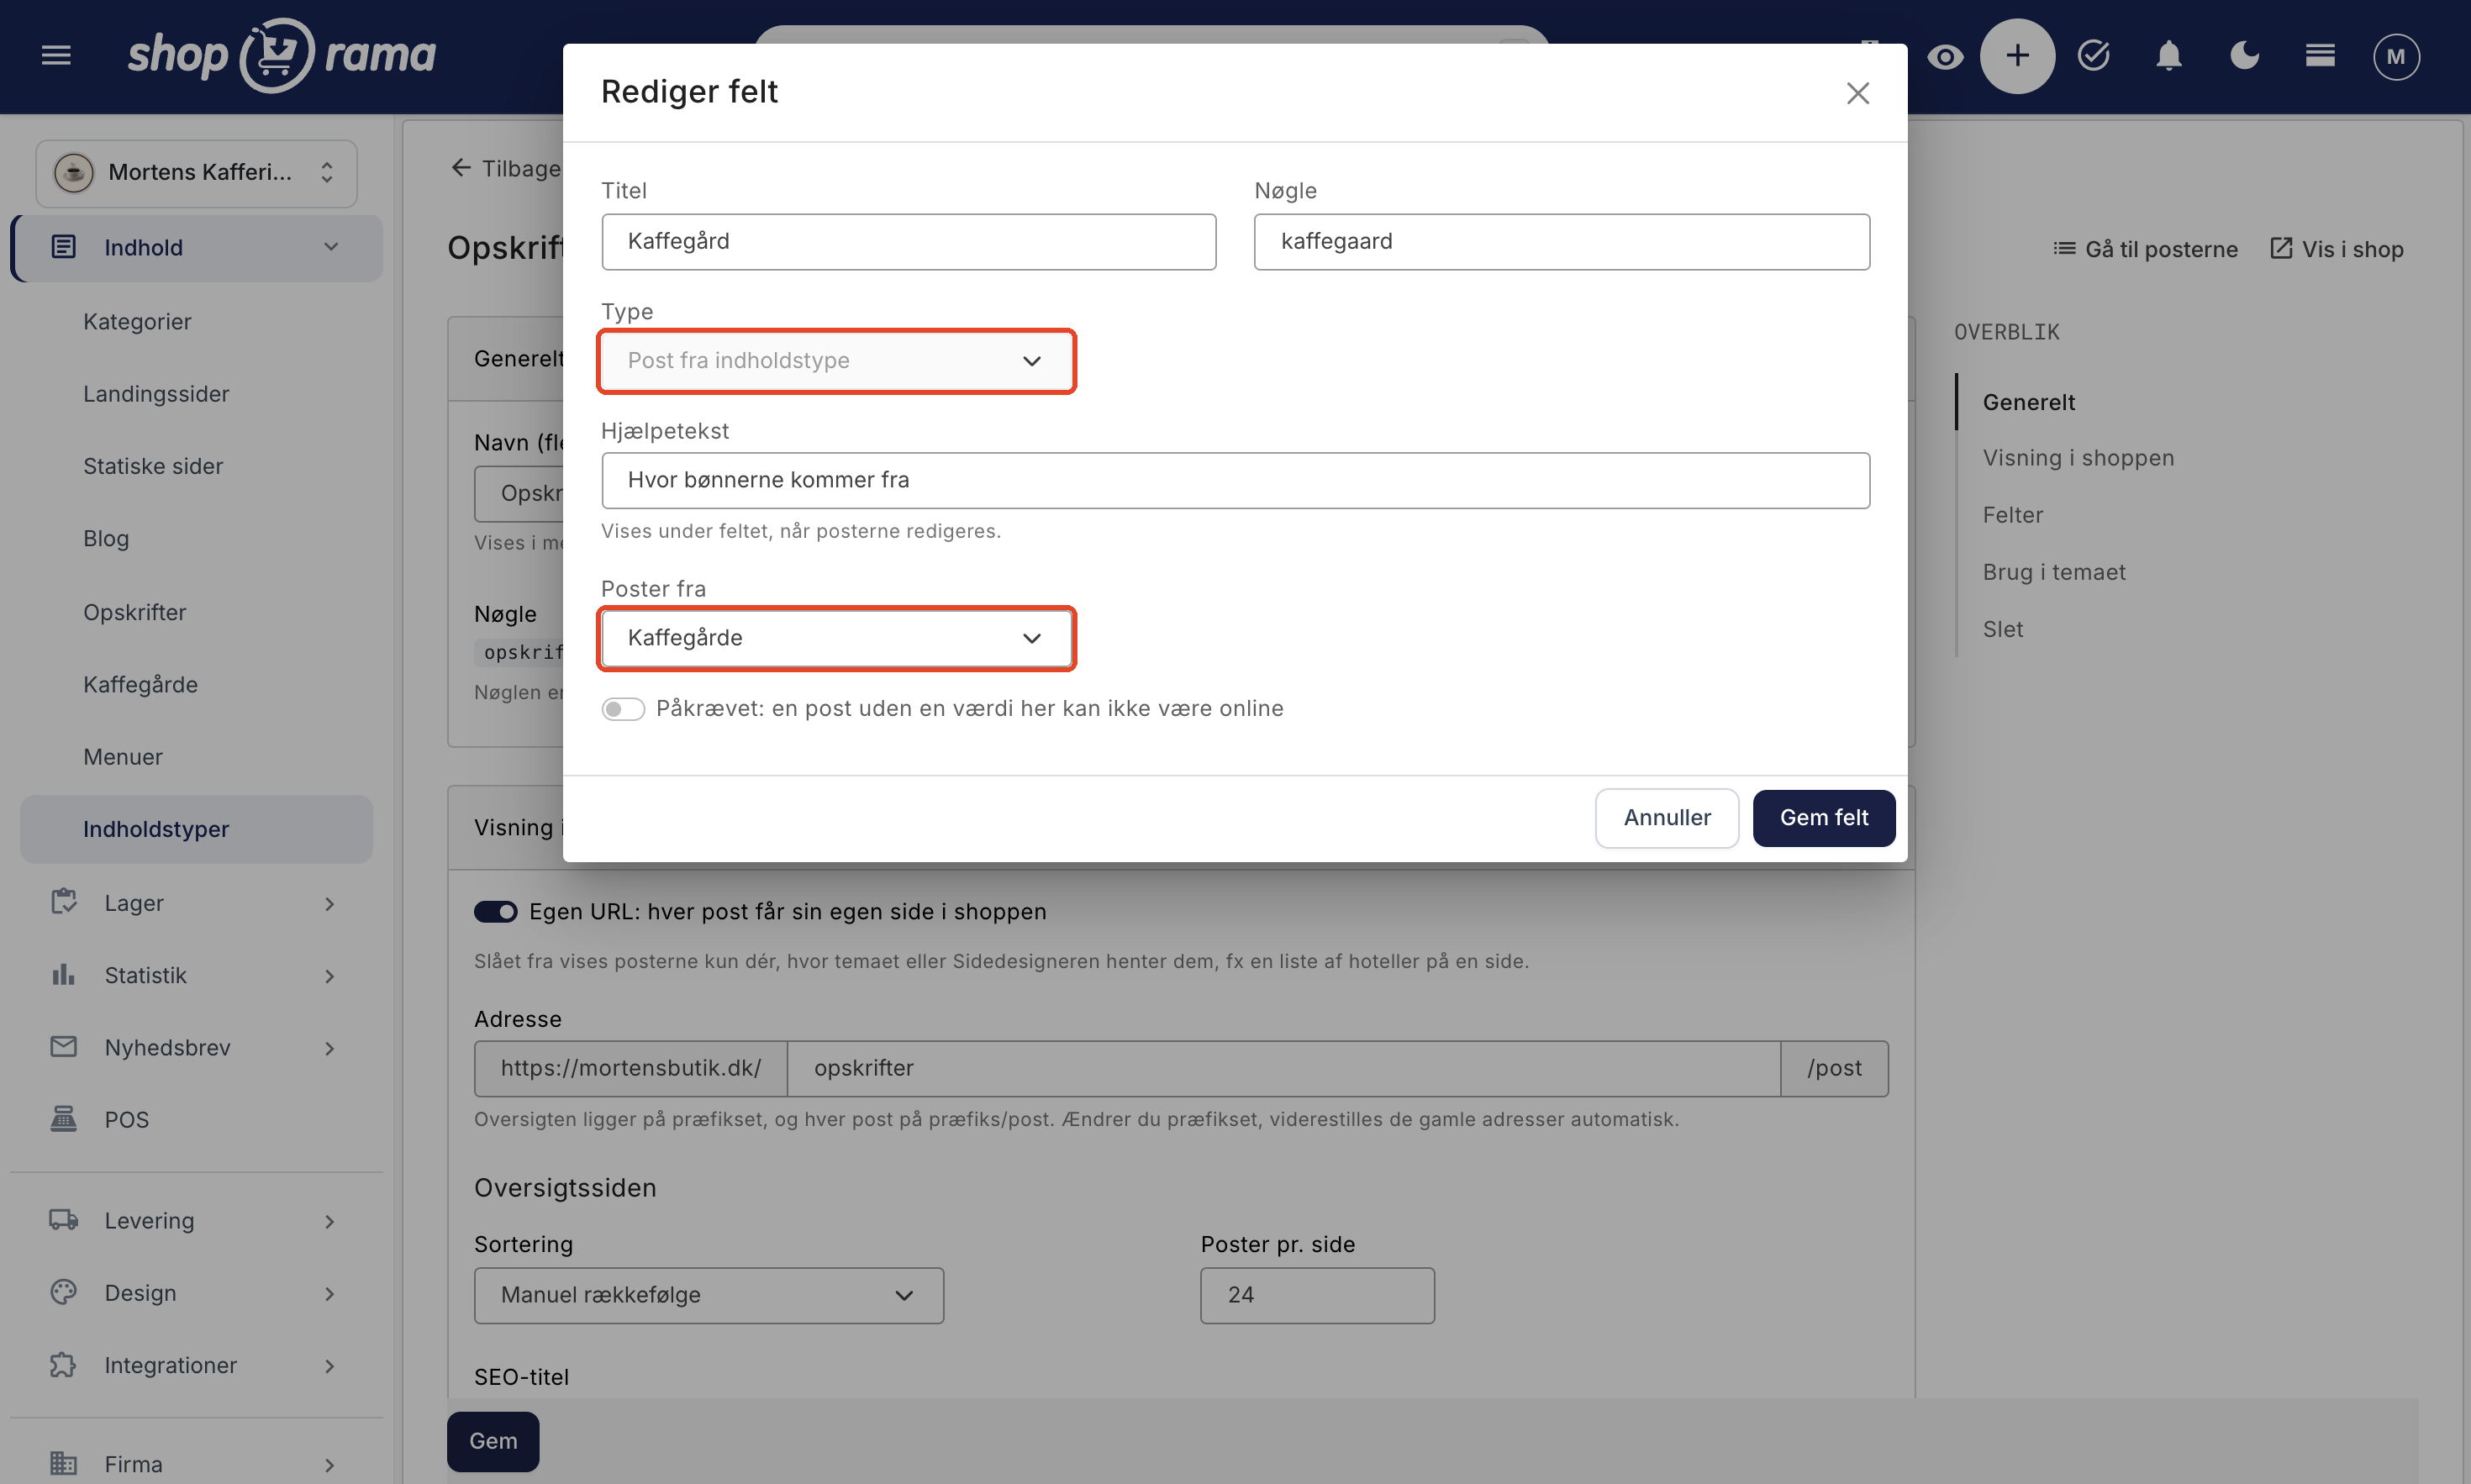
References only show what is visible in the store. If you take a product, category, or entry offline, it automatically disappears from the entries that reference it, and when you put it back online, it reappears. This prevents broken links when a product is discontinued.
Repeating Rows, e.g., an ingredient list
A “Repeating Rows” field is a list where each row has the same subfields. For an ingredient list, for example, you can enter “Ingredient” under “Name” for a row and assign the subfields “Quantity” and “Ingredient” under “Fields” for each row. On the product page, you can then add as many rows as you need.
The subfields can be Text, Text Area, Formatted Text, Integer, or Image. In Shoporama’s themes, repeating rows are displayed as a table on the record’s page.
Required Fields
If you enable “Required” for a field, a record without a value in that field cannot go online. If a required field is missing when you save, the record will still be saved so you don’t lose your work. It will simply be set to offline, and you’ll see the message “The record has been saved offline because these required fields are missing: …”. You can’t set the record to online until the fields are filled in. Records you import from a CSV file follow the same rule.
If you make a field required after you’ve created entries, the existing entries won’t be set to “Offline” immediately. That won’t happen until the next time they’re saved.
Tip: If a listing isn’t showing up in the shop, check to see if it’s marked as “Offline” in the list of listings. Open the listing to see which required fields are missing.
When you edit or delete a field
You can always edit the title, tooltip, required status, and other settings for a field. The key and type cannot be changed. If you selected the wrong type, you must create a new field and delete the old one.
If you delete a field, the value in that field will be deleted from all records. The confirmation message will indicate how many records contain a value in that field, and this action cannot be undone. We recommend exporting the records to a CSV file first so you have a copy.
How to Create and Edit Records
Each content type has its own section under Content, e.g., Content → Recipes. Here you’ll see all entries with their title, status, the fields you’ve selected to “Show in the list of entries,” and when the entry was last updated.
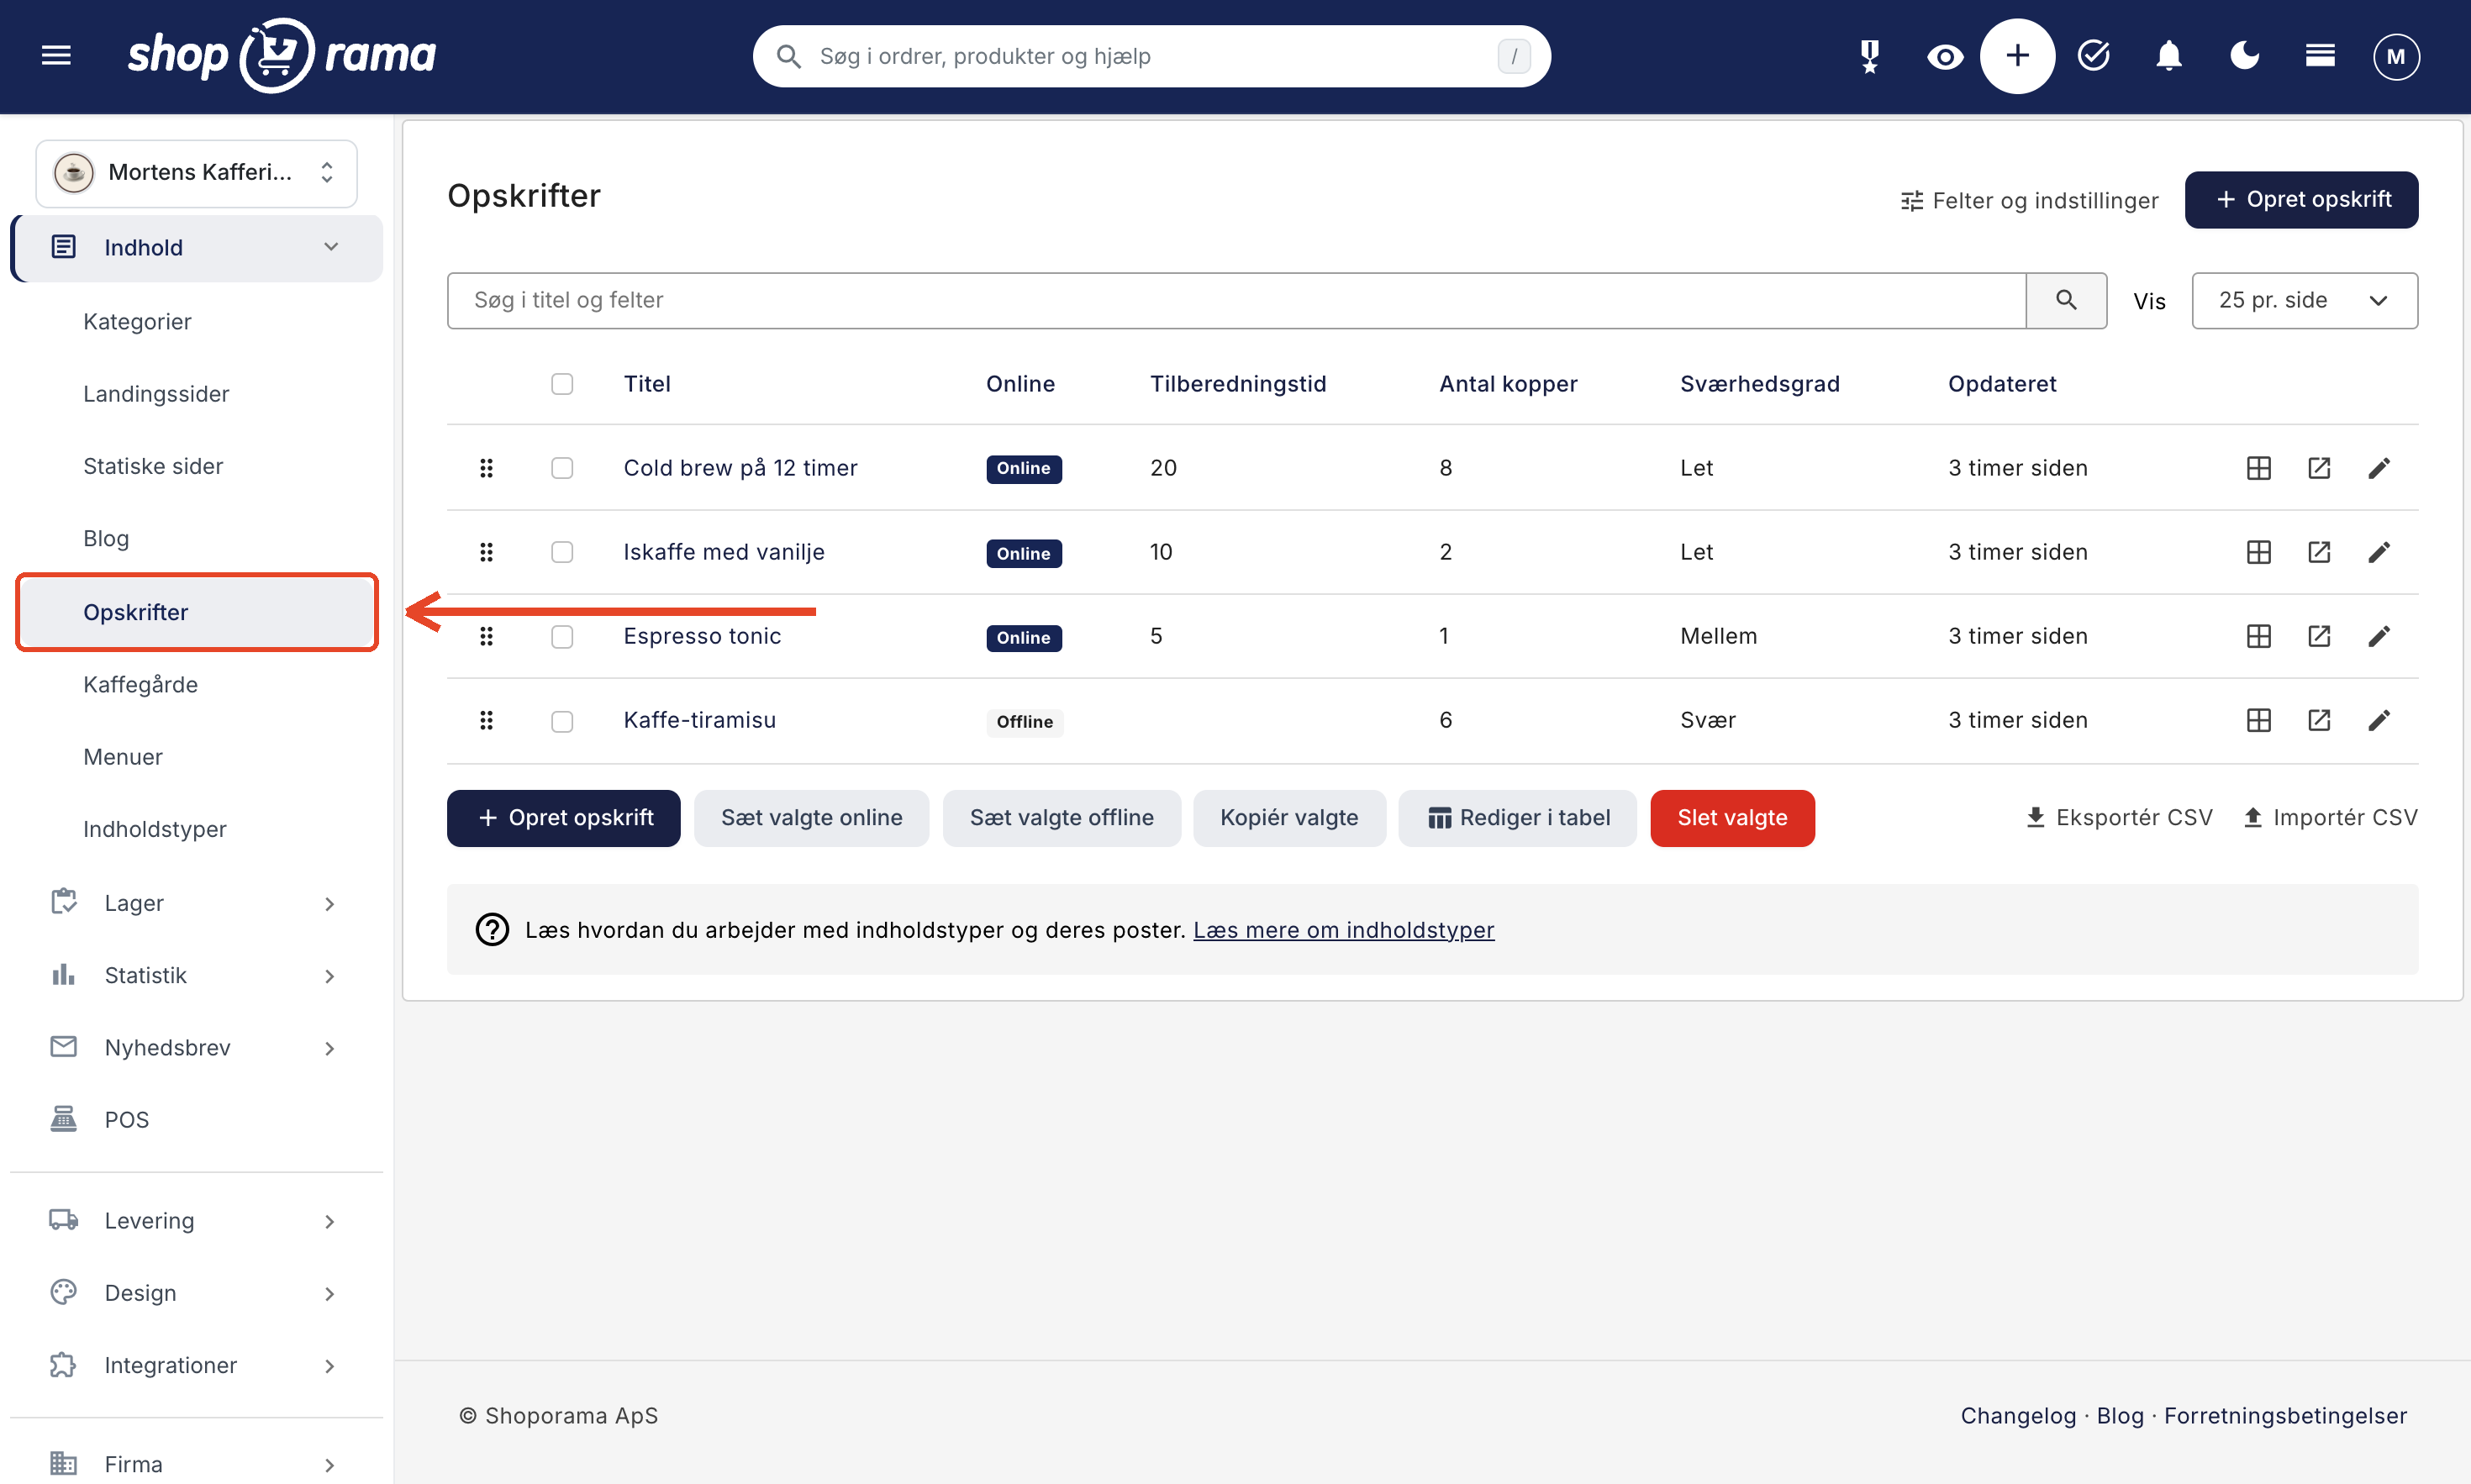
Click " Create Recipe " to create a new entry. The button uses the type’s name in the singular form; for example, for the "Retailers" type, it is labeled "Create Retailer." The " Fields and Settings " link at the top of the page takes you back to the type itself.
On the entry, you’ll find the tabs General (title, the “Online” status, and the address if the type has a Custom URL), Fields (the fields you’ve created for the type), Images (if the type has an image gallery), and Search Engine Fields (if the type has a Custom URL). At the bottom, save by clicking Save or Save and Close. If the type has a Custom URL, you can also choose Save and View, which opens the entry in the store. You can also save by pressing Cmd+S on a Mac or Ctrl+S on Windows.
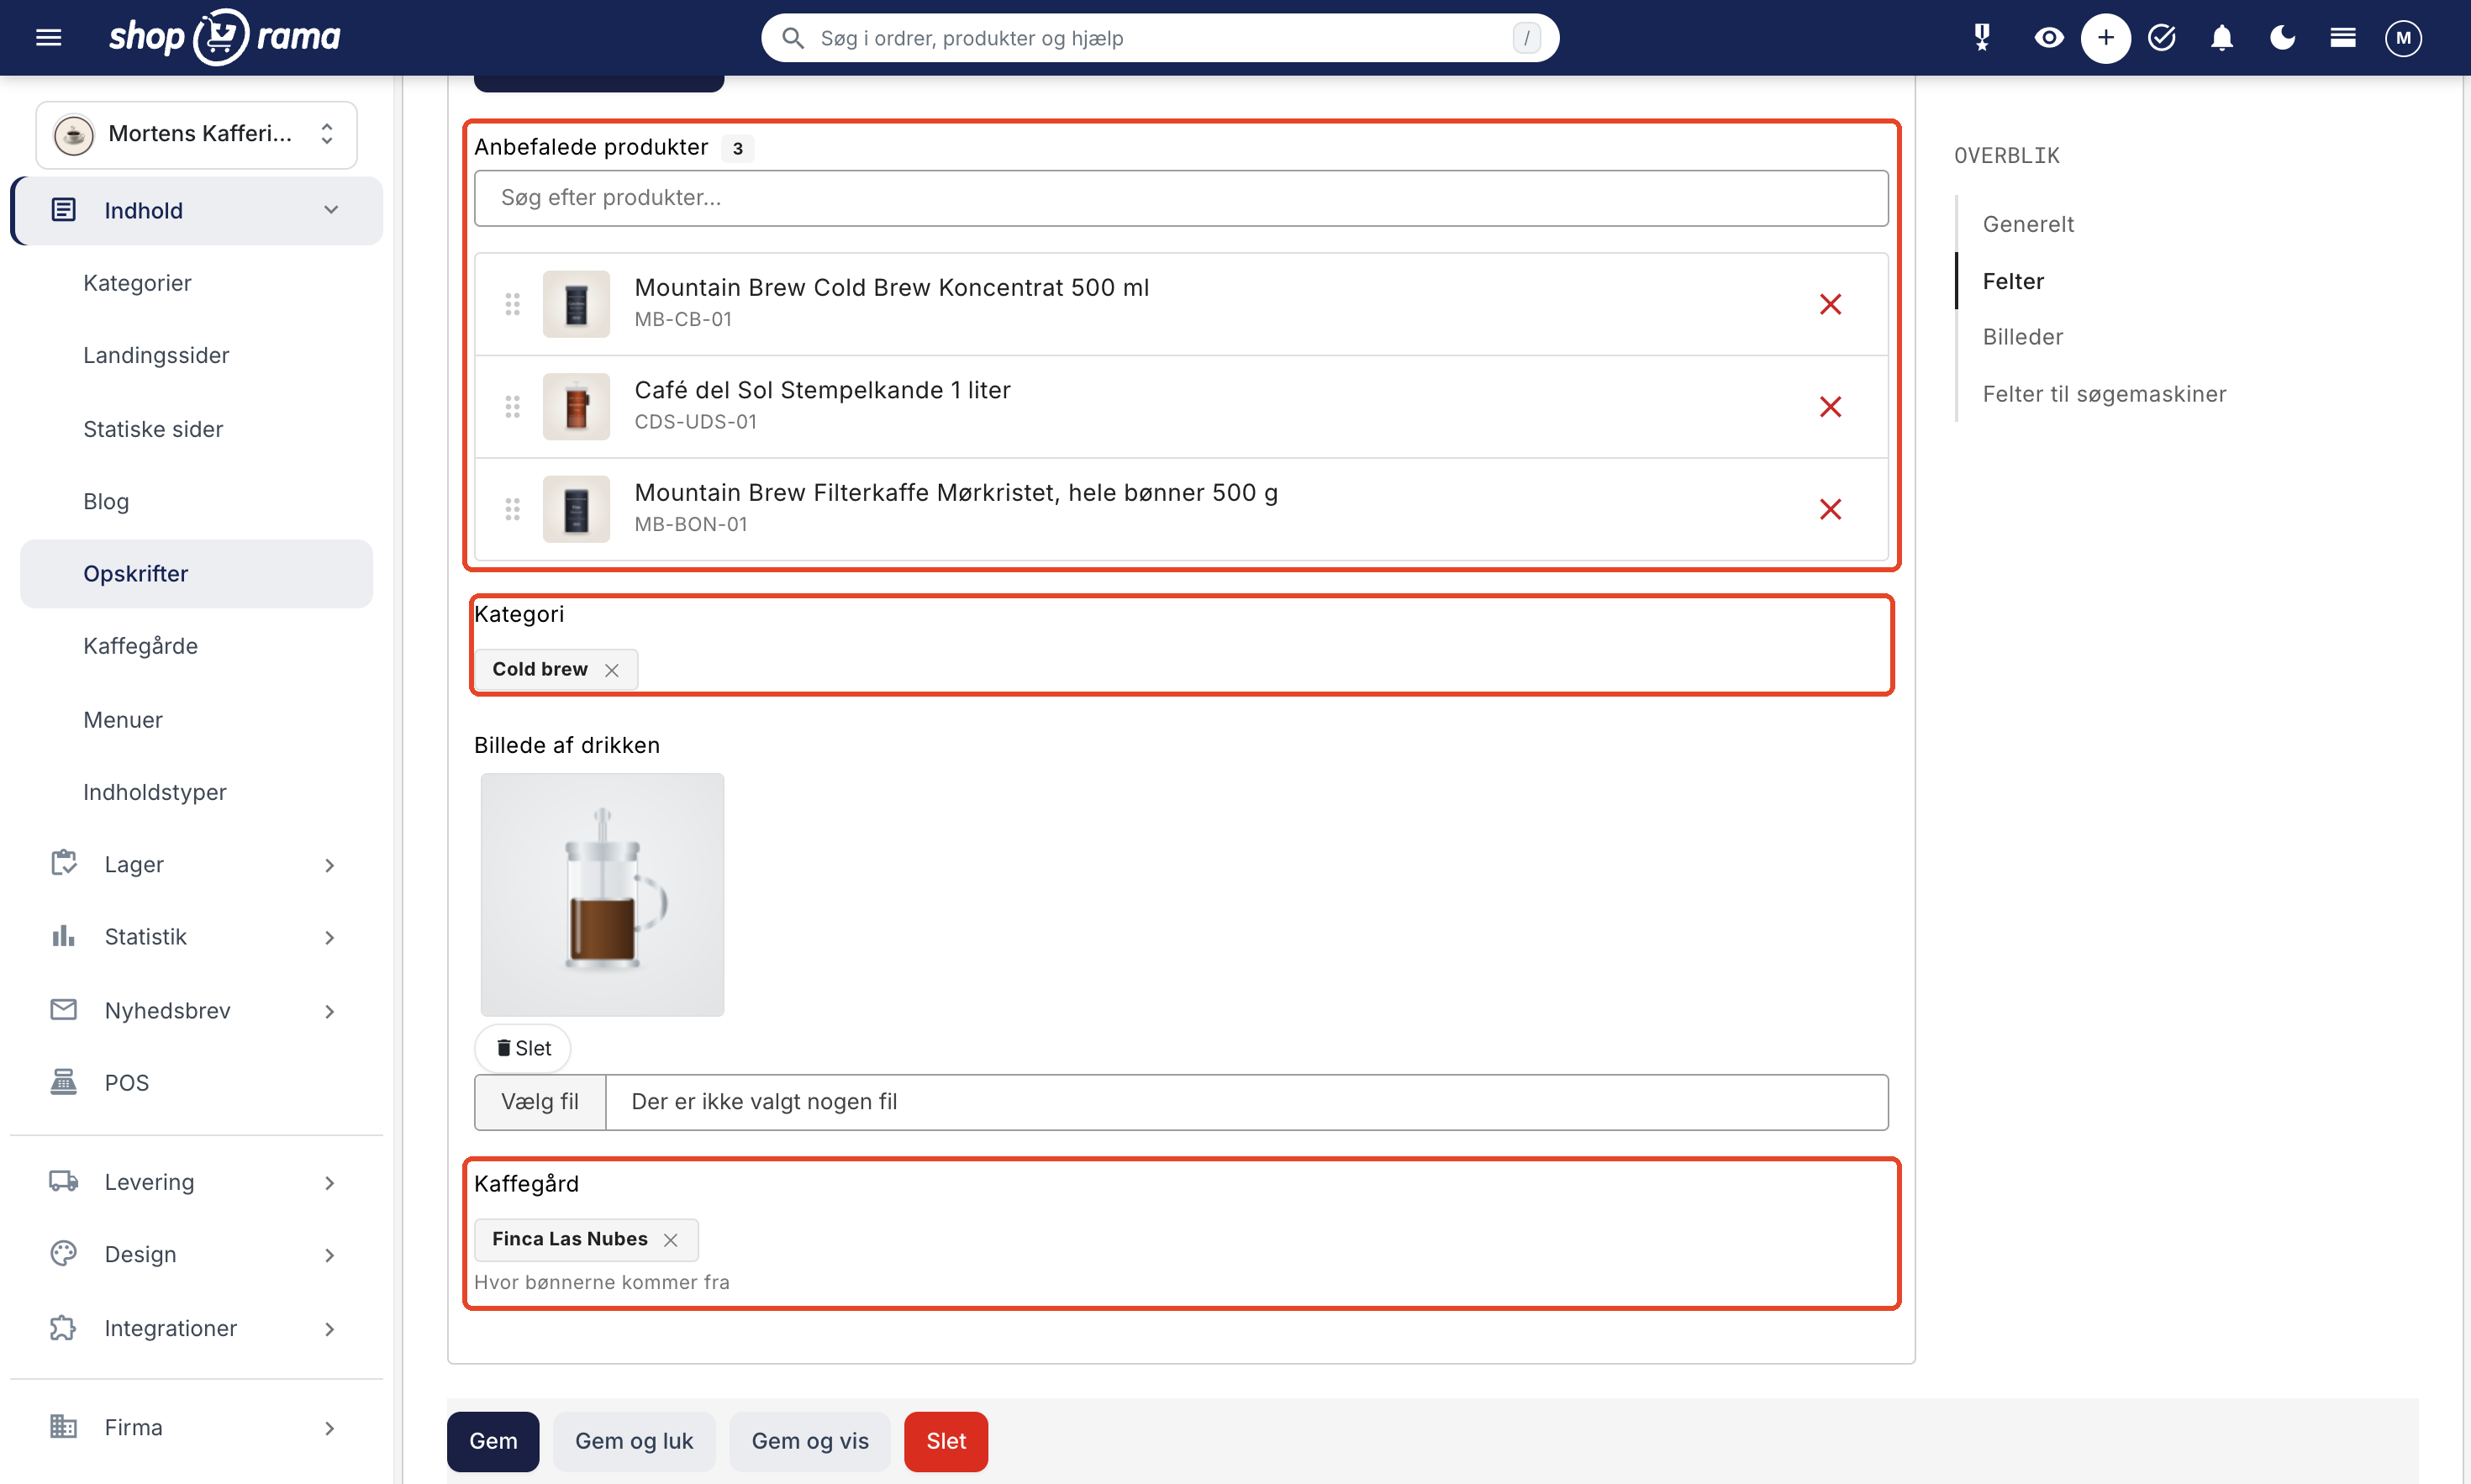
Online and Offline
New entries are online from the start. If you’re writing an entry in several stages, turn “Online” off until it’s finished. In the list of entries, you can toggle an entry between online and offline by clicking the “Online” or “Offline” label.
Your customers cannot see an entry that is offline. You can still view it in the store using “Show in Store” or “Save and Show” when you’re logged into the admin panel, and search engines are instructed not to display it.
Search, sort, and edit multiple entries at once
- Search: The search field searches both the title and the fields.
- Sort: Click a column header. If you want to set the order yourself, drag the rows. You can do this when the list is in manual order and you’re not searching. This order is used in the store when the type is sorted by Manual Order.
- Multiple entries at a time: Check the boxes next to the entries, then select “Set Selected Online,” “Set Selected Offline,” “Copy Selected,” or “Delete Selected.” Entries missing a required field will go offline, even when you set them to online from the list. Copied entries are offline, so remember to set them to online once you’ve edited them.
If you delete entries that are online and have their own page, Shoporama will then offer to redirect the old URLs to a relevant page, just as when you delete blog posts. This ensures that customers and search engines don’t end up on a blank page.
URL and Fields for Search Engines
If the type is “Custom URL,” each post has an Address. It is generated from the title if the field is empty. If you change the address later, the old address is automatically redirected.
In the “Fields for Search Engines” tab, you enter the post’s Title and Description, which Google displays in search results, and you can enable “noindex, follow” for each individual post. A preview shows how the post will appear on Google. If the Title field is empty, the post’s title is used. The listings are automatically included in the store’s XML sitemap, and each page receives a canonical URL, just like your other pages. Learn more in SEO in Shoporama.
Edit multiple entries at once with "Edit in Table"
With “Edit in Table,” the selected items (or all of them, if you haven’t selected any) are displayed in a spreadsheet where you can edit directly in the cells and save your changes. This is quick when, for example, you need to adjust the cooking time for 30 recipes. The spreadsheet includes Title, Online, Slug (the URL if the item type has a Custom URL), and the following fields: text, text area, link, color, number, yes/no, dropdown lists, multiple selections, and dates. You edit images, formatted text, references, and repeated rows on the individual record. If you enter a title in a new row, a new record is created. Learn more about table editing.
Import and Export Records with CSV
"Export CSV " gives you all the records in a file that you can open in Excel. "Import CSV " imports records from a file, for example, when you’re moving a dealer list from a spreadsheet or when you want to edit many records at once. The easiest way is to export first, make the changes in the file, and then import it again. Learn more about CSV files.
- The first row contains the column names, which are the same as in the export. The delimiter can be a semicolon or a comma.
- If a record with the same ID or slug (address) exists, it will be updated. Otherwise, a new record will be created if the row has a title.
- Columns not included in the file will not be changed. However, an empty cell clears the field, so remove any columns you do not want to modify.
- Status is entered as “online” or “offline.” If a required field is missing, the record will be marked as “offline.”
- Multiple selections and references are separated by commas, and image URLs by |. Images are fetched in the background, so they appear shortly afterward. If you change the image column, the record’s image gallery will be replaced with the images in the file.
Importing requires that your user role has the “Deletion and Bulk Import” option enabled. Read more in Roles and Permissions.
How entries are displayed in the shop
One page per post and an overview page
If the type is “Custom URL,” each entry gets its own page, and the type gets an overview showing all entries that are online, organized by page. In Shoporama’s themes, the entry’s page displays the image gallery and all filled-in fields. References to products become product cards; references to categories and other entries become links (when they have their own page); and repeated rows are displayed as a table. You do not need to make any changes to the theme.
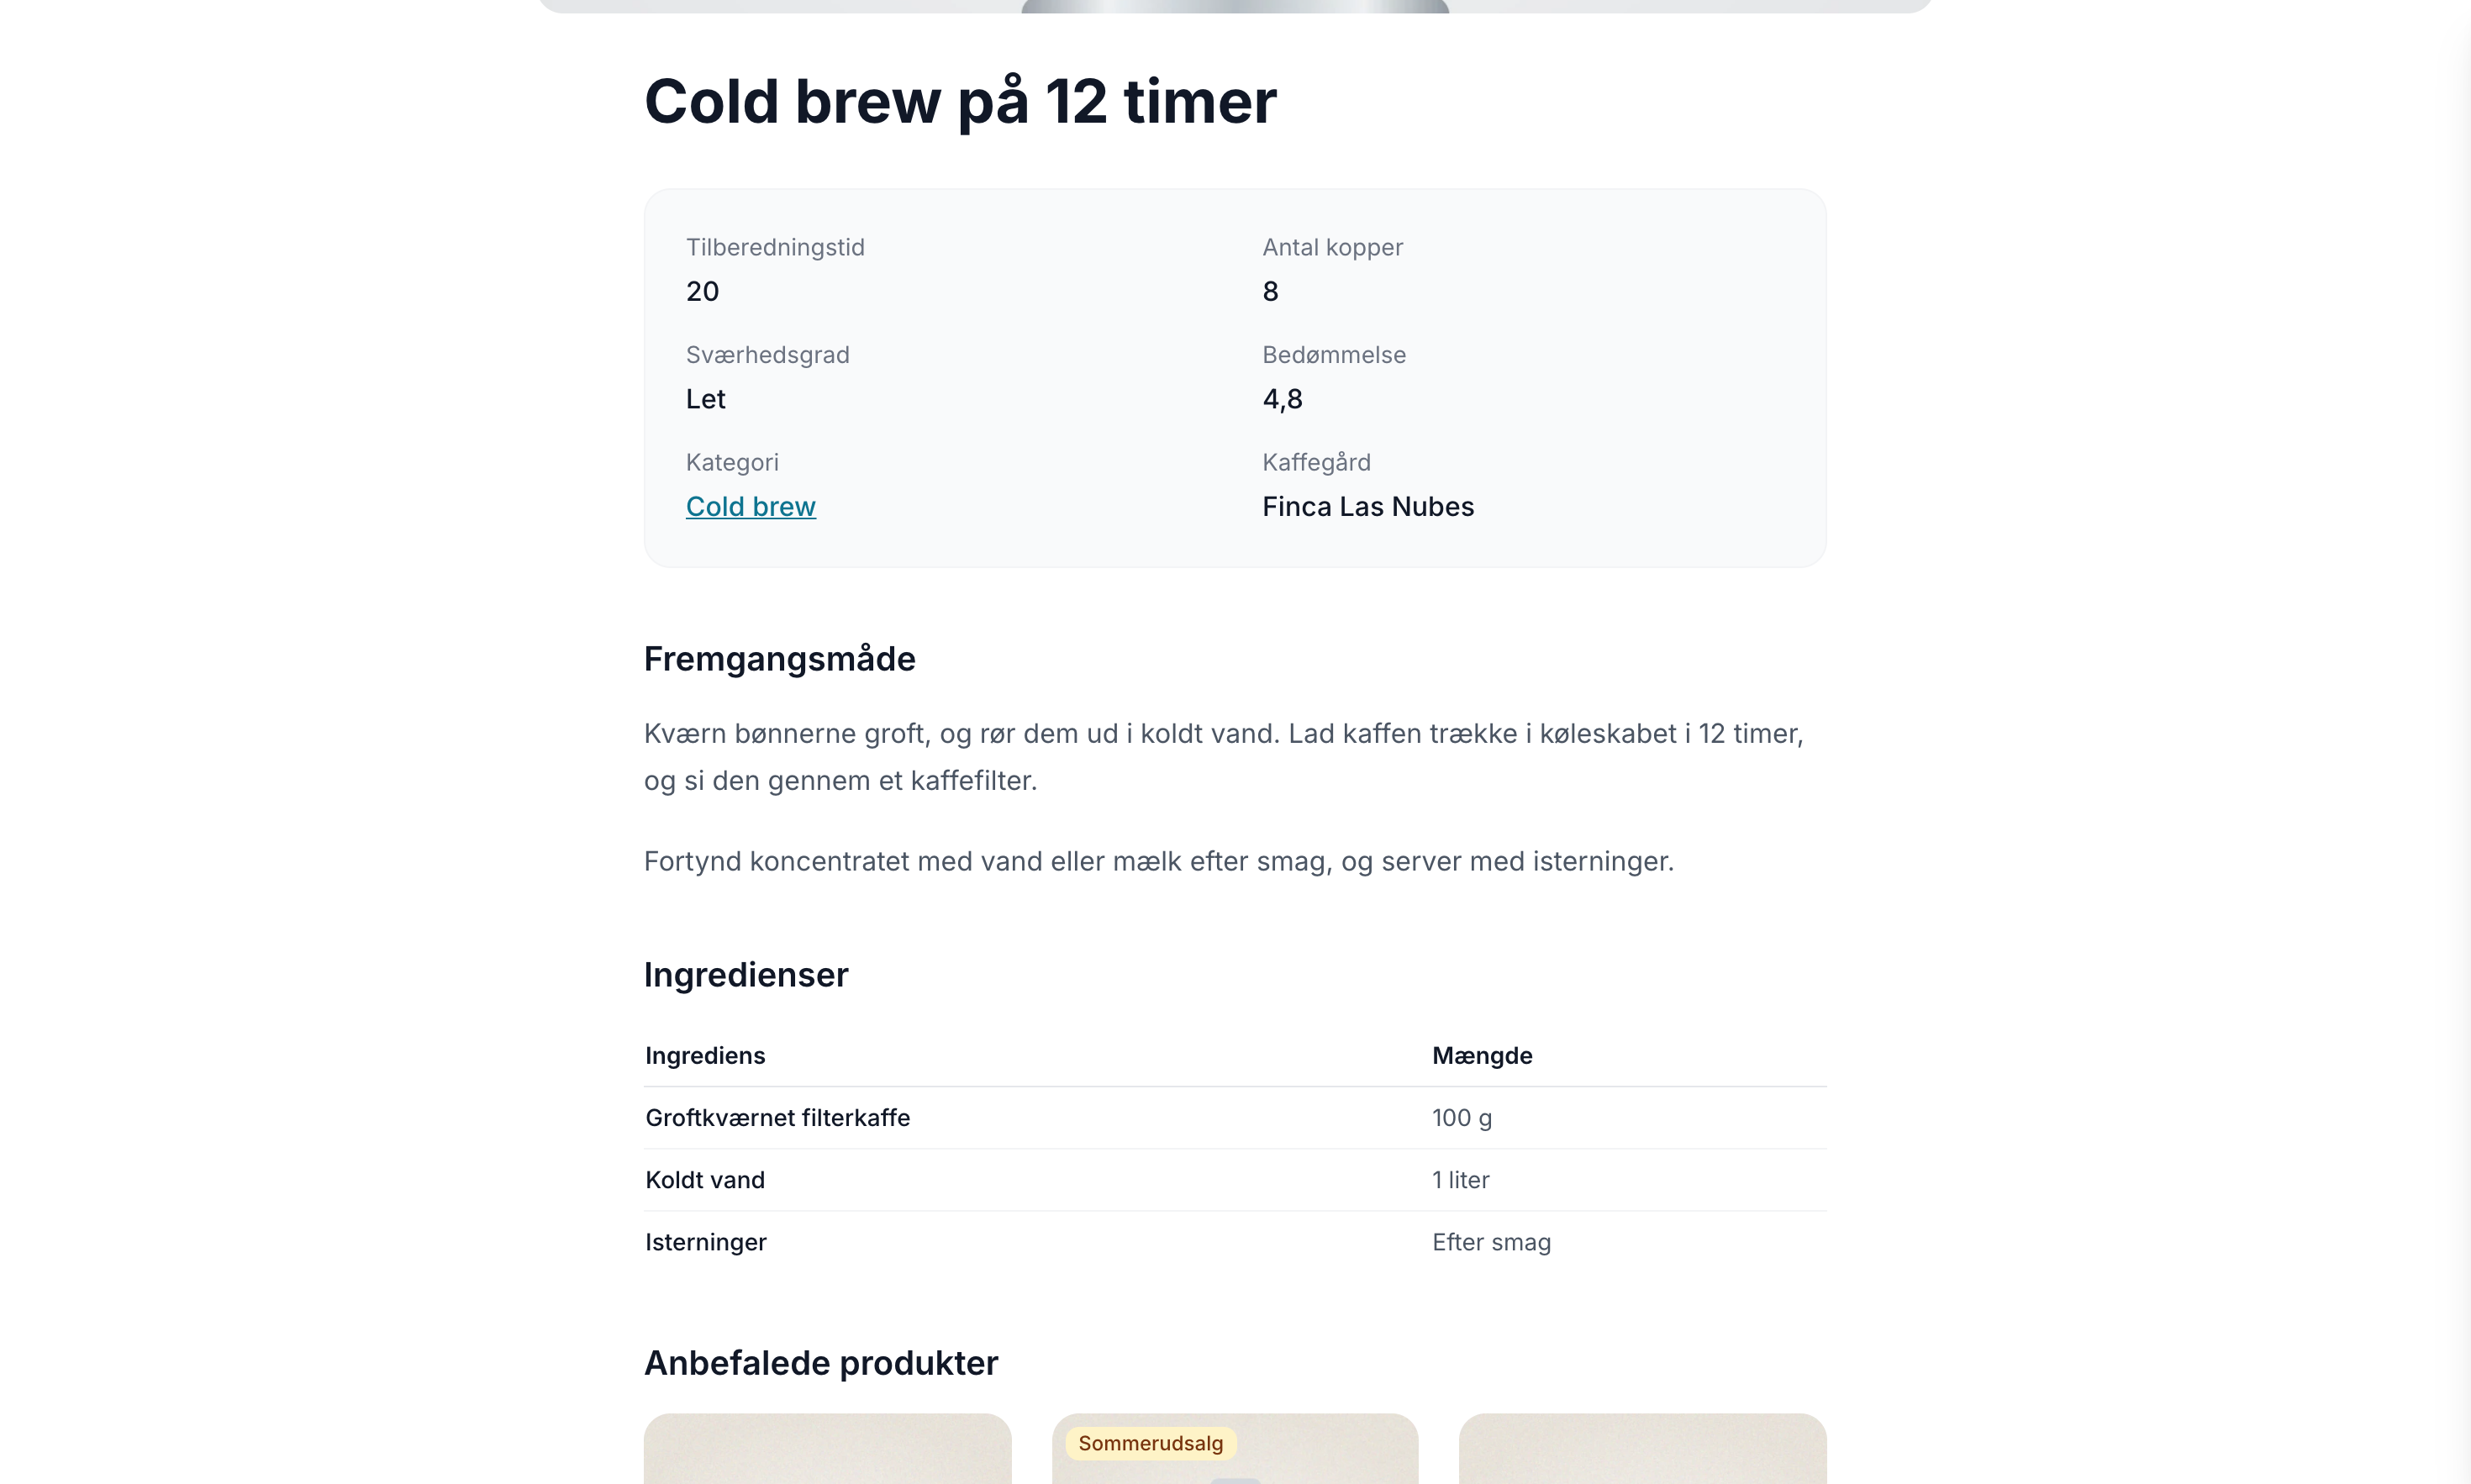
On the overview, the cards display the post’s image and the fields you’ve selected to “Show in the list of posts.” You control the number per page and the order under “Overview Page” for the type.
Display entries using the Page Designer: the “Content Entries” section
If you want to display entries on other pages—for example, the latest recipes on the front page—use the “Content Entries” section in the Page Designer. In Delaware, it’s called “Content entries.” It works regardless of whether the type has its own URL. In this section, select:
- Content type: the type from which the entries should be retrieved.
- How many entries, and in what order. The field names vary slightly from theme to theme; for example, “Number” and “Order” in Montana.
- Show Image, Show Fields, and Show Link to Overview (in California, Show Button to Overview). These are turned off when you insert the section, so turn them on if you want the cards to display images and fields. "Show Fields" displays the fields marked as "Show" in the list of records, and the link to the overview is only displayed if the type has a "Custom URL."
The section displays the records that are online, based on the number and order you have selected. It does not automatically select records based on the page it is on, so on a product page, it does not automatically display the recipes that match the product. Where you can use this section depends on the theme. In Montana, MontanaB2B, Delaware, and DelawareDK, it can be used on most pages, including product pages. In California, it can be used on categories and static pages, and in Alaska2 on categories (including the homepage), landing pages, and blog posts. Read more in the Page Designer and in the Academy’s overview of the modules in Montana and Delaware.
Design the post pages and the overview in Page Designer
If the type is “Custom URL” and you’re using a theme with Page Designer, you can add sections to the post pages and the overview, just like on blog posts. Go to Design → Page Designer. Under Content Pages, each type has a card with the type’s name in the singular, e.g., Recipe:
- Create Layout creates a layout for the posts. This can apply to all posts (in the list of layouts, it’s called, for example, “All Recipes”) or only specific posts (“Recipe Layout”). Under Settings, the types are listed in the Content Types group under “Use this page layout for,” and under “Select specific pages,” you can select the posts.
- Overview creates a layout for the overview page, e.g., “Recipe Overview.” There can only be one overview layout per type.
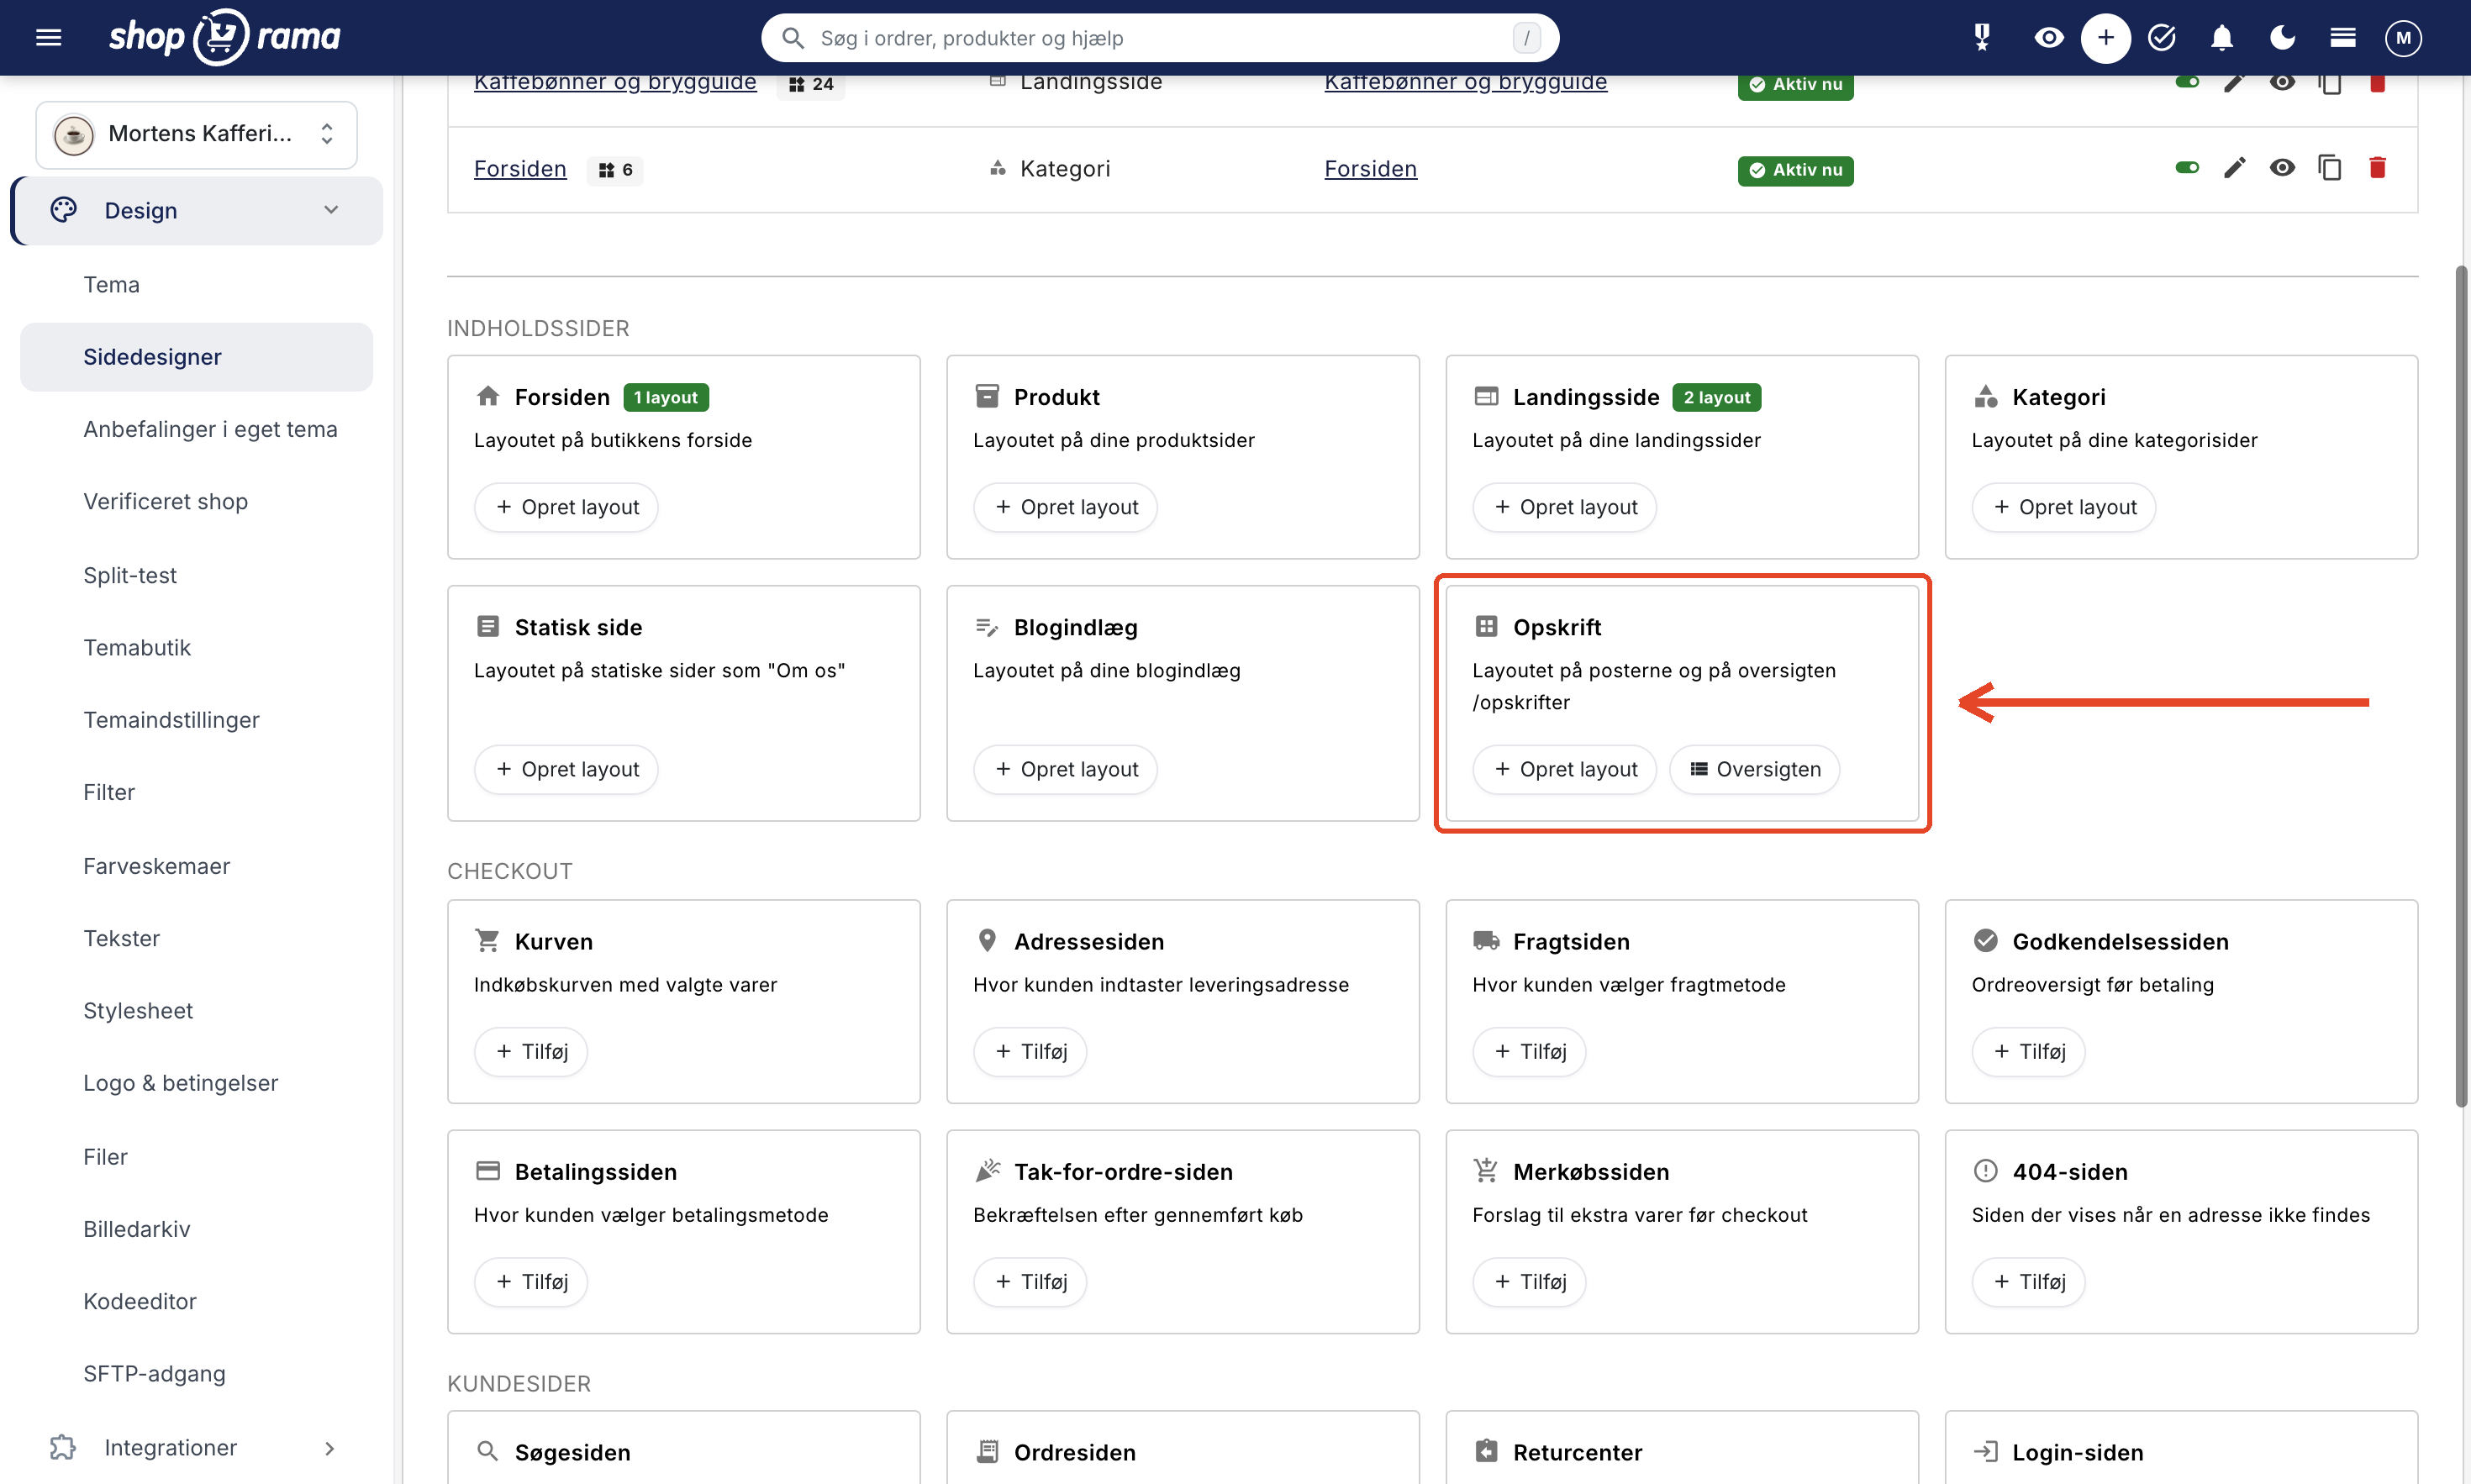
You can also go directly from the post. The “Page Setup” button at the top of the post and the “Edit Page Setup” icon in the list of posts open the post’s layout in the Page Designer, or let you create one if there isn’t one yet. That layout applies only to that specific post, even if you have a layout for all posts of that type.
The sections appear alongside the post’s own content, so the post and its fields do not disappear. In Montana and MontanaB2B, you can place the sections above or below the post. In Delaware, DelawareDK, and California, they appear below the content, and in Alaska2, they follow the theme’s default placement. You can use the same sections as in blog posts (in California, the same as on static pages). If you delete a content type, its layouts are also deleted.
Link to posts and overviews from the menu
Under Content → Menus, you can add a post or a list to the store’s menu. In “Add Item,” select “Content Post” to link to a single post or “Content List” to link to a list of a specific content type, such as /recipes. These options are available when the store has at least one type with a Custom URL. When you search for a post, the type’s name appears next to each result, so you can distinguish a recipe from a merchant with the same name. Read more in Menus and Navigation.
Which themes can display content types?
Six of Shoporama’s themes can display post pages, the overview, and the Content Posts section without any changes: Montana, MontanaB2B, Delaware, DelawareDK, California, and Alaska2. Washington and the classic themes cannot display content types. You can still create types and items, but they won’t appear in the store until you switch to one of the six themes. Read more in Which themes are available on Shoporama?
If you have your own theme or a theme from the Theme Store, it depends on the theme. If the theme cannot display the item pages, the URLs will return an error page (404), and you’ll receive a message under “Notifications” in the admin panel. The solution is to update the theme or disable “Custom URL” for the type. Read more in “Notifications: What the Admin Panel Alerts You About.”
Post types carry over when you switch themes
Content types, fields, and posts belong to the store and not the theme. If you switch themes, they’ll still be there, and if you switch between the six themes listed above, they’ll appear immediately.
Let Claude create types and entries for you
If you’ve connected Claude to your store, Claude can create content types, add fields, and enter posts for you. This is handy when you have a lot of recipes stored in a document or spreadsheet. For example, you can write:
"Create the 'Recipes' content type with the fields 'prep time,' 'ingredients,' and 'recommended products,' and add these 10 recipes."
Claude works with content types through the Content section, so that section must be set to Read and Edit. Deleting types, fields, and entries requires your approval if you’ve enabled Extra Security. Read more in Manage Your Store with AI, Customize Which Tools Claude Can Use in Your Store, and Extra Security: Approve Changes from Claude.
Who can create and delete content types?
Content types fall under the “Content” section in the user roles:
- Creating and editing content types and their fields requires the “Edit ” permission under “Content.”
- The records fall under “Content,” just like blog posts. With “View,” the user can view the records, and with “Edit,” the user can create, edit, and delete them.
- Importing records from a CSV file requires the " Deletion and Bulk Import" option.
- Deleting a content type that has entries also requires the " Deletion and Bulk Import" option. The deletion is recorded in the activity log.
Read more in Roles and Permissions.
Important: If you delete a content type using “Delete Content Type” at the bottom of the type, the type, its fields, and all records—including images—will be deleted. This action cannot be undone, so export the records to CSV first if you want a copy.
For those with their own theme (for developers)
Technical section: This section is for theme developers. If you’re using one of Shoporama’s themes, you can skip this.
The theme only recognizes the type’s key and the fields’ keys—never their names. Therefore, the store owner can rename types and fields without breaking the theme. The keys are listed on the type in the admin panel, and the “Use in Theme ” card on the type shows a code example with the type’s own keys.
<{* The first 6 recipes in admin order *}>
<{foreach $webshop->getContentEntries('recipe', 6) as $recipe}>
    <{if $image = $recipe->getImage()}>
        <img src="<{$image->getSrc(400, 300, 'box')}>" alt="">
    <{/if}>
    <a href="<{$opskrift->getUrl()}>"><{$recipe->getTitle()|escape}></a>
    <{$recipe->getValue('prep-time')}> min. · <{$recipe->getLabel('difficulty')}>
<{/foreach}>

<{* A specific post based on slug or ID *}>
<{if $hotel = $webshop->getContentEntry('hotel', 'strandhotellet')}>
    <{$hotel->getTitle()|escape}>: <{$hotel->getValue('stars')}> stars
<{/if}>
- getContentEntries(key, count) retrieves the entries that are online. getContentEntry(key, slug) retrieves a single entry based on slug or ID, or returns null.
- getValue('field key') returns the field’s value. Images are image objects, references are products, categories, or entries, yes/no are true/false, multiple selections are a list, and repeated rows are a list of rows. getLabel('field_key') returns the value as display text, and getFields() returns all populated fields for generic display.
- The types are defined in the admin panel, so the theme must handle situations where a type or field is missing. Use an `if` statement to check before using a value.
The post’s own page is displayed using the content_entry.html template, and the list view uses content_list.html. If you want a specific layout for a single type, create content_recipe.html and content_recipe_list.html using the type’s key, and those will be used instead. If the theme lacks these templates, the URL will return a 404 error, and the shop owner will receive a notification from Content Types. If the Page Builder is to be able to design pages for that type, the theme must specify the sections under `content_entry ` and `content_list` in its `sections.json` file.
The field types `decimal`, `link`, and the references to products, categories, and entries can also be used in the theme’s own extensions, such as a field on a blog post where the store owner selects a recipe. The Page Designer also includes the content_type field, which appears as a list of the store’s content types. Read more in Theme Settings for Products and Pages and in the developer documentation on content types. Types, fields, and entries can also be managed via the REST API.
Frequently Asked Questions
Where can I see which theme my store is using?
Under Design → Theme, you can see which theme the store is using. If it’s Montana, MontanaB2B, Delaware, DelawareDK, California, or Alaska2, the records and overview will appear immediately when the type has a Custom URL. If you have a different theme, ask your developer or email support@shoporama.dk.
Can customers find the listings using the search bar in the store?
No, not at this time. The search bar in the store does not search the posts. Customers can find the posts via the overview, the menu, the “Content Posts” section, and Google, because posts with their own page are included in the store’s sitemap.
Can I have my recipes displayed as rich results with stars and an image in Google?
Not automatically. The built-in themes provide the posts with a title, description, and canonical URL, but not structured data (schema.org). If you have a custom theme, your developer can add them to the theme’s template for the post type using the post’s fields.
Can the product page display the recipes or size guide associated with the product?
Not automatically. A post can link to products, but the product page won’t automatically find the posts that link to it. Your developer can add a “Post” field of the “Content Type” type to the products in the theme’s extensions, so you can select the guide on the product, and the theme will display it on the product page.
Should products be listed by item number or ID when I import entries from a CSV file?
Use Shoporama’s product ID, separated by commas, e.g., 232165,232161. Item numbers do not work. You can see a product’s ID in the URL when you edit the product. Feel free to export a few records first so you can see the format for all the columns.
Can I copy a content type to another one of my shops?
Not directly. Create the content type in the other shop using the same keys, and import the entries via CSV. Claude can create the content type and fields for you if you’ve connected Claude to the shop. If you use the same keys, the theme will work the same in both shops. References to products and categories must be selected again in the new shop.
Does a record go offline automatically when a date has passed?
No. A date field is simply a value associated with the entry. If you want to remove an entry from the store, set it to offline—for example, by selecting “Set Selected Offline” from the list of entries.
Is there a limit to how many entries a type can have?
No. The list under “Content” displays entries page by page, and the overview in the shop breaks them down according to the number per page you’ve selected for that type. “Edit in Table” displays up to 1,000 entries at a time, and during a large CSV import, the images are fetched afterward in the background.
Related articles
Page designer
Lær hvordan du bruger Sidedesigner i Shoporama til at opbygge sidelayouts med blokke som hero-sektioner, produktlister, bannere og meget mere, helt...
Theme settings for products and pages (theme extensions)
Learn how the Theme Settings tab works for products, categories, static pages, landing pages, and blog posts in Shoporama. The theme defines the...
Extended fields
How to use the "Fields" tab for products in Shoporama: additional fields, Google Shopping custom labels, HTML fields, and the fields from your theme.
Blog linked to your shop
Complete guide to the blog feature in Shoporama - create posts, schedule publishing, link products, optimize for search engines and use dynamic...
Manage Your Store with AI: Get Started with Claude and MCP
Connect your Shoporama store to Claude using the connector library or via MCP, and have it create orders, discount codes, and storefronts. Learn...