Get Started: The Setup Guide for Your New Online Store
Here's how the four steps of the Shoporama setup wizard work: what it asks you, what it sets up for you, and the order in which a new online store should proceed from there.
When you create a new online store with Shoporama, you’ll be greeted by a brief four-step setup guide. The guide asks for the most essential information, sets up a number of things for you, and takes you to your dashboard with a store that’s already starting to look like something. Here’s a complete walkthrough: what the guide asks, what it handles behind the scenes, and what you’ll need to tackle yourself afterward.
What the guide is and when it appears
The guide opens automatically right after your store is created. It appears on its own page without the usual left-hand menu, so you can focus on the four questions instead of getting lost in the admin section. At the top, you’ll see a step-by-step guide with all four steps: Store, Content, Design, and Colors. Steps you’ve completed are marked with a checkmark.
The wizard isn’t in the menu. It opens automatically the first time, and you can always return to it by typing /wizard after the address of your admin panel. There’s nothing you can mess up along the way. The wizard doesn’t save your changes until you click “Next Step” or, on the final step, “Create My Store.” As it says on the first step: it takes less than 2 minutes, and all selections can be changed later.
It’s already set up before the wizard starts
The moment the store is created, we lay a foundation so you have something to work from and can run a test order from day one:
- A front page category called “Front Page”
- The shipping method “Post Danmark with delivery”
- Denmark as the default country with 25% VAT for both individuals and businesses, and 39 kr. in shipping
- A product profile named “Standard Item with Sizes,” with the options Small, Medium, and Large. If you request demo products, a simpler profile named “Standard Item” will also be created, and that’s the one the demo products will use
- Payment method: Invoice payment, so you can test an order without yet having an agreement with a payment gateway
- Three static pages: Terms and Conditions, Contact Us, and About Us
- The Montana theme, with prices displayed including sales tax
These are default values, not recommendations. You must review and customize the shipping cost, VAT, and especially the text on the Terms and Conditions page to match your own business before the store goes live.
Step 1: Tell us about your store
The first step has only two fields, but the rest of the guide builds on them.
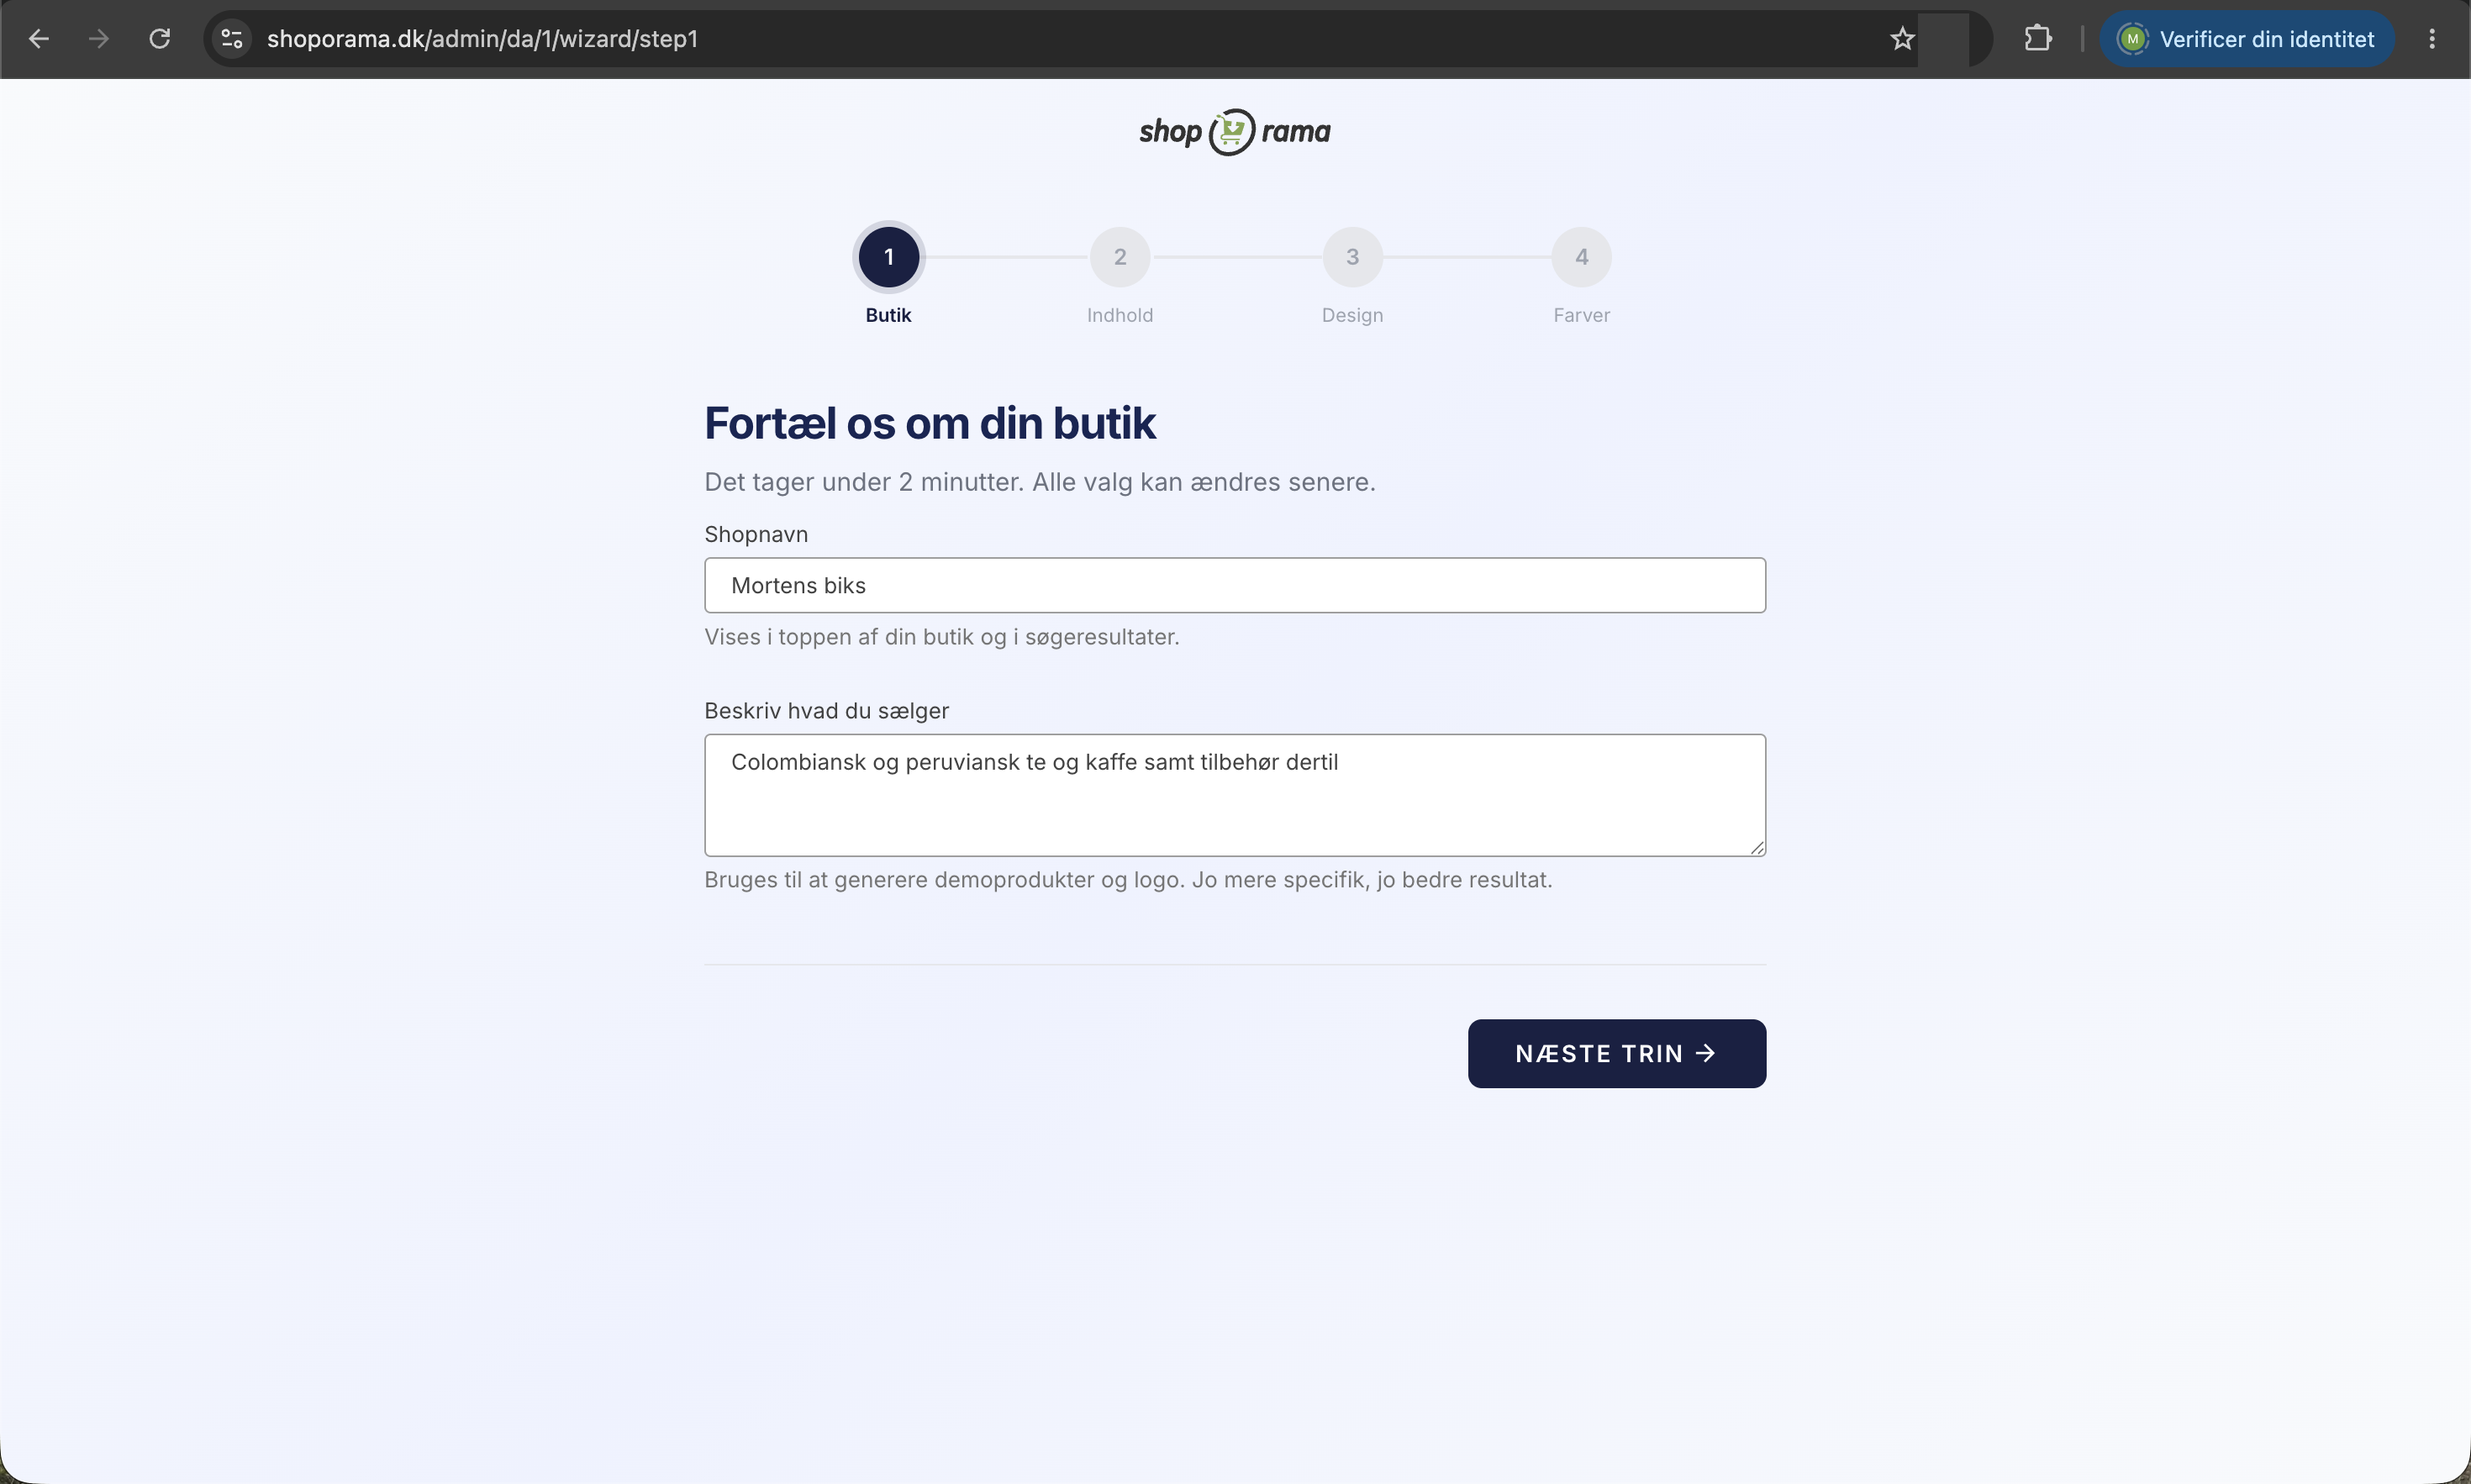
- Shop Name. Pre-filled with the name you entered during setup. The name appears at the top of your shop and in search results. This field is required.
- Describe what you sell. A free-text field with a placeholder example, such as “Danish-designed sterling silver jewelry for women.” The text is used to generate demo products and a logo, and as noted below the field: the more specific, the better the result.
The description is the most important field in the entire guide. If you skip it, no demo products or automatic logo will be created in the next step, even if you enable the relevant settings. However, any logo you upload yourself will be saved. So write a sentence or two about both what you’re selling and who you’re selling it to. “Clothing” yields a limited result, while “organic merino wool baby clothes for ages 0 to 3” yields a much better one.
Step 2: Would you like a head start?
The second step offers to populate your store with demo content so you have something to look at instead of an empty shell. There are two toggles, and they’re both turned on by default. If you’d rather skip the demo content entirely, just turn them off or click the “Skip this step” link.
Create Demo Products
We’ll create 10 products based on your description. Each product will have a name, description, and image, and will be posted online in the “Home” category as well as in a few categories suggested based on the product. The categories will be created automatically if they don’t already exist.
Please note that the prices and stock quantities for the demo products are random numbers. They are set to make the store look active, not because they match your business. Correct them or delete the products before going live. If you accidentally delete something, you can restore it under “Products,” “Trash.”
Create an Automatic Logo
We generate a logo based on your store name and description. Below the contact information, you’ll see “Would you rather use your own logo?” with a file upload field. If you upload a file here, it will be used instead of the automatically generated logo, even if the contact option is enabled. So your own logo always takes precedence.
If you don’t have a logo ready right now, it’s fine to use the automatic one and change it later under Store, Design, Logo & Terms. This is described in the article on logos, favicons, and terms of service.
Step 3: Choose your design
Here, the themes are displayed as thumbnails. Montana is listed first and marked as “Most Popular,” followed by the other themes. For themes that have a demo store, there’s a button labeled “View Example,” which opens the demo in a new tab without changing your selection. As noted above the cards: every design is fully customizable.
Choose the theme that matches the look and feel you want. You can change the theme again later under Store, Design, Theme, and fine-tune it under Theme Settings.
One important warning: if you run through the wizard again on a store where you or your developer has uploaded a custom theme, this step will remove your custom theme and reset the store to one of the default themes. If you have your own theme, change the theme instead under Store, Design, Theme.
Step 4: Set Your Color Scheme
The final step is colors. This step only appears if the theme you selected has predefined color schemes. If the theme doesn’t have any, the wizard will end immediately after step 3, and you’ll be taken to your dashboard.
If you choose Montana, you’ll get eight schemes: Standard, Warm, Cool, Nature, Elegant, Rose, Luxury, and Sand. Each card displays a strip of color swatches, the scheme’s name, and a brief description, such as “Warm earth tones with a warm orange call-to-action color.” Standard is selected by default, so if you simply click through, you’ll get the theme’s classic look.
A color scheme isn’t just a general mood. It sets ten specific colors for your theme, including the base color, action color, background, header, footer, and USP bar. Afterward, you can adjust each color individually under Store, Design, Color Schemes, as described in the article on color schemes.
When you click “Create My Store”
The button on the last step is labeled “Create My Store,” and afterward, you’ll be taken to your dashboard. If you requested demo products or an automatic logo, you’ll see a box that says “Generating sample data, ready in” along with a countdown. The content is generated in the background, and this may take up to five minutes. You don’t need to wait on the page: it monitors the process automatically and will switch to a green box that says “We’re done!” along with a link to your store. You’ll also receive an email notifying you that your new store is ready, including a link to the store, your logo, and the products that were created.
Please note that at this point, the store is a demo store at a temporary address. It’s not live yet, and this is intentional: you need to be able to finish setting it up before the store opens to customers.
Your checklist once the wizard is complete
The wizard gets you up and running quickly, but it can’t make business decisions for you. Here’s the order we recommend. The first four items must be in place before you can process a real order.
- Edit or delete the demo products. Go to Products, All Products. Remember that prices and stock quantities are random numbers. If you need to add a lot of items, importing via CSV is almost always faster than entering them manually.
- Organize your categories. Under Content, Categories. The category structure also serves as your navigation, so it’s worth spending half an hour here.
- Set up shipping and countries. Under Store, Shipping, Shipping Methods and Store, Shipping, Countries. Here, you can adjust the 39 kr., select which countries you ship to, and decide whether to offer free shipping above a certain amount. See Delivery: Basic Setup and Shipping Strategy.
- Add a payment gateway. Under Store, Integrations, Payment Gateways. As long as you only have Invoice Payment enabled, customers cannot pay by card. The dashboard will remind you of this with a box and a link to the setup. Read more about how to accept online payments.
- Change the logo, favicon, and terms of service. Under Store, Design, Logo & Terms. The terms of service are a standard text that must be customized for your business.
- Fine-tune the theme. Under Store, Design, Theme Settings, and Color Schemes. The Color Schemes menu item only appears if your theme supports color schemes. Here, you can set the homepage content, USP texts, and the details that make the store look like yours.
- Set up your own domain. Go to Account, Web Store, Domain. Do this before you start marketing the store so that links and ads don’t point to the temporary address. See the article on moving the store to your own domain.
- Go live. On the dashboard, you’ll see a box that says “Your store isn’t live yet” and a “Go live” button. Here, you’ll fill in your company information and accept the terms and conditions.
Newsletters, Google Shopping feeds, discount codes, and customer groups can wait. First, make sure the store can sell a single item to a single customer without errors, and test it yourself by placing an order while you’re still on the demo address.
For the tech-savvy
- The color scheme isn’t a layer on top of the theme. The ten color values are entered as standard theme settings, so you can override them individually later without losing the rest.
- Step 3 clears the selection of the private theme and simultaneously sets the store’s cache to be cleared, so a theme change takes effect shortly afterward. Step 4 clears the cache immediately.
- Demo products and the logo are loaded in the background. This means the store is usable right away, while the content appears gradually.
- The old setup process with separate pages for design, accounting system, domain, and payment gateway is no longer part of the setup. Use the corresponding pages in the general administration section instead.
Frequently Asked Questions
I closed the setup wizard in the middle of the process. Is my store broken?
No. The store was already created when you signed up, and the wizard is just a shortcut to the initial settings. Everything you clicked “Next Step” on has been saved. You can either continue in the regular admin panel or return to the wizard by adding /wizard to the end of your admin panel URL.
Can I run through the wizard again?
Yes, but do so with caution. If you go through the entire process again, the store name, description, theme, and colors will be overwritten with your new selections, and you may end up with 10 new demo products in addition to the old ones. If you just want to change the theme or colors, use the menu items under Store > Design instead.
The demo products have really odd prices. Is something wrong?
No, that’s intentional. The demo products are assigned random prices and random stock levels so the store looks lively right away. They’re meant to serve as a backdrop for you to view your design, not as a product catalog. Correct the prices and stock levels, or delete the products, before you go live.
It says “Generating sample data, ready in” with a countdown. Should I stay on the page?
No. Feel free to continue working elsewhere in the admin panel or close the tab. The content is being generated in the background, and the page will refresh automatically when it’s ready. You’ll also receive an email when your store is ready, so you won’t miss it.
Is the VAT set up correctly from the start?
The store is set up with Denmark as the default country and a 25% VAT rate for both consumers and businesses, and prices are displayed inclusive of VAT in the store. This is suitable for a typical Danish retail store. If you sell to businesses, internationally, or have products with a different VAT rate, you’ll need to adjust this yourself under Store, Shipping, Countries before going live.
How good will the automatic logo be?
It will be a usable draft based on your store name and description, so your store won’t have an empty corner. It does not replace a professional graphic designer. If you already have a logo, upload it in the same step, because the file you upload will always be used instead of the automatic one.
I don’t want any demo content at all. What should I do?
Turn off both switches in step 2, or click “Skip this step.” Then neither products nor a logo will be created. The same thing happens automatically if you’ve left the description field in step 1 blank, because without a description, we have nothing to generate from. If you upload a logo yourself, it will be saved regardless.
Do I have to go live right away?
No. Your store starts as a demo store at a temporary address, and you decide when to open it. Use this time to set up your products, shipping, payment, and terms and conditions. When you’re ready, click “Go Live” in the box on the dashboard. If you’re unsure how long your demo period lasts, email support@shoporama.dk.
Related articles
Logo, Favicon, and Terms and Conditions
Here's how to upload your logo and favicon and enter your terms and conditions in Shoporama. See where the content appears in the store, at...
Theme Settings: How to Customize Your Theme
Theme settings are the theme's own control panel in Shoporama. Here, you can change colors, text, images, and enable or disable features without...
Color Schemes: Switch Between Multiple Color Palettes
Change the entire color scheme of your online store with a single click. Learn how to use color schemes, why this menu option is only available in...
Delivery: Basic Setup and Shipping Strategy
Get a handle on the entire Delivery menu in Shoporama: countries, shipping methods, shipping rates, weight-based rates, shipping agreements, and...
How do I receive payment online?
What does it take to accept credit card or MobilePay payments online? Read about acquiring agreements, payment gateways and alternative payment...
Move your shop to your own domain
Guide to moving your Shoporama online store to your own domain with DNS setup, SSL and domain validation.
Related features
D2C - Direct to Consumer
D2C is a business model where you sell directly to the customer. Learn about the benefits, challenges and strategy for Direct to Consumer sales via...
Webshop solution
Complete webshop solution with hosting, payments, Danish support and GDPR from day 1. Try for free for 30 days. Fixed price, no commitment.
Webshop for pet shops
Start an online shop for your pet store with inventory management, product variants, POS checkout and loyalty program. Try for free for 30 days.
Webshop for hairdressing
Start a webshop for your hair salon. Sell hair care products, gift cards and accessories online with integrated checkout system. 30 days free.
Webshop for yarn shop
Start your yarn shop online with Shoporama. Manage color numbers, knitting kits and digital patterns. POS checkout system included. 30 days free.
Webshop for sports association / sports club
Free online shop for your sports club with the FLEX plan for €0/month. Sell clubwear, manage sizes and let members collect from the clubhouse.
Webshop for liquor stores
Start a professional webshop for your liquor store. Product descriptions, filtering, checkout system and integration with accounting. Try for free...
Cheap webshop
Find the cheapest online store with everything included. Compare prices on Shoporama, Shopify and DanDomain over 12 months. Start for free.
Free webshop
Start your online shop free for 30 days with all features. Continue for free with FLEX (€0/month, 5% of sales). No credit card, no commitment.
Webshop for startups
Start your online store for free with Shoporama FLEX. 0 kr/month, no long-term commitment, and all features included. FLEX supports 1 user. Perfect...
Best webshop platform
Honest comparison of Shopify, WooCommerce, DanDomain, Shoporama, Ideal.shop, Meeshop, Shup and SmartWeb. Find the best ecommerce platform.
Create your own online store—without a developer and without coding
Create your own online store without a developer. Choose a Danish theme, build your pages with drag-and-drop, and get help from AI. Try it free for...
Build Your Own Online Store
Build your own online store with Danish themes, a page builder, and an AI assistant. Everything is included, and you own the result. Try it free...