Tickets: Sell events, classes, and trips on specific dates
Set up ticket sales with dates, seats, and ticket types. Customers select a date on the product page and receive a ticket with a QR code for each participant.
If you host beer tastings, classes, concerts, or trips on specific dates, you can sell tickets directly through your online store. Each item has its own dates with a set number of spots; customers select a date on the product page, and each participant receives their own ticket with a QR code via email. You can track sales and participants under Orders → Tickets, and check guests in at the door using your phone.
Tickets are treated as regular orders in your store. Payment is processed through your own payment solution, and there is no separate fee per ticket sold. The date picker and participant fields at checkout are available in the built-in themes Montana, MontanaB2B, Delaware, and DelawareDK. If you’re using your own theme, read the section on custom themes at the bottom.
In short: Enable Tickets on a product profile, add the ticket item to the profile, and set up the dates on the item’s Tickets and Dates tab. The rest happens automatically: seats are counted down, tickets are sent once the order is paid for, and the customer receives a reminder 48 hours in advance.
Here’s how it works
- The item is the event, e.g., “Beer Tasting with the Brewer” or “Hiking in Tuscany.”
- The dates are associated with the product. Each date has its own number of seats, its own status, and possibly a price surcharge.
- Ticket types are variants, such as Adult and Child or Standard and VIP. All ticket types for the same date share the seats available for that date.
- Tickets are issued individually. If a customer purchases three tickets, they receive three tickets, each with its own unique code.
- Inventory is not used. The number of seats available on a given date determines how many tickets can be purchased.
Step 1: Enable Tickets on the Product Profile
Tickets are enabled on the profile, not on the individual item. All items in the profile thus become ticket items.
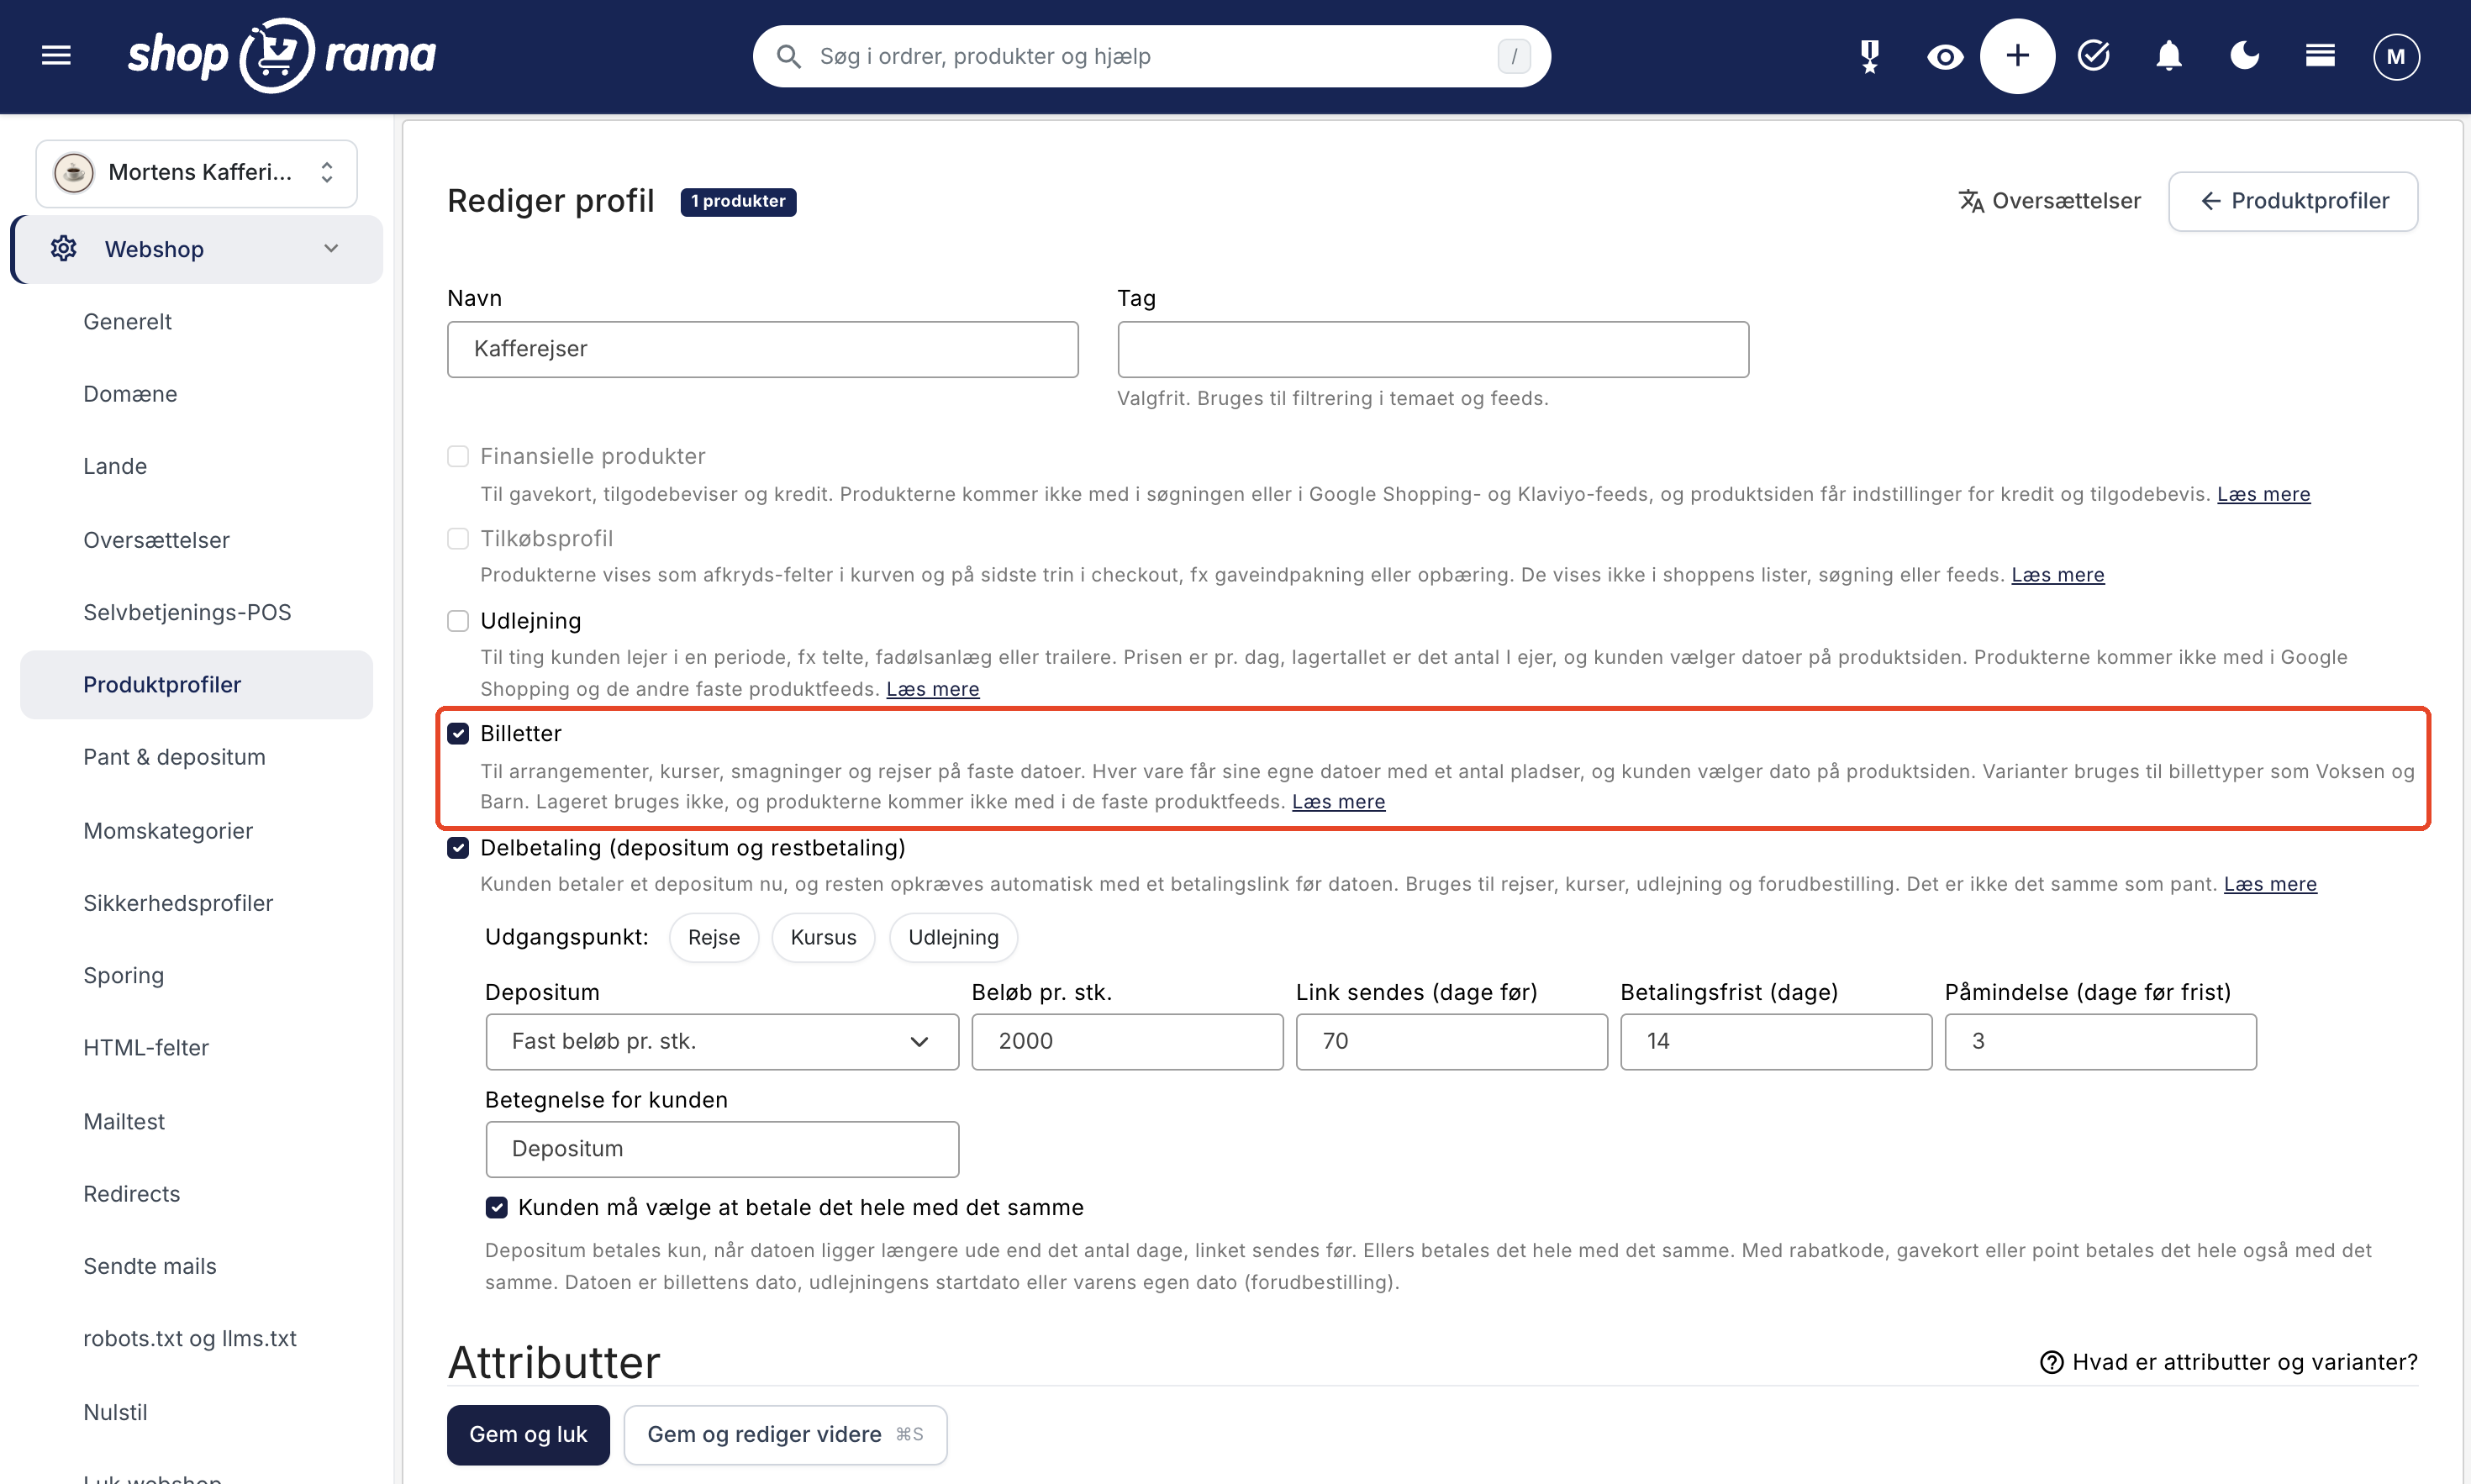
- Go to Webshop → Product Profiles, and create a new profile, e.g., “Events,” or open an existing one.
- Check the “Tickets” box.
- If you need multiple ticket types, add an attribute to the profile, such as “Ticket Type” with the values Adult and Child. If the types should have different prices, enable “Individual Price per Variant” for the attribute.
- Save the profile.
A profile cannot be used for both tickets and rentals, add-ons, or financial products. However, it can have “Installment Payment” (deposit and balance) enabled, so the customer pays a deposit now and the balance later. If you need a refresher on profiles and variants, read Product Profiles and Variants.
Step 2: Create the ticket item and fill out the “Tickets and Dates” form
Create the item using the new profile, and provide a name, description, images, and price just as you would for a regular item. The price is the price per ticket. When the item is in a ticket profile, it will display the “Tickets and Dates” tab on the product page in the admin panel. At the top of the tab, select:
- Attendee Information: None (buyer only), Name per attendee, or Name and birthday per attendee. The customer fills out the fields for each ticket at checkout and can edit them on their ticket page until sales close. Only ask for a birthday if you need it—for example, because a tour operator requires it.
- Also ask for: when the product asks for names, the options below the selection will indicate what else the customer needs to provide. Click on “Add,” e.g., email, company, or allergies (or “Edit Fields”), and check the boxes for “Email,” “Phone,” “Company,” and “Allergies and Diet,” then add up to three custom fields, e.g., “T-shirt size” or “Which team?”. Check the “Required” box for the fields the customer must fill out before proceeding to checkout. A custom field is used when it has a heading.
- Location: The address appears on the ticket, in emails, and in the calendar file. For example, “Bryggeriet, Havnegade 12, 5000 Odense C.”
- Terms: Displayed on the product page, at checkout, and in emails. For example, enter your cancellation policy here.
- Emails: Send tickets with a QR code once the order is paid, and send a reminder 48 hours in advance. Both options are enabled by default. If you disable the QR codes, the customer will instead receive a booking confirmation with the date and participants.
Step 3: Add the dates
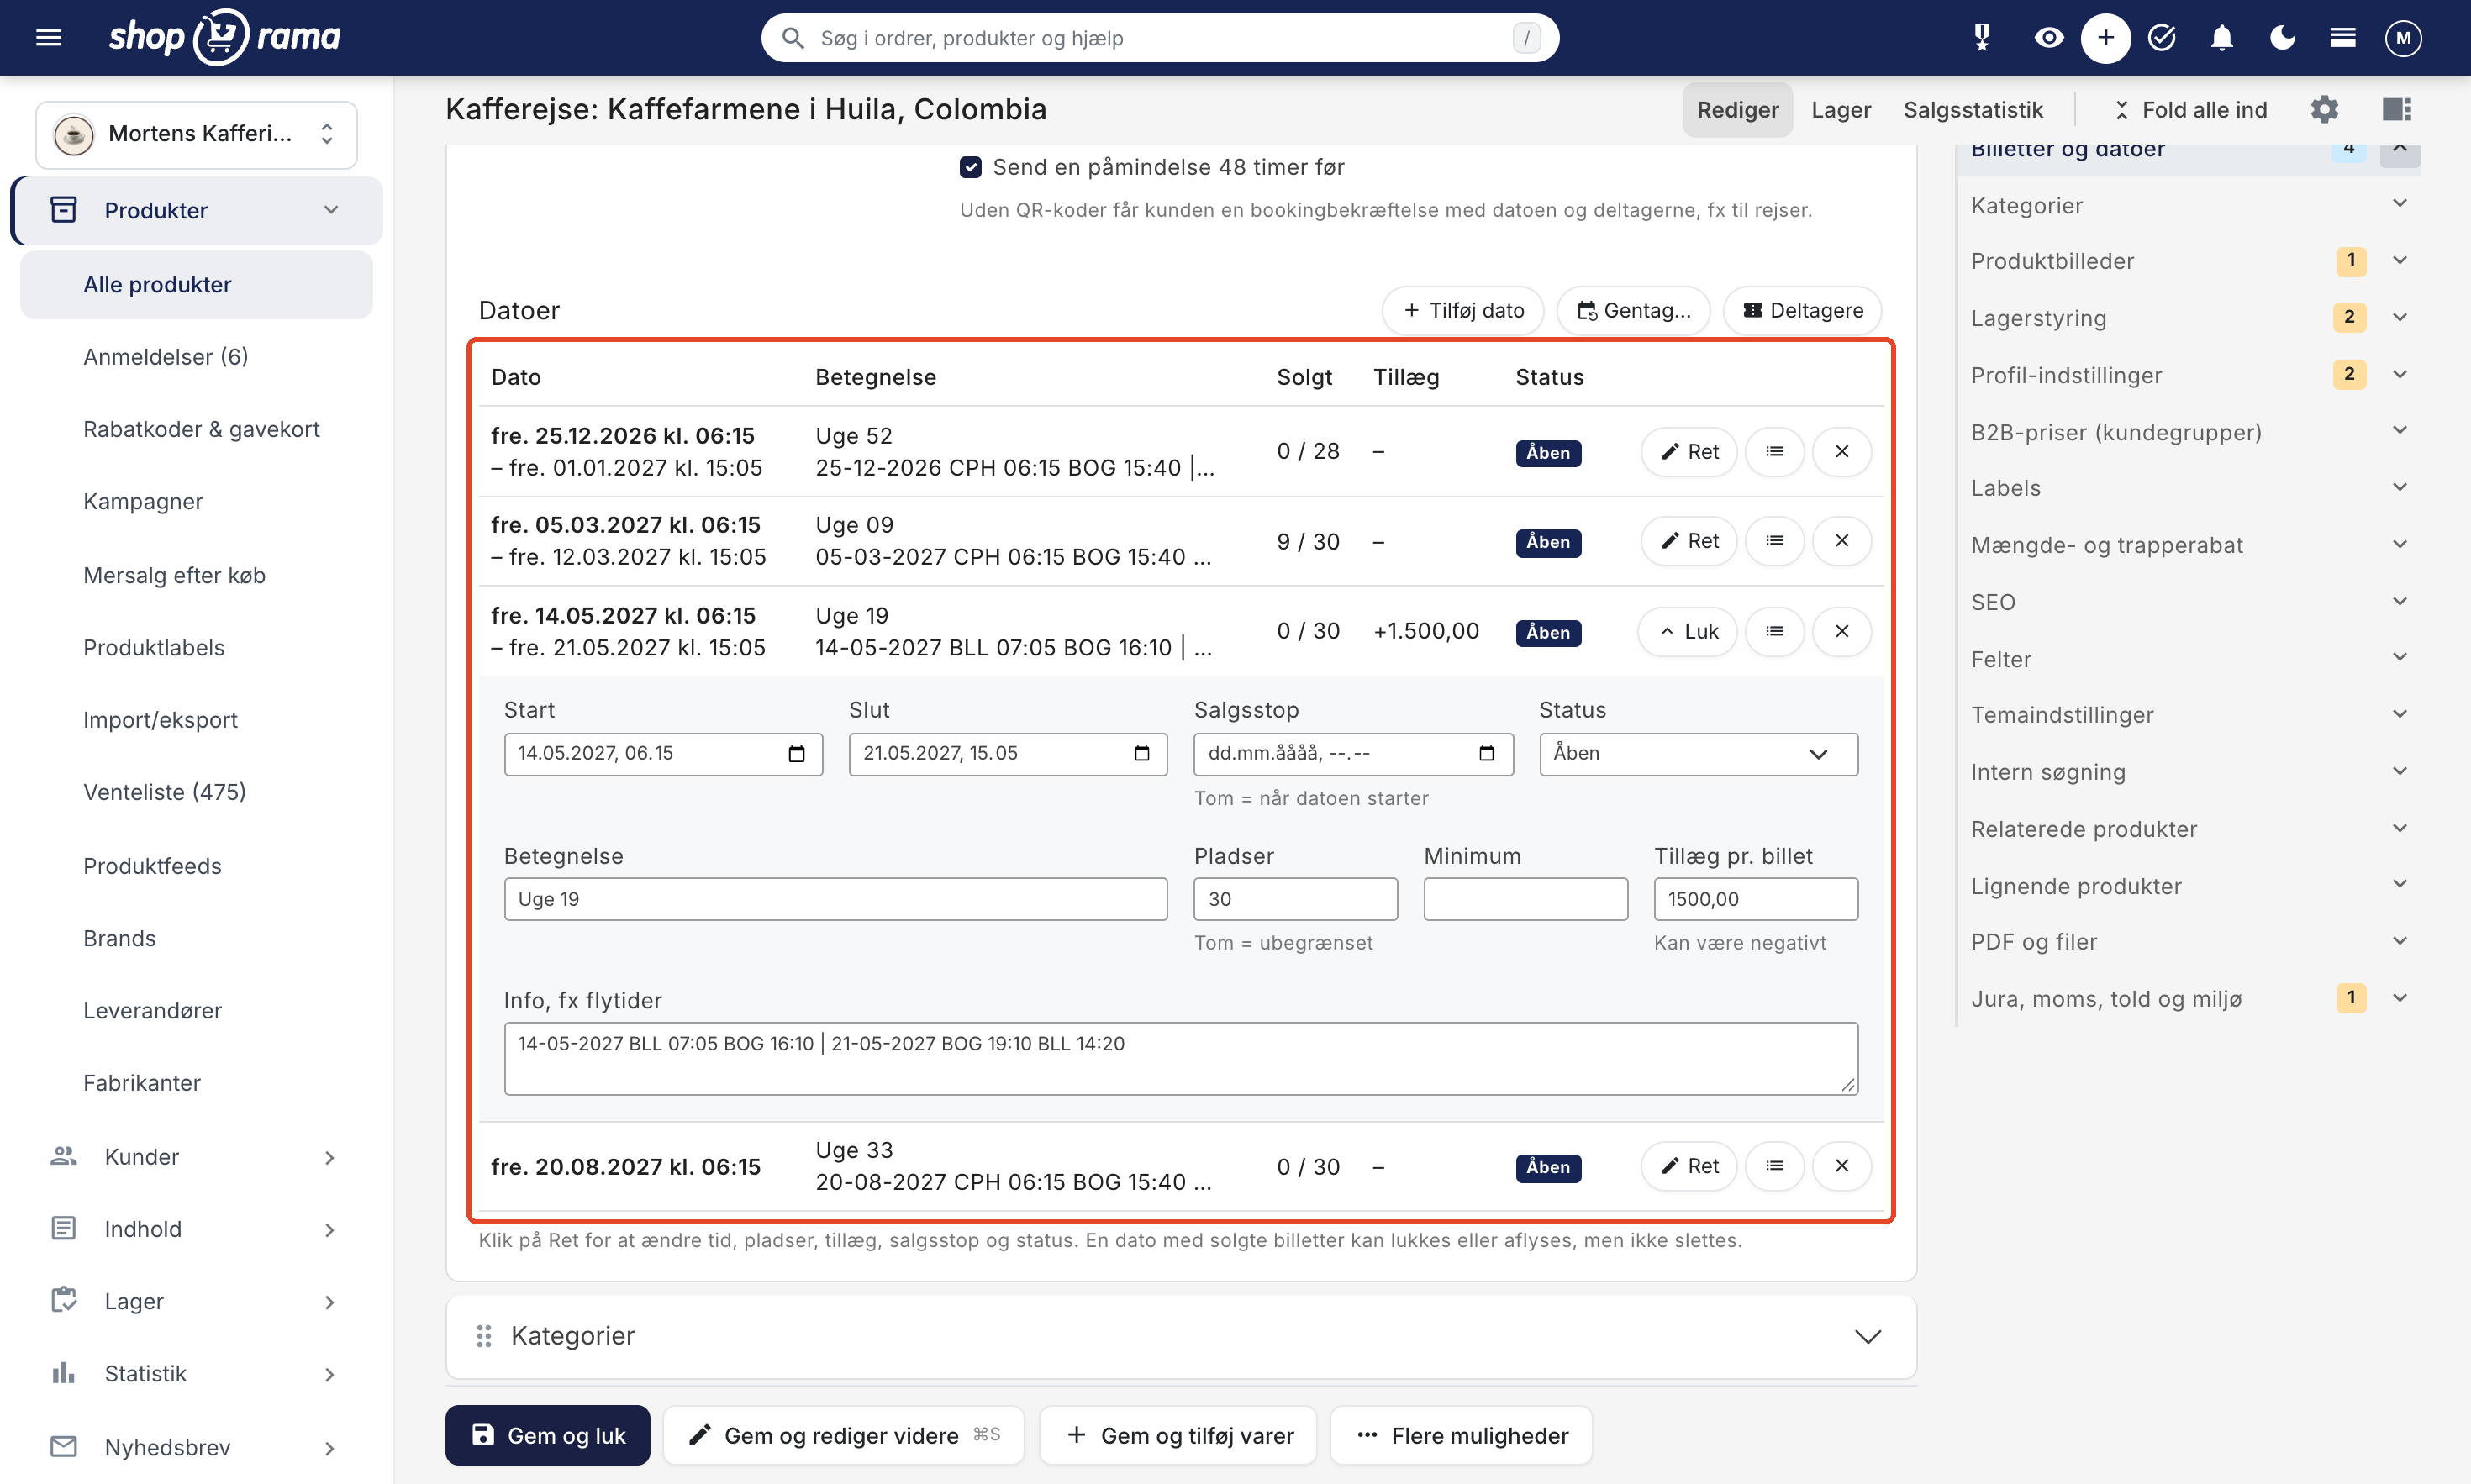
Under the “Dates on the calendar” heading, click “Add date.” A new date will appear in the list, and the fields will be open:
- Start and, if applicable, End.
- Sales cutoff: Left blank means sales continue until the date begins.
- Status: Open, Closed, or Canceled. Only open dates can be purchased in the store.
- Description: a short text, e.g., “Christmas Beer” or “Departure from Billund.”
- Seats and Minimum: the minimum number of participants required to proceed. An empty field means unlimited.
- Surcharge per ticket: added to the price for that specific date and may be negative.
- Info, e.g., flight times: displayed next to the date in the date selector.
The list displays each date on a single line, showing the date, description, tickets sold out of total seats, surcharge, and status. Click Edit to change a date and Close to collapse the fields again. The button with the list icon opens the participant list for that date.
If you have many dates, such as a tasting every Thursday, use “Repeat….” Specify the First Start, Duration (hours), how often (every N days or weeks), Number of Times, Seats per Date, and, if applicable, a Description, then click Add Dates. You can create up to 200 dates at a time.
The dates are saved when you save the product. A date for which tickets have been sold can be closed or canceled, but not deleted.
Different prices on different dates
The “Surcharge per Ticket” field is added to the ticket type’s base price. If a trip costs 8,995 DKK, and you add a +1,500 DKK surcharge to the departures during peak season, they will cost 10,495 DKK. The surcharge can also be negative, e.g., -50 kr. on a weekday morning. The customer sees the price per date directly in the date selector.
Do you sell trips?
Tickets are also used for trips and departures. A few things are worth setting up:
- Enter the tour operator, the Rejsegarantifonden registration number, and a link to the standard information form in the “Terms” field. This information will then appear on the product page, at checkout, and in emails.
- Select “Name and Date of Birth” per participant if you need this information for the airline, for example. The field in the checkout prompts the customer to enter their name exactly as it appears on their passport if they’re traveling.
- Turn off “Send tickets with QR code” if scanning isn’t required. The customer will then receive a booking confirmation with the date and participants.
- Use the info field on the date to include flight times and the meeting location.
What the customer sees
On the product page
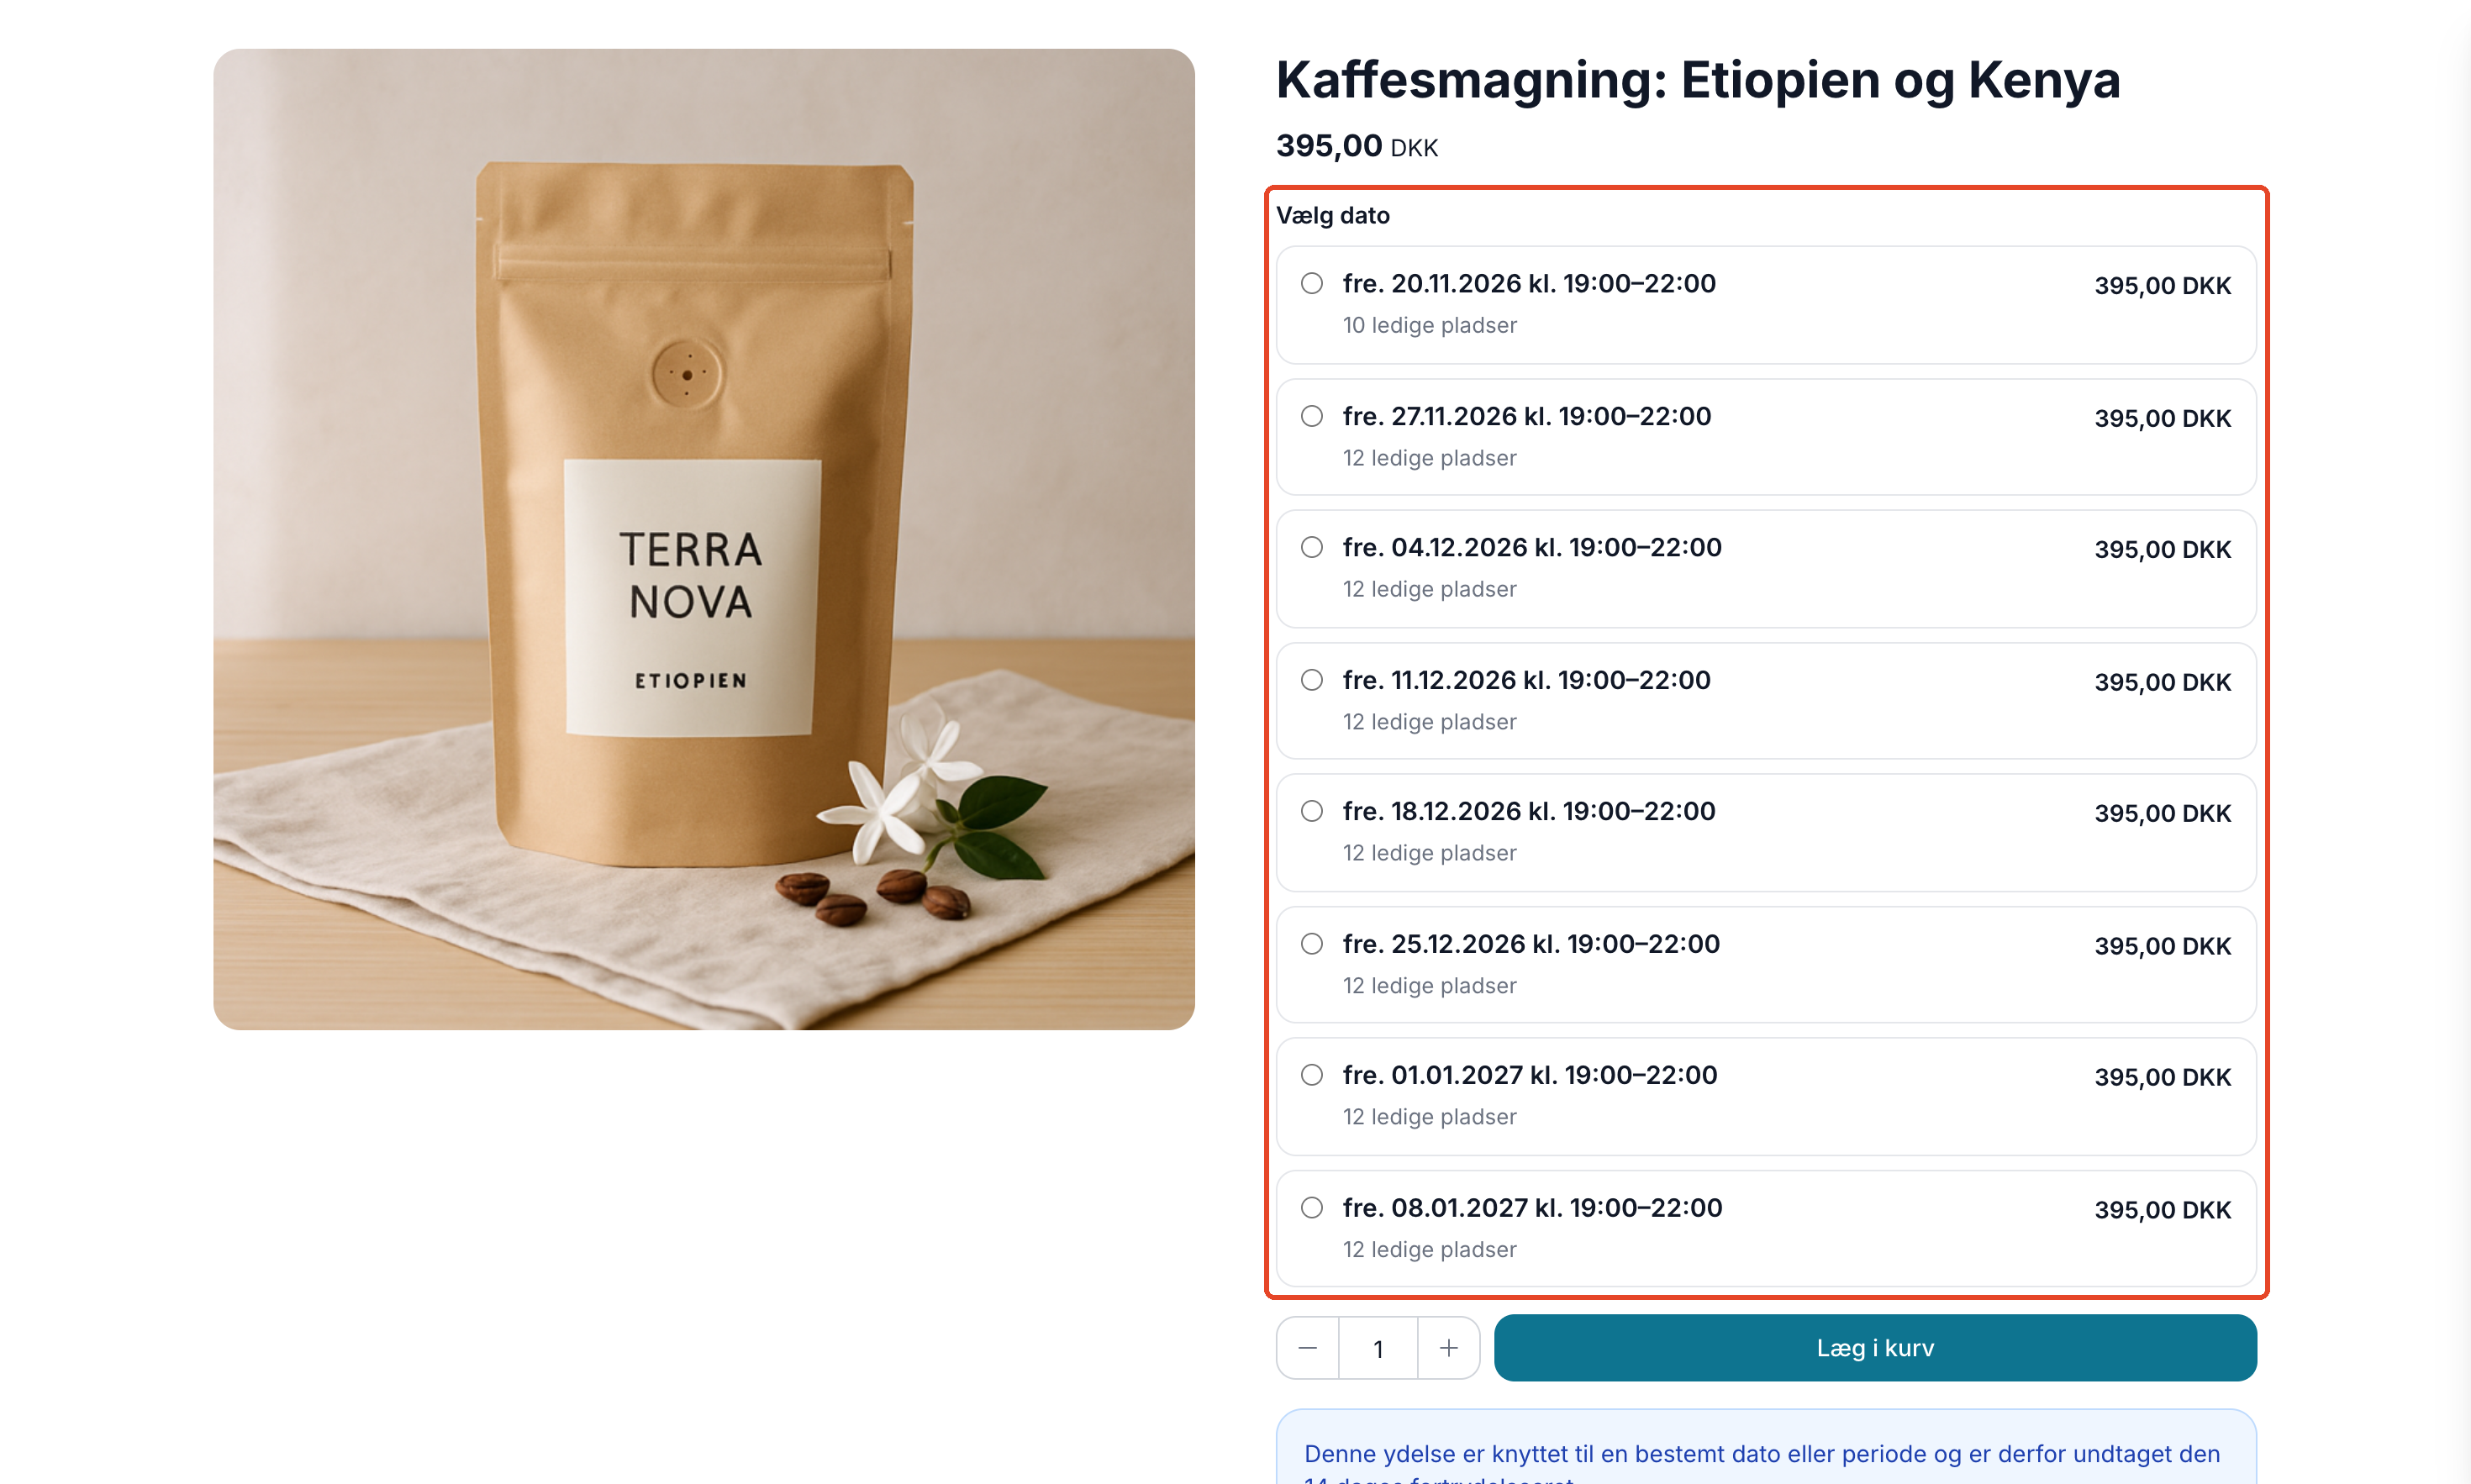
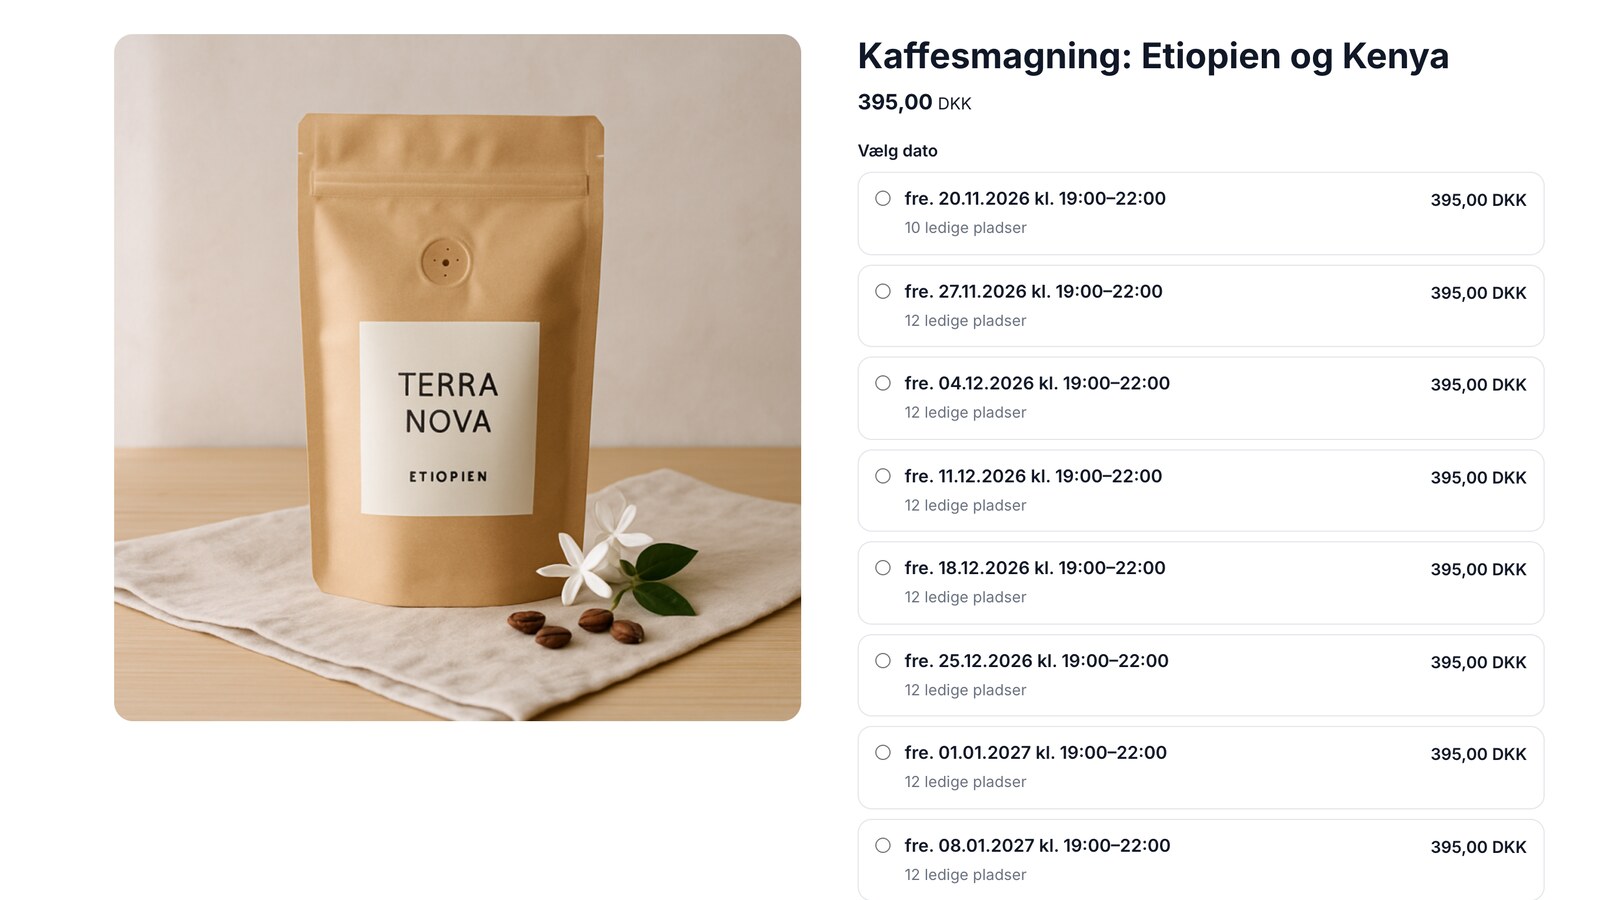
The product page displays a date selector showing upcoming dates available for purchase and the price per date. If there are 5 seats or fewer remaining, it will say, for example, “Only 3 seats left.” A sold-out date is marked “Sold Out” and has a “Add me to the waitlist” button. If the item has only one available date, it is preselected. Available spots are refreshed every time the page is loaded.
On the product cards in categories and search results, “Select Date” (in Delaware, “Choose Date”) appears instead of a “Buy” button, and no stock status is displayed.
In the cart and checkout
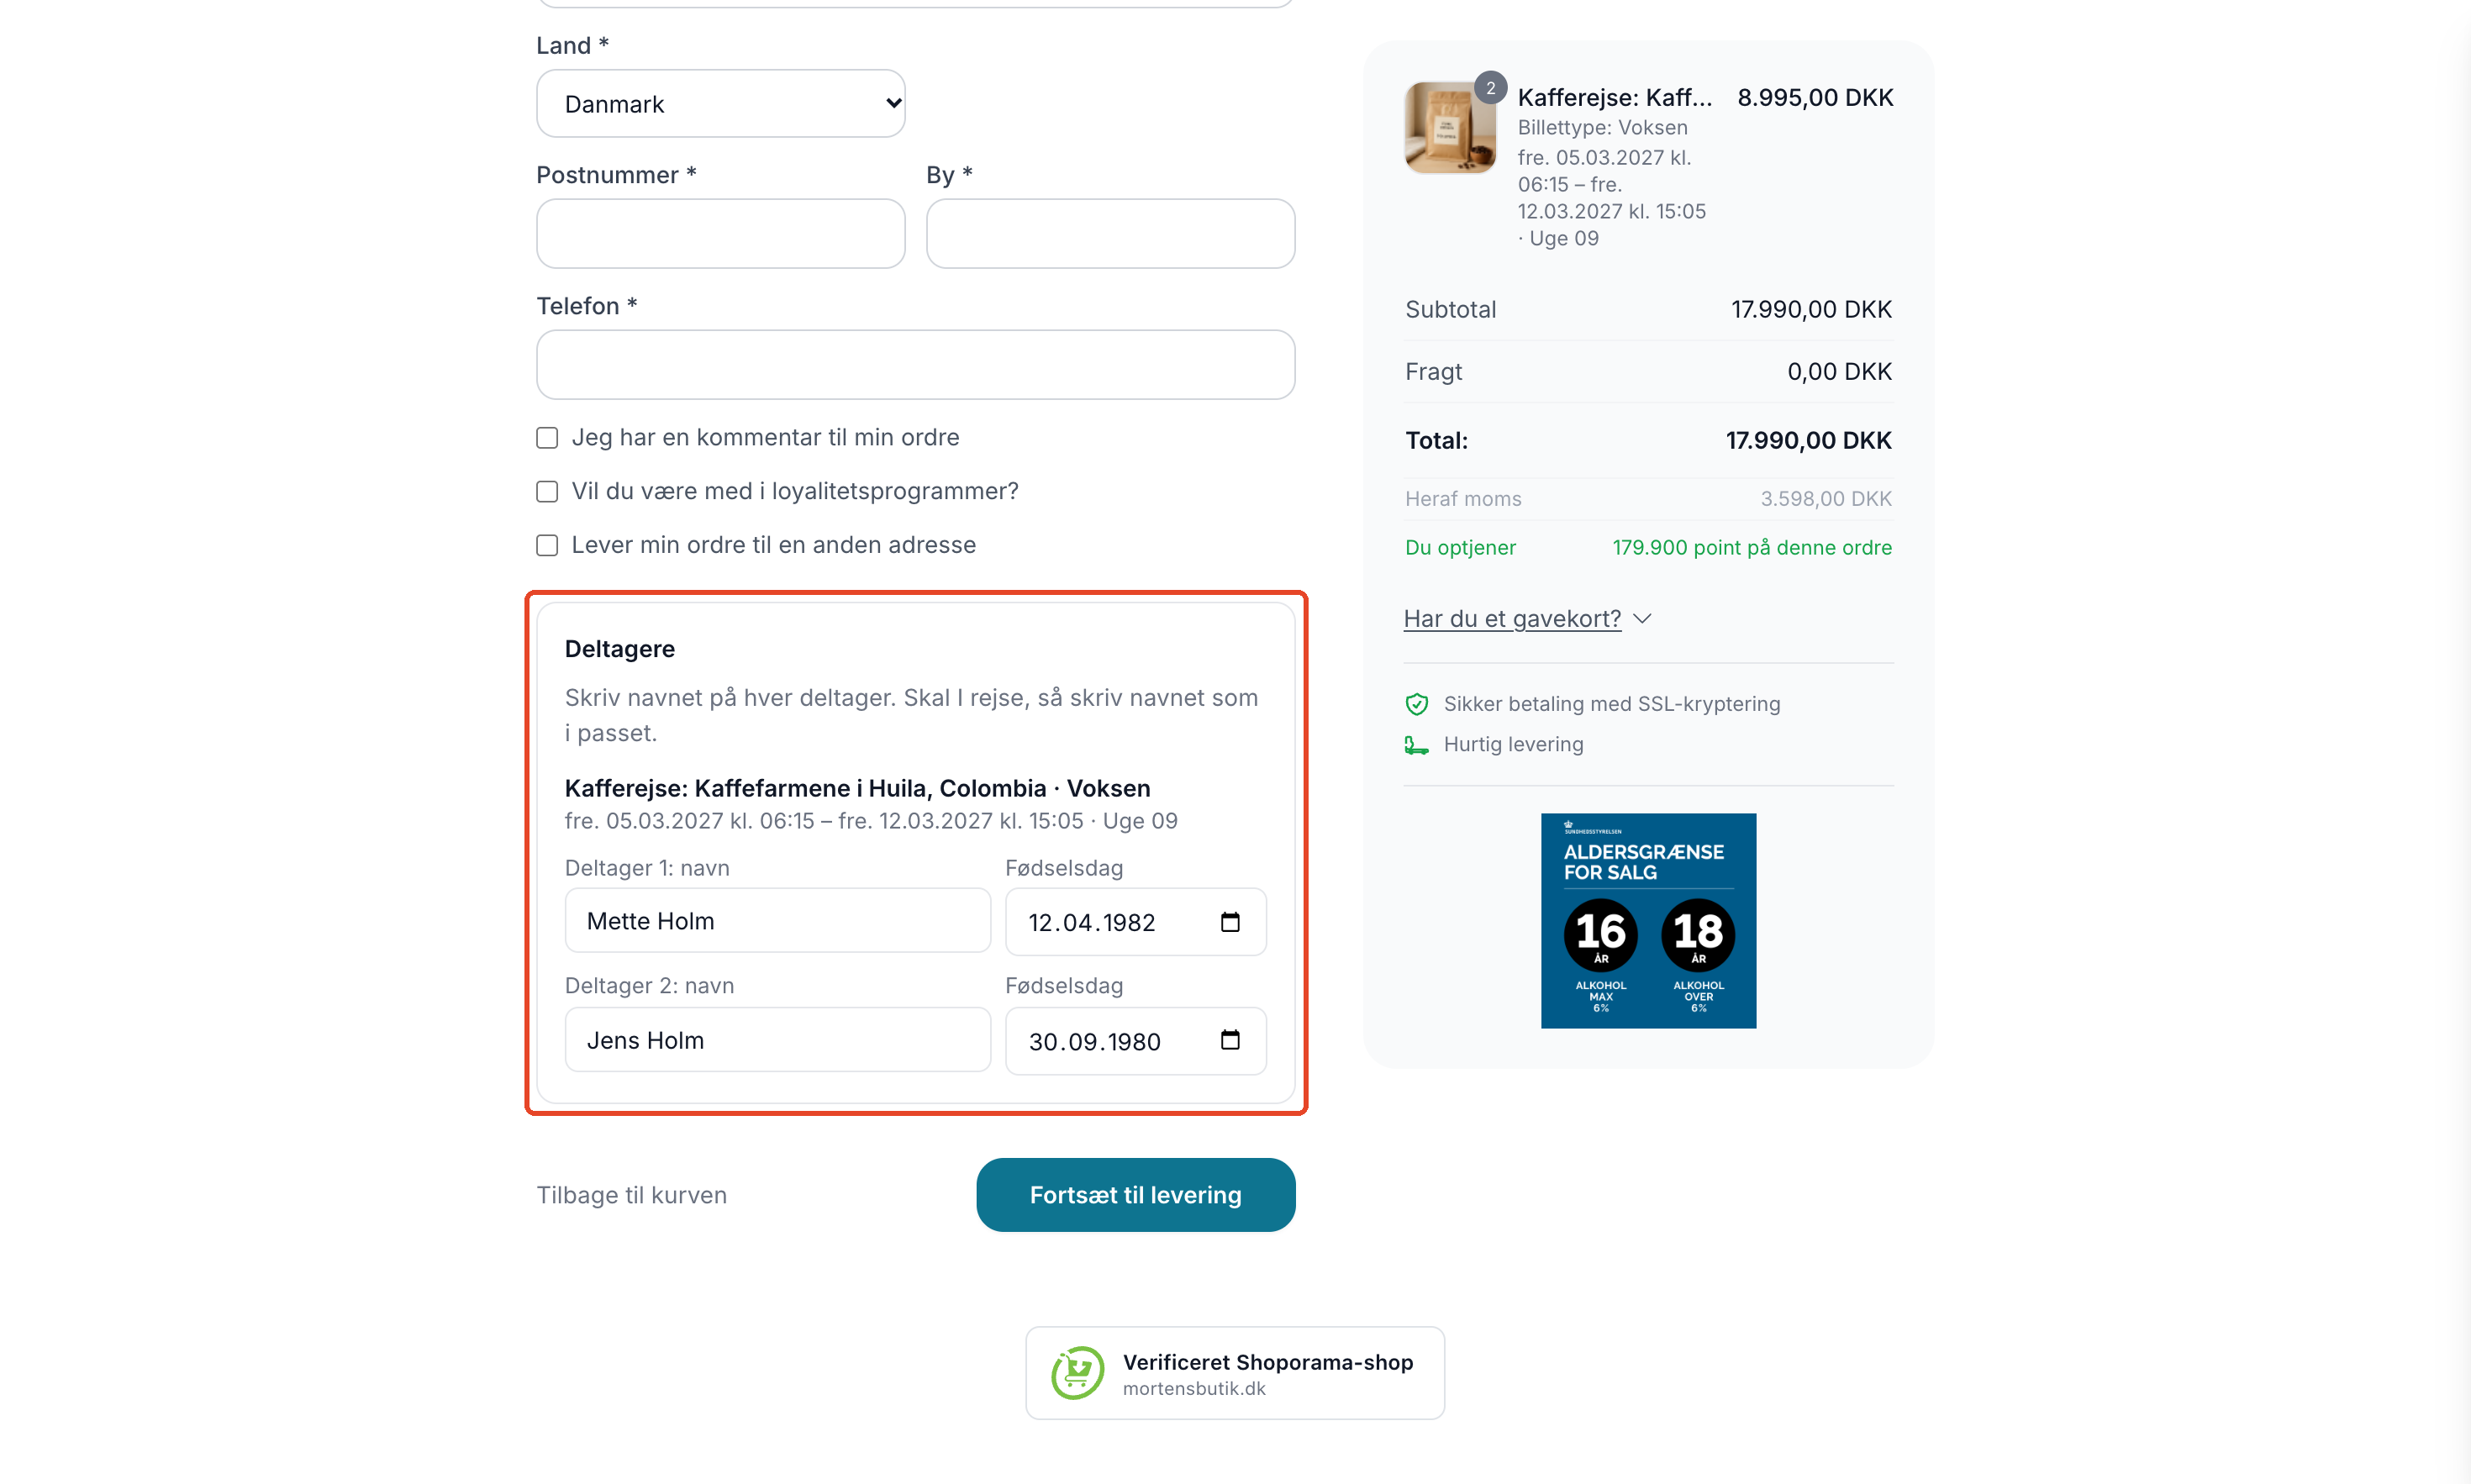
The date and description appear on the line in the shopping cart and checkout. If you’ve chosen to ask for participant details, the address step displays the “Participants” box with one field per ticket (“Participant 1: Name” and, if applicable, “Birthday”). If any names are missing, the customer is redirected back to the fields with the message “Enter the names of all participants.” If the customer skips this step—for example, using Vipps MobilePay Express—the names can be entered later on the ticket page.
If the cart contains only tickets, the customer must still select a delivery method at checkout. If you’re selling tickets only, create a delivery method priced at 0 kr., such as “Ticket sent via email.”
After the purchase
- The thank-you page and order page feature a box with a “View Your Tickets” button that appears when the customer opens them in the browser used to place the order or is logged into their account. If the order page is opened from a different location, it will instead state that the tickets have been sent via email. This prevents anyone from retrieving someone else’s tickets using an order number and an email address.
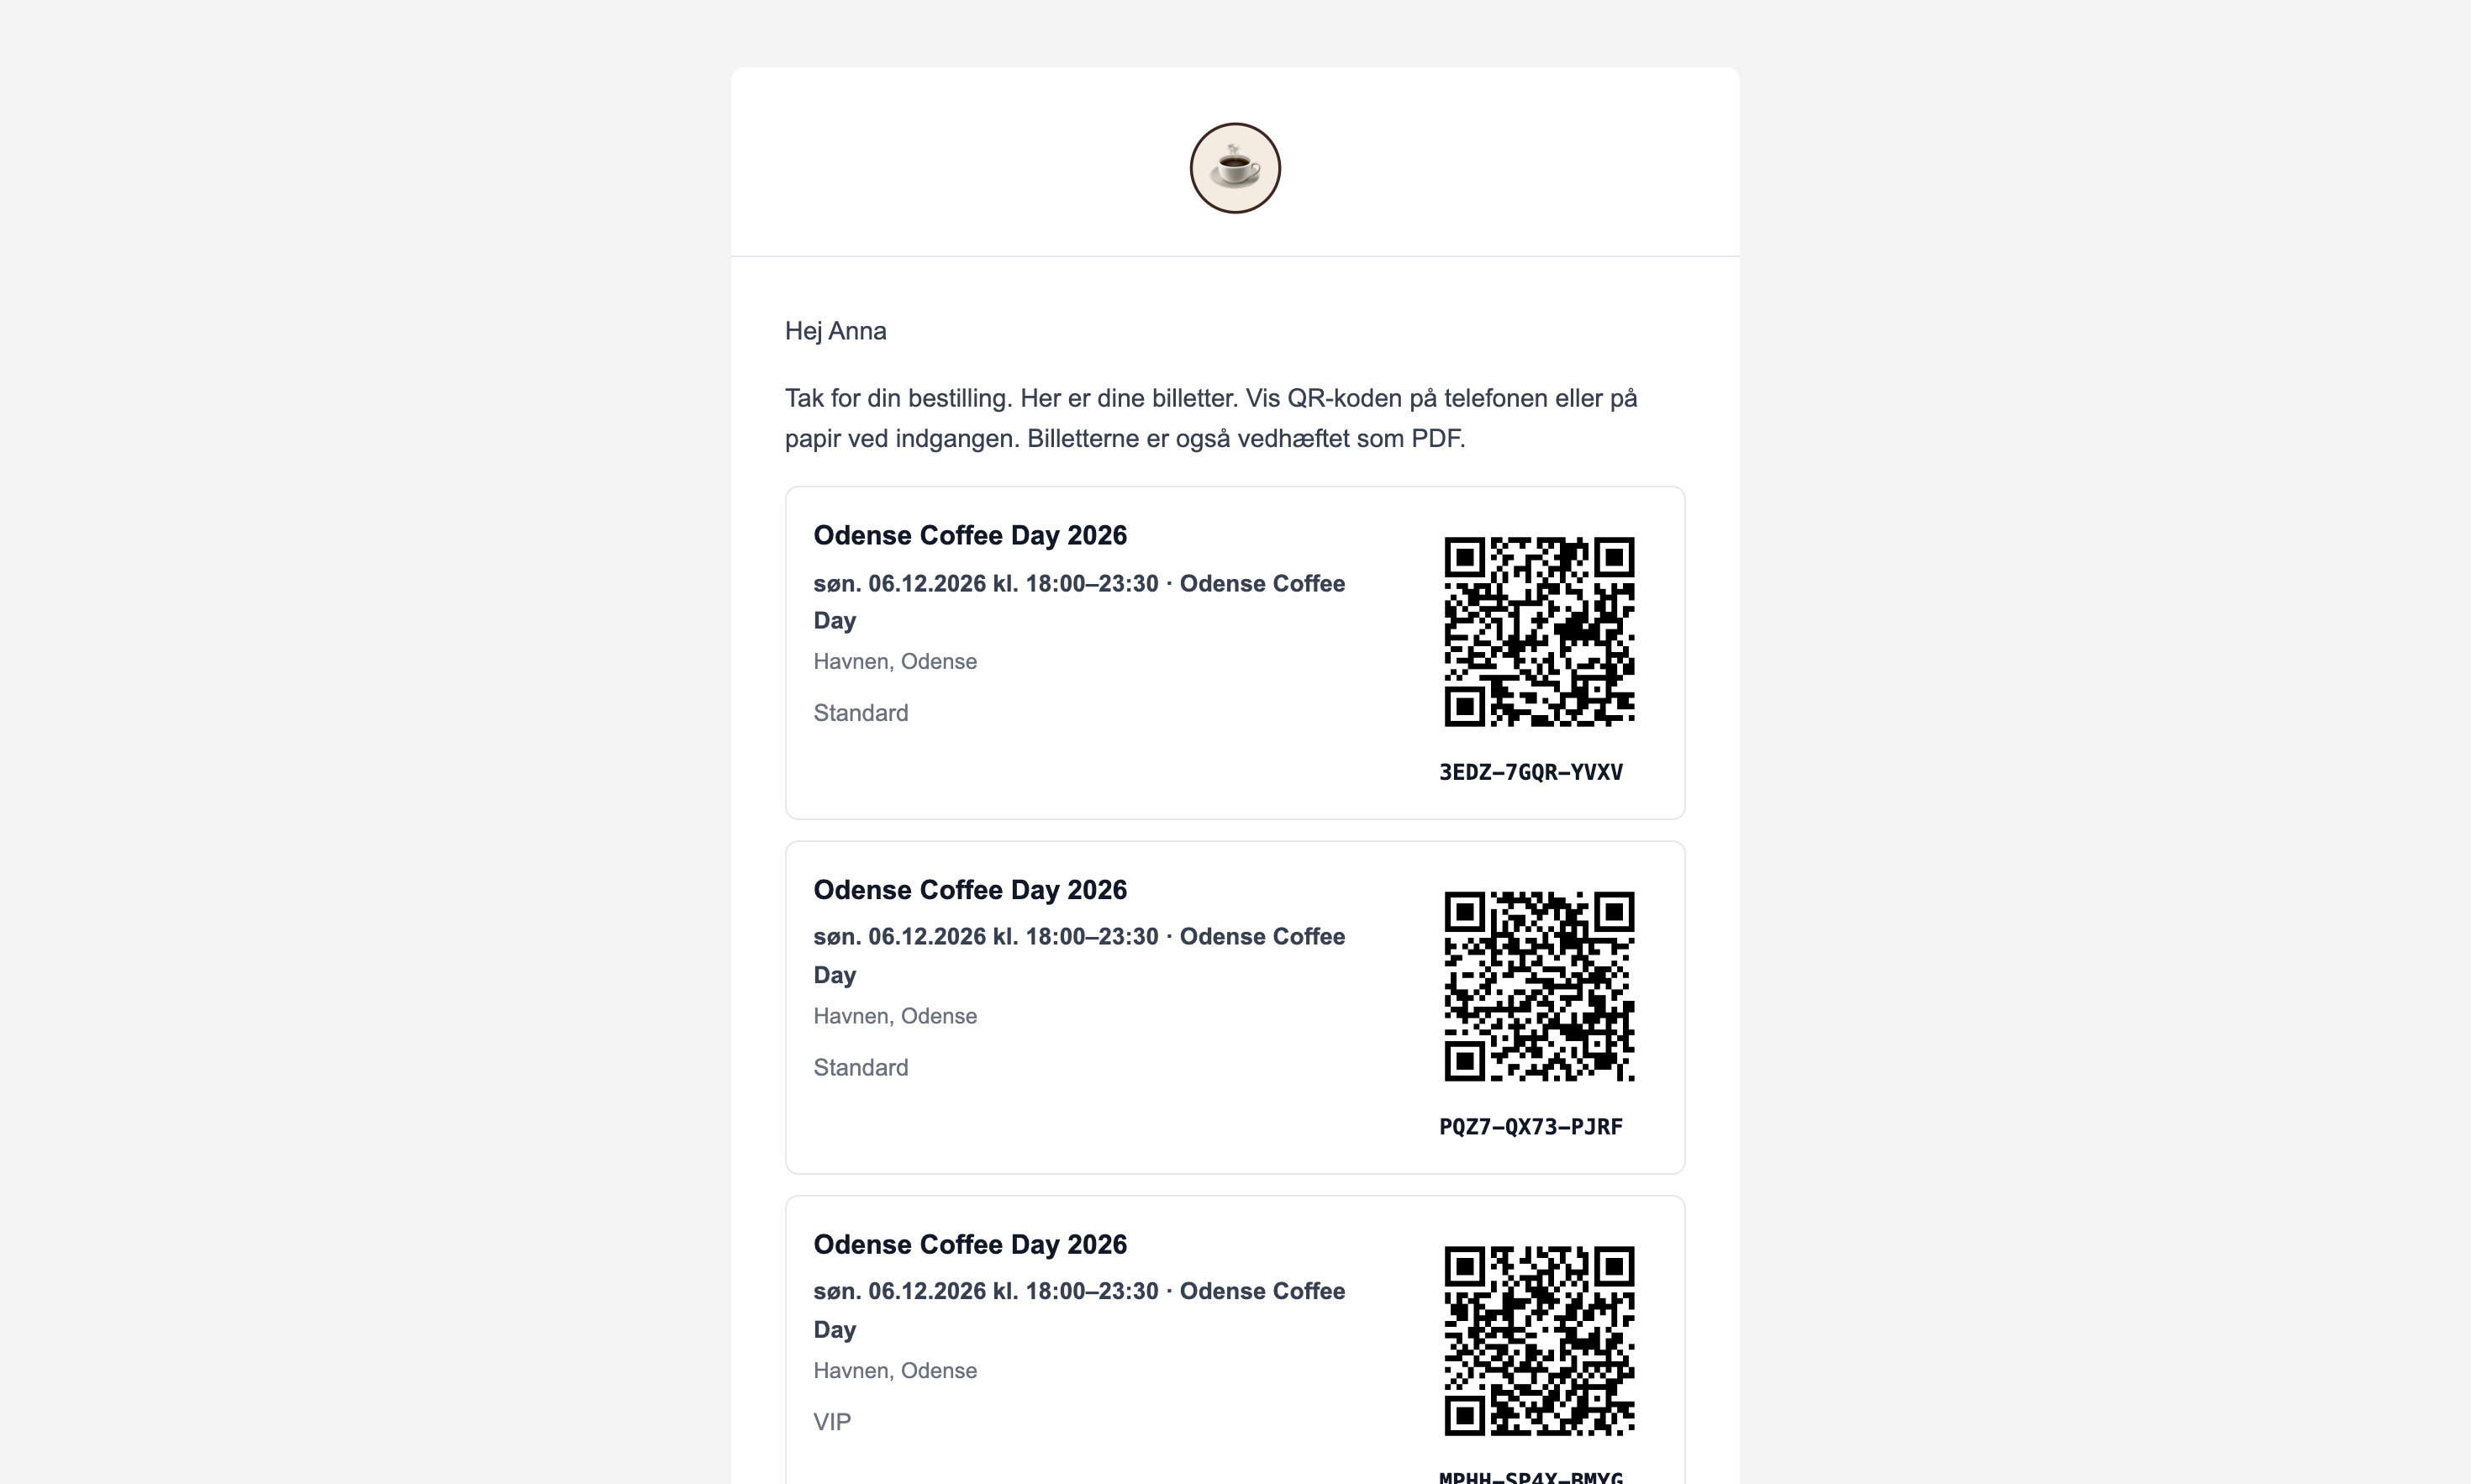
- The email containing the tickets is sent once, after the order has been paid for. It contains one QR code per ticket, and the tickets are attached as a PDF. The PDF is optimized for mobile devices, with one ticket per page and a large QR code, and it works even without an internet connection at the entrance.
- The ticket page is opened from the email or the thank-you page via a personalized link. Here, the customer can view the QR codes, download them using “Download All as PDF,” print them on A4 paper using “Print (A4),” add the date to their calendar using “Add to Calendar,” and edit the participants’ names until the sale closes. The birthday is not displayed on the page.
- A reminder is sent 48 hours in advance with the time and location, unless you’ve turned it off for the item.
Waiting list for sold-out dates
On a sold-out date, customers can enter their email address by clicking “Add me to the waitlist.” If a spot becomes available—for example, because a ticket is canceled or because you add more seats—the first people on the list will automatically receive an email. You’ll send as many emails as there are available seats. Seats aren’t reserved for them—it’s first come, first served.
The waitlist is located on the event’s page in the admin panel. Here, you can remove a person using “Remove,” and if you’ve added many seats, you can notify everyone immediately by clicking “Send a message to everyone on the waitlist now.” The waitlist is deleted once the event date has passed.
Overview under Orders → Tickets
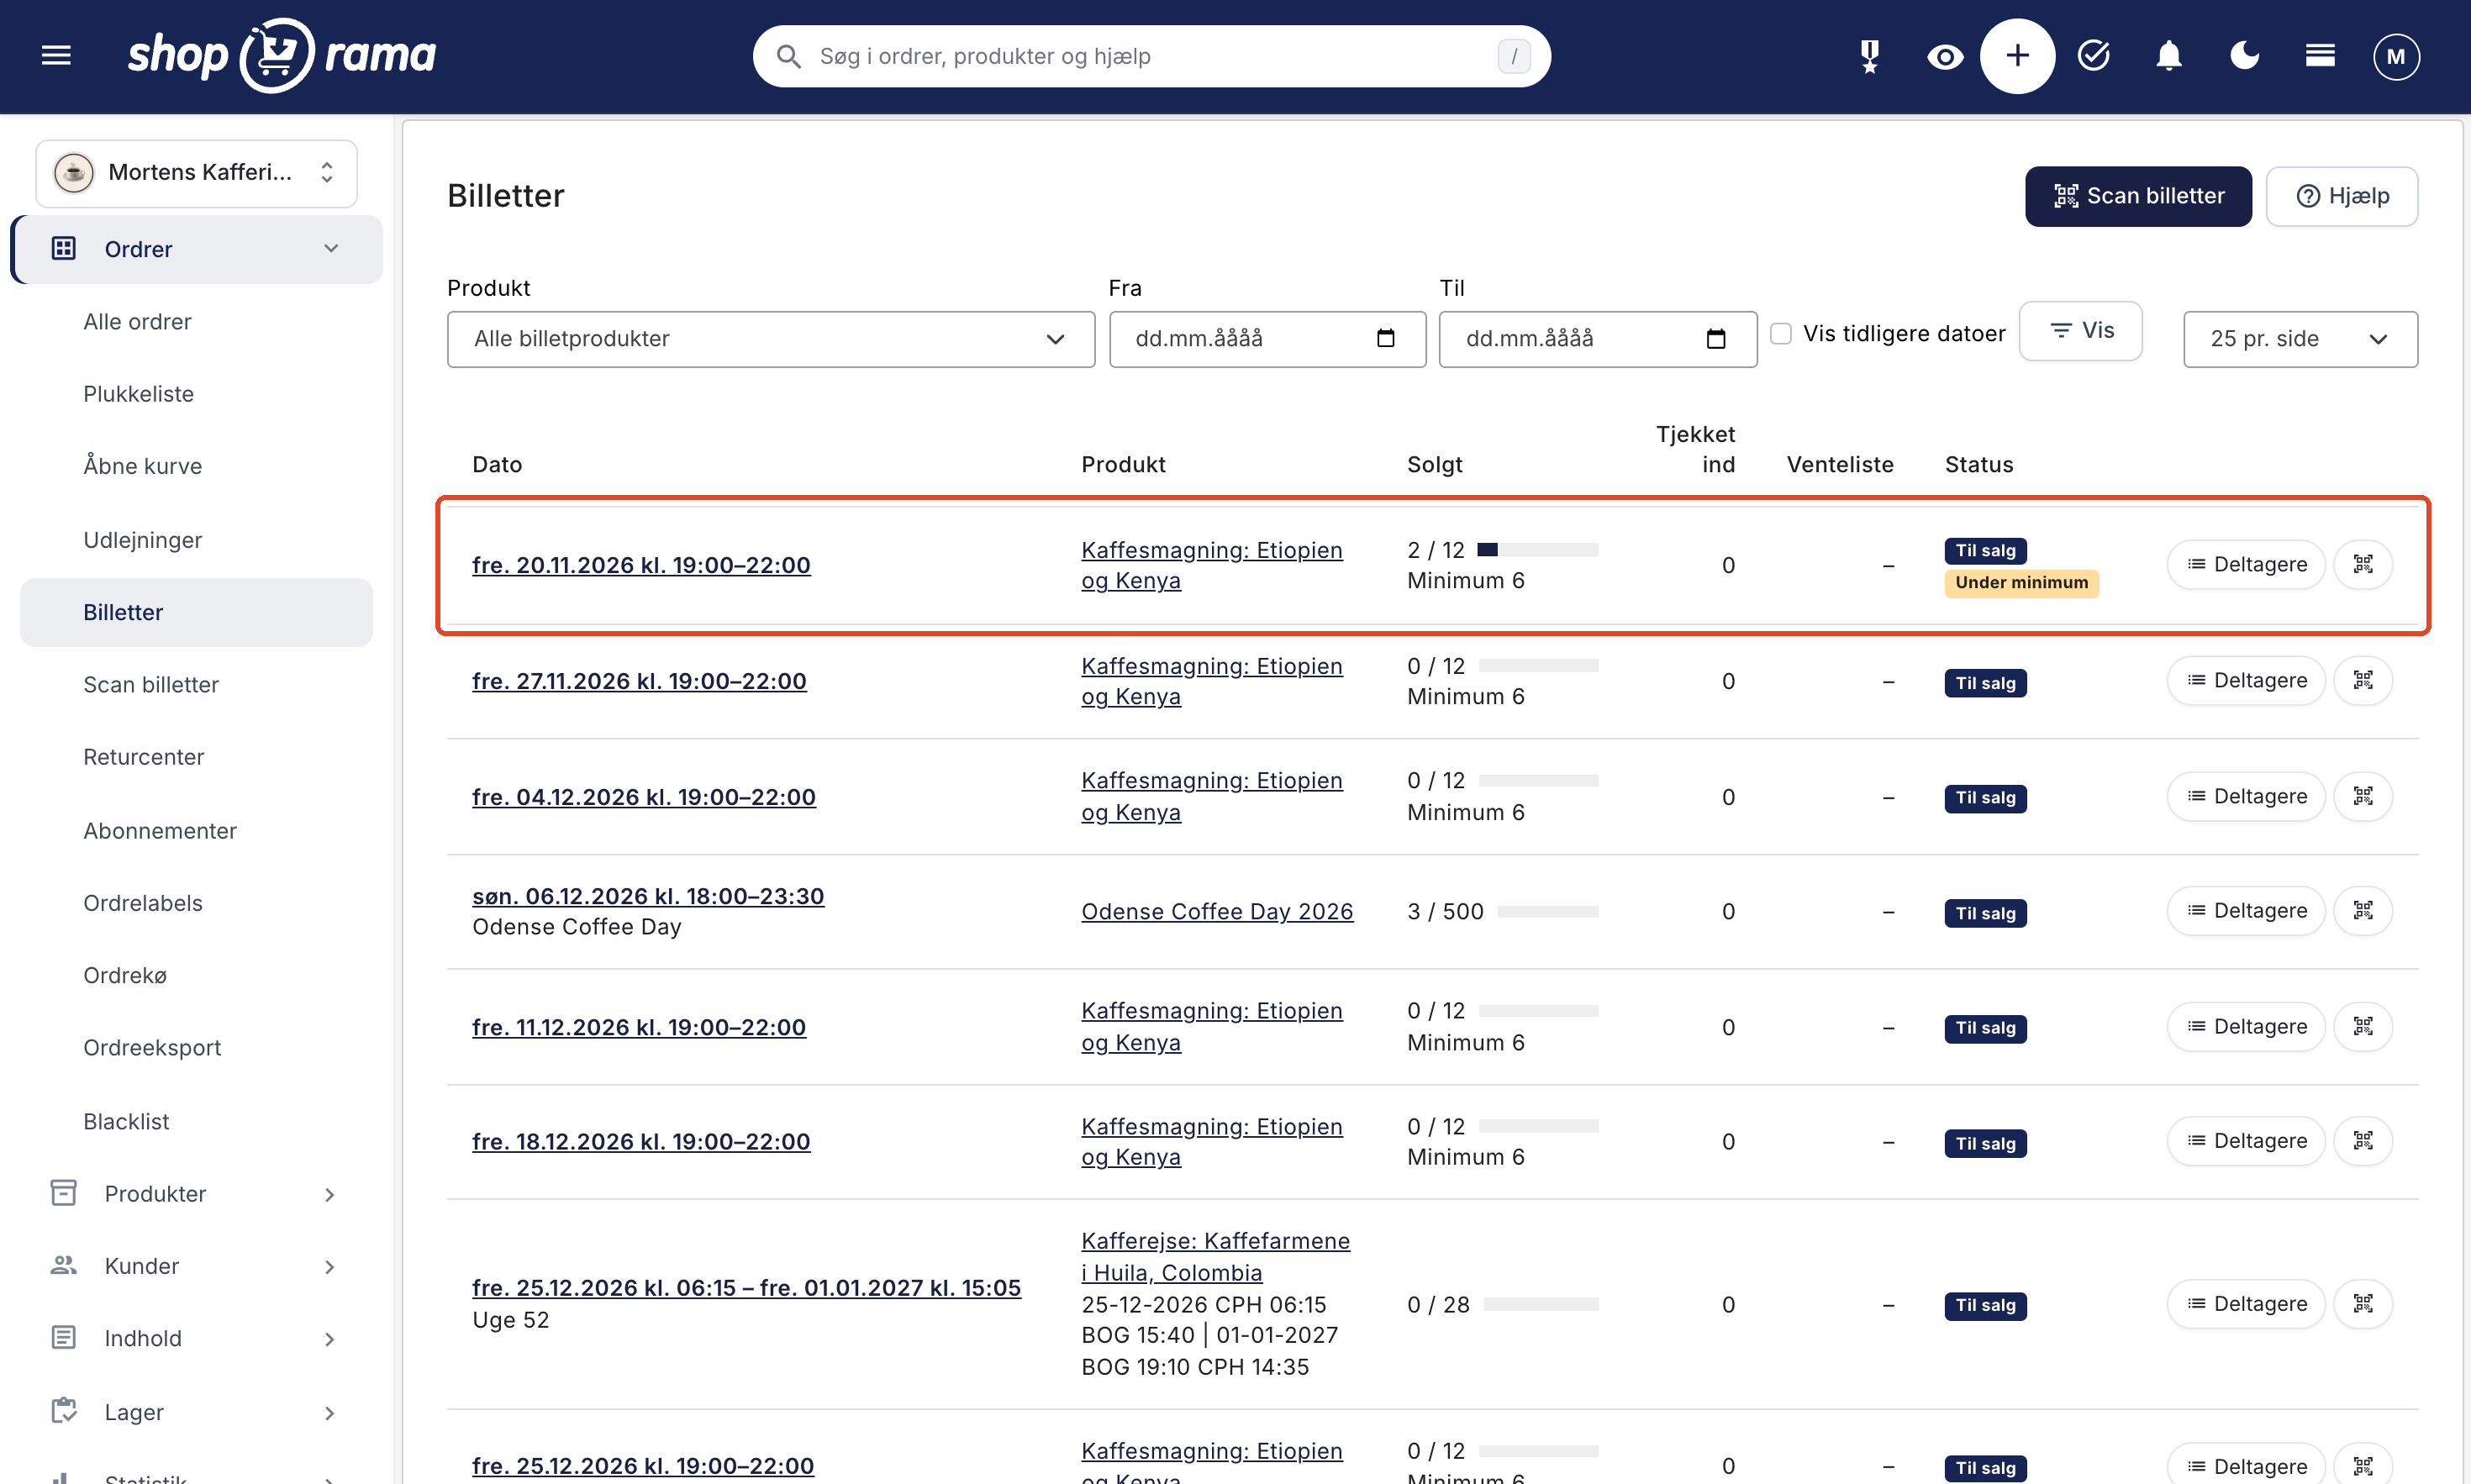
The menu items Orders → Tickets and Orders → Scan Tickets appear as soon as you have a ticket profile. The overview shows upcoming dates with sold tickets relative to available seats, how many have checked in, and how many are on the waitlist. You can filter by product and date range using From and To, and view past dates using Show Previous Dates. If you have many dates, the list is divided into pages. Select how many dates should appear on each page (10, 25, 50, or 100) in the field at the top right. This selection will be saved for next time.
Each date has a label so you can quickly see where action is needed:
| Marker | Means |
|---|---|
| For Sale | The date is open, and there are spots available. |
| Sold out | All spots have been sold. Customers can sign up for the waiting list. |
| Closed for sales | You have closed the date, or the sales deadline has passed. The tickets that have been sold are still valid. |
| Canceled | The event has been canceled, and the tickets are no longer valid. |
| Overbooked | More tickets have been sold than there are seats available. This can happen if two customers pay for the last seat at the exact same moment, or if a canceled order is reopened. You’ll also receive a notification under Messages. Correct the number of seats for the product, or move a participant to a different date from the order. |
| Below minimum | Sales end within 7 days, and the minimum number of participants has not been reached. Shoporama does not cancel the date on its own—that’s your decision. |
On the front page
If you have a ticket profile, the front page of the admin module displays Upcoming Events. It shows the next three dates with tickets sold relative to available seats and an indicator when a date is sold out, overbooked, closed for sales, or below the minimum. If there are people on the waitlist, the number appears next to the date. On the day of the event, it shows how many people have arrived and provides a link to the scanner. Canceled dates are not included, and “View All” takes you to Orders → Tickets.
The “Next 7 Days ” module shows when sales end for a date and whether a date is short on participants to reach the minimum by the time sales end. It isn’t displayed on the front page by default. Click “Customize” and then “Add Module” to enable it.
If you click on a date, you’ll go to that date’s page with the participant list. Here, you can check participants in, search, print the list, download it as an Excel (CSV) file, send a message to all participants using “Send to All,” and edit the date using “Edit Date.” Exporting requires the “Export” add-on on your user account. The list and check-in at the door are described in “Scan Tickets: Check-in at the Door.”
Cancel an Event
If you need to cancel a date, open the date’s page and use the “Cancel Date” box at the bottom. The box will be visible until the date begins. Click “Cancel,” notify the participants, and confirm. All participants will receive an email stating that the date has been canceled, and the tickets will no longer grant access. This action cannot be undone.
Refunds are not processed automatically. Credit the orders afterward so customers receive their refunds. If you simply select the “Canceled” status under “Edit” on the event’s page, the event will be closed, but no emails will be sent. Therefore, use the button on the event’s page when participants need to be notified.
Edit tickets on an order
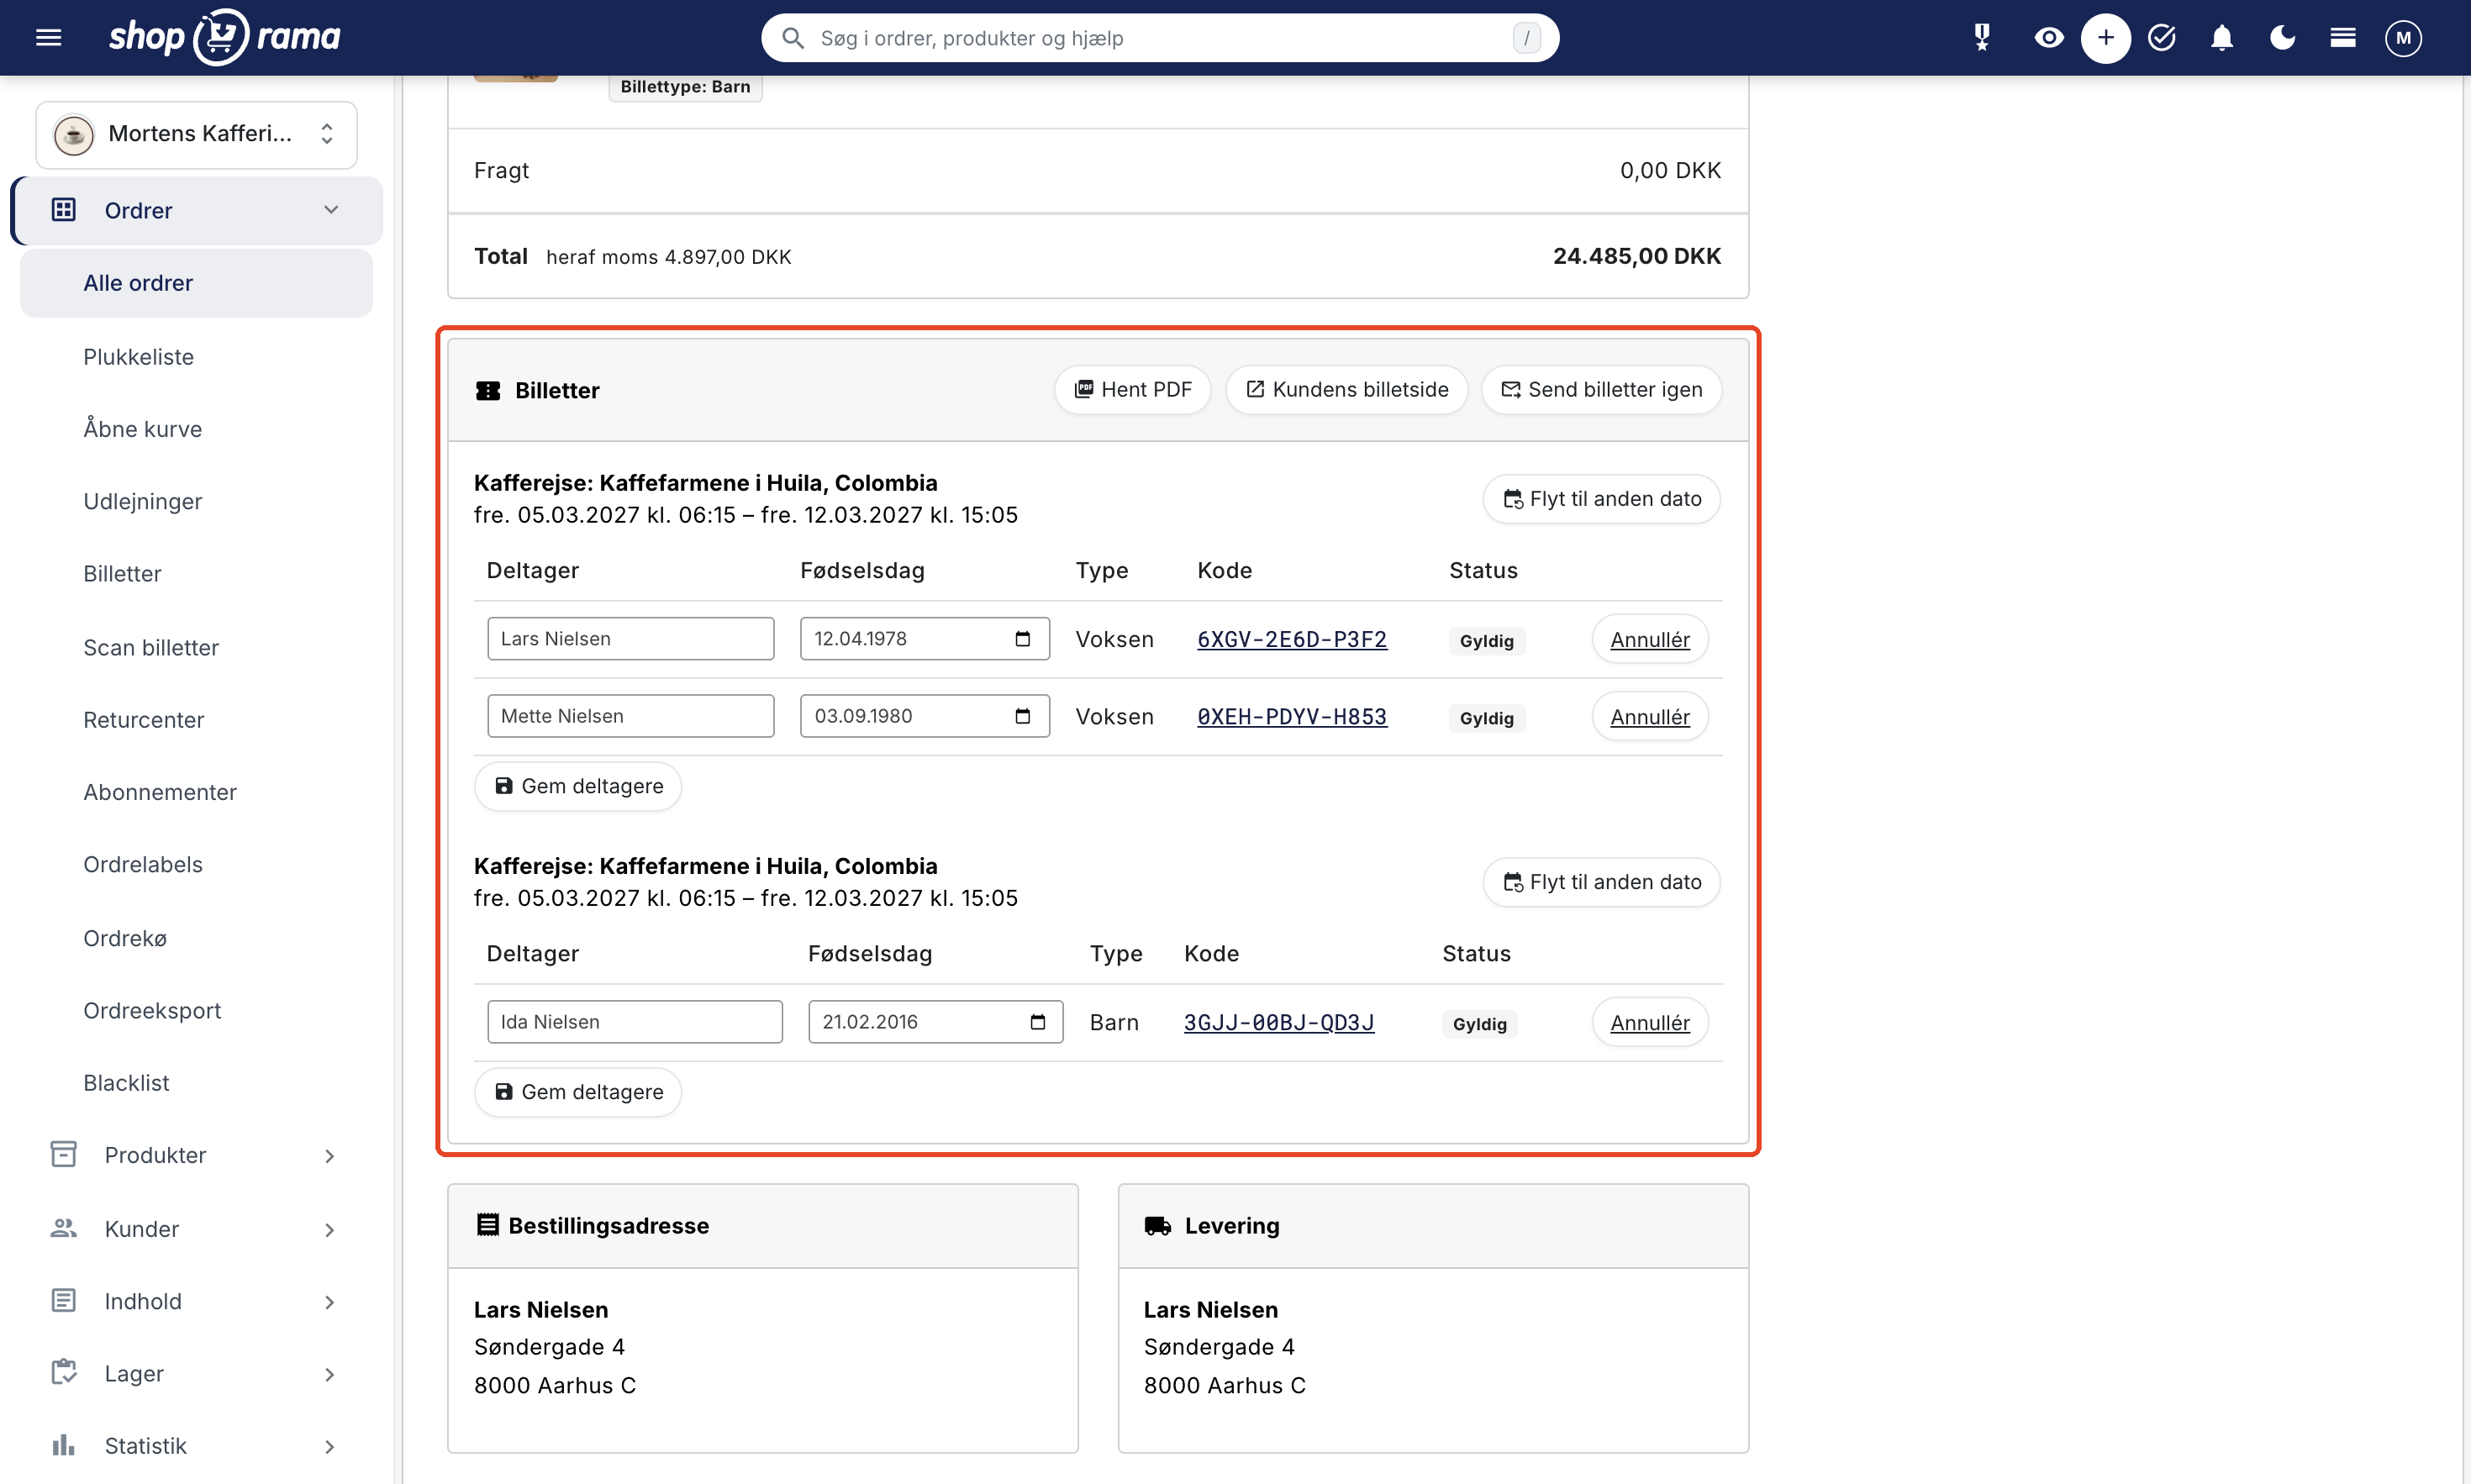
An order with tickets has a “Tickets” tab. Here, each ticket is listed with the participant’s name, birthday (if applicable), type, code, and status (“Valid,” “Canceled,” or “Checked In”). You can:
- Edit the participants’ names and birthdays and click “ Save Participants.”
- Cancel a single ticket using Cancel. The seat becomes available, and the code no longer grants access. If you change your mind, click Reopen.
- Cancel a check-in using “Cancel Check-in.”
- Move the tickets to a different date for the same event using “Move to Another Date.” The codes remain the same, and the price does not change. Tickets that have been checked in cannot be moved. If the new date is sold out, you can still move the tickets by checking the box next to “Move even if the date is sold out.”
- Download the tickets for printing (A4) using “Download PDF,” view what the customer sees using “Customer’s Ticket Page,” and resend the email using “Resend Tickets.” Always do this after a rescheduling so the customer has the new date.
Seats also become available when the order is canceled or when tickets are credited via a credit memo. For example, if you credit one of three tickets, one ticket that has not been checked in will be canceled. Each change is recorded in the order notes with your name.
Participant information is automatically deleted
Participants’ names and birthdays are personal data that you should not store longer than necessary. At the bottom of Orders → Tickets, under “Delete Participant Information,” select how long after the date they should be deleted: 3, 6, 12, 24, or 36 months, and click Save. The default is 12 months. Afterward, names, birthdays, and responses in the additional fields are automatically anonymized, while the order itself is retained as required by accounting law.
Right of Withdrawal, Inventory, and Product Feeds
- Right of withdrawal: Services provided on a specific date are exempt from the 14-day right of withdrawal. Therefore, the first time you save a ticket item, Shoporama sets the “Right of Withdrawal” field under “Law, VAT, Customs, and Environment” to “Service on a Specific Date” (e.g., ticket, course, or lodging) if the “Right of Withdrawal” is set to “General Right of Withdrawal.” The customer will see the text “This service is tied to a specific date or period and is therefore exempt from the 14-day right of withdrawal” on the product page. If you select a different option later, your selection will remain in effect. Read more in Exclude Products from the Right of Withdrawal.
- Inventory: Ticket items do not use inventory, and they never automatically go offline, even if the inventory count is 0.
- Product feeds: Ticket items are not included in Google Shopping, Klaviyo, or other regular product feeds.
Deposit and Balance Payment
If you sell travel or expensive courses, the customer can pay a deposit at the time of booking and the balance later. Enable “Installment Payments” (deposit and balance) on the same profile as “Tickets.” The date selector will then display, for example: “If you book more than 70 days in advance, you’ll pay a deposit of 2,000.00 DKK per ticket now and the balance later. You’ll receive a payment link via email,” and the customer will automatically receive a payment link for the remaining balance before the event date. The ticket email and ticket page state that the remaining balance must be paid before the event, and at the door, the scanner will display a warning if it hasn’t been paid. The setup is described in “Installment Payments: Deposit Now, Balance Later,” and the concept is explained under “installment payments” in the glossary.
Check-in at the Door
Under Orders → Scan Tickets, you scan the QR codes with a barcode scanner or your phone’s camera, and the screen turns green, orange, or red. You can also grant door staff their own access with the “Door Staff” role, so they only see the scanner and the participant lists. Everything is described in “Scan Tickets: Check-in at the Door,” and you can read about what check-in is in the glossary.
What the ticket sales system can’t do (yet)
Ticket sales is designed for events with open seating. There are some things it can’t do, and we’d rather be clear about them:
- No seat assignments. Customers cannot choose a specific seat or table.
- No reservations while the customer is paying. In rare cases, the last seat may be sold twice if two customers pay at the exact same moment. The date will then be marked as “Overbooked,” and you’ll receive a notification.
- No automatic refunds for cancellations. You must issue refunds for the orders yourself.
- No add-ons per participant. Add-ons, such as a single room, are part of the order and appear on the participant list for the entire order.
- No Apple Wallet or Google Wallet. The customer receives the ticket via email as a PDF and on the ticket page.
- No scanning without an internet connection. The scanner must be connected to check tickets in.
- Not available in POS, Headless, or via the REST cart. Tickets are sold only through the online store’s checkout. There is also no Vipps MobilePay Express “Buy Now” option for ticket items.
- Not available as a subscription. Tickets cannot be purchased as a subscription.
- Dates are not included when you copy an item. The settings on the “Tickets and Dates” tab are included, but the dates must be re-entered.
- The export is a CSV file that opens in Excel, not an .xlsx file.
Are you using your own theme?
Tickets work fully in Montana, MontanaB2B, Delaware, and DelawareDK. If you have your own theme, the profile displays a warning that the theme does not have the date picker for tickets. If the item has only one date, it can still be purchased because the date is selected automatically. If there are multiple dates, the theme’s date picker is required. If the theme lacks the email templates for tickets, customers will receive a simple default email, and you’ll be notified of this under Messages.
If you’d like to use tickets in your own theme, please email support@shoporama.dk, and we’ll help you or your developer get set up.
Frequently Asked Questions
My course has only one date. Does the customer still need to select it?
No. If the item has only one available date, it’s preselected in the date picker, so the customer can simply add the ticket to the cart. If you add more dates later, the customer can choose for themselves.
Can the customer purchase both adult and child tickets, or tickets for two different Thursdays, in the same order?
Yes. Each ticket type and each date will appear as a separate line item in the cart with the date listed. Ticket types for the same date count toward the same seat allocation, so 2 adults and 1 child use 3 seats.
Do you charge a fee per ticket sold?
No, there is no separate ticket fee. The tickets are regular orders in your store, and the payment goes through your own payment solution. Your standard subscription and payment fees apply as they do for all other orders.
One of three participants cancels. How do I make the seat available again?
Open the order and click “Cancel” next to the ticket on the “Tickets” tab. The spot becomes available immediately, and if anyone is on the waitlist, they’ll be notified. Whether the customer is eligible for a refund is determined by your terms and conditions, and you process the refund just as you would for any other order.
A customer has placed an order but hasn’t paid. Does the order still reserve the seats?
Yes. Tickets are created when the order is placed, so an unpaid order holds the seats just as it holds items in stock. The seats become available when you cancel the order. If you only accept payment by card or MobilePay, you can enable “Auto-cancel order ” under Webshop → General in the Finance and Inventory System tab. Unpaid orders will then be canceled after the number of minutes you specify, with a minimum of 30. If you want to limit how many tickets a single customer can purchase, fill in the “Max. number per order” field for the item.
Can I ask participants about their company, allergies, or something else entirely?
Yes. Select “Name per Participant” or “Name and Date of Birth per Participant” on the “Tickets and Dates” tab, click the link next to “Also Ask About,” and check the boxes—for example, “Company” for a course and “Allergies and Diet” for a tasting. If you need something else, enter the heading in one of the three custom fields. The answers appear below the name on the participant list, on the printout, and on the order, and they’re included in the Excel file. The customer can edit them on their ticket page until the sales cutoff.
We need to send a passenger list with names and birthdays to the airline. Can we export it?
Yes, if the product asks for the name and date of birth for each participant. Click on Excel (CSV) on the date’s page. The file includes name, date of birth, age, one column per additional field, ticket type, code, order number, purchaser, email, phone number, add-ons, payment status, and check-in time. You must have the “Export” option enabled on your user account.
What does the customer see if we cancel?
The customer will receive an email about the cancellation, and the ticket page will display the message: “The event has been canceled. We’ll contact you regarding a refund or an alternative date.” Therefore, please notify customers about the next steps, for example, by using the “Send to All” feature on the event page.
Can the customer change the name on a ticket themselves if a friend is taking their place?
Yes, on the ticket page until sales close, as long as the ticket hasn’t been checked in. This requires that the product asks for names. You can also edit the name yourself on the “Tickets” tab of the order and click “Save Participants.”
I can’t find the “Tickets” menu item. Where is it?
The menu items Orders → Tickets and Orders → Scan Tickets will only appear once the store has a product profile with Tickets enabled. Check the box on the profile and reload the admin panel.
A customer says the tickets never arrived. What should I do?
First, check that the order has been paid, as tickets are only sent once payment is complete. Then click “Resend Tickets” on the order’s “Tickets” card and ask the customer to check their spam folder. You can also open the customer’s ticket page and send the link directly.
See also
- Scan tickets: check-in at the door
- Installment payments: deposit now and pay the rest later
- Product profiles and variants
- Exclude products from the right of withdrawal
- Ticket (dictionary)
If you have any questions about ticket sales, you’re always welcome to email support@shoporama.dk.
Related articles
Installment Payment: Pay a deposit now and the rest later
Here's how to let customers pay a deposit when they book and the remainder later via an automatic payment link. For trips, courses, rentals, and...
Exclude products from the right of withdrawal (e.g., custom-made items, perishable goods, digital content)
Here's how to label items that are legally exempt from the 14-day right of withdrawal, such as custom-made and perishable items, tickets for a...
Manage your orders in Shoporama
Guide to managing orders in Shoporama - from receiving to shipping and status updates.
Product Profiles and Variants
Guide to product profiles and variants in Shoporama. Understand how profiles, attributes and variants are related.
Scan tickets: Check in at the door
Check guests in using a barcode scanner, your phone's camera, or the guest list, and grant door staff their own access by assigning them the "Door...
Related features
Ticket
A ticket grants access to an event, a class, or a trip on a specific date. Learn about seats, ticket types, QR codes, and ticket sales on Shoporama.
Ticketing System in Your Own Online Store
Sell tickets for tastings, classes, concerts, and trips through your own online store. Dates with available seats, QR tickets, check-in via phone,...
Sell tickets in your own online store, in the same shopping cart as your products
Sell tastings, classes, and trips in your own online store: tickets and merchandise in the same shopping cart, QR tickets via email, check-in using...
Buy tickets: dates, seats, and check-in at the door
Learn how to sell tickets in Shoporama: enable the "Tickets" feature on a profile, add dates with available seats, test the purchase process, view...
Check-in
Check-in is when a guest's ticket is scanned at the entrance and marked as used. Here's how to check guests in using a scanner or phone in Shoporama.
Installment Payments
Installment payments are when a customer pays for a purchase in several installments. See the difference between installment plans from Anyday or...